4-2
Installing modules
IMPORTANT:
Before installing a module in the chassis, make sure the connectors on the module are not broken or
blocked.
Unless otherwise stated, MPUs, service modules, and fabric modules are collectively referred to as
"modules" in this document. The modules are hot swappable.
For the modules available for the switch, see "FRUs and compatibility matrixes" in
H3C S12500G-AF
Switch Series Hardware Information and Specifications
.
Installing MPUs
CAUTION:
•
If you are not to install an MPU in an MPU slot, keep the filler panel in the slot.
•
When you install an MPU, avoid damaging the connectors on the MPU.
•
To prevent a filler panel from being drawn into the chassis when fan speed is high, use both
hands to grasp the filler panel by its two sides during filler panel installation and removal on an
operating switch.
IMPORTANT:
Captive screws are required to install an MPU or service module on the switch. As a best practice,
fasten a captive screw to a torque of 5.5 kgf-cm (0.54 Nm).
You can install one MPU, or two MPUs for redundancy on the switch. If you are to install one MPU,
install it in either of the MPU slots.
Installing an MPU for the S12516G-AF and S12508G-AF
For the S12516G-AF and S12508G-AF, the MPU ejector levers and the ejector lever pillow blocks on
the MPU slots are pink marked. The MPU installation procedure is the same for the S12516G-AF
and S12508G-AF.
To install an MPU for the S12516G-AF and S12508G-AF:
1.
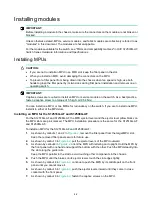
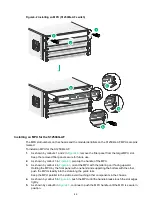
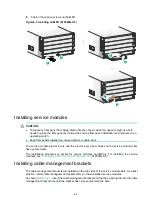
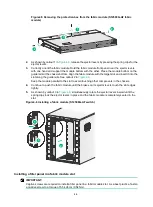
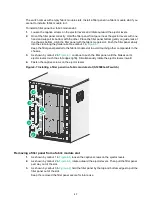
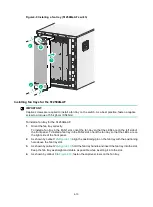
As shown by callouts 1 and 2 in
, remove the filler panel from the target MPU slot.
Keep the removed filler panel secure for future use.
2.
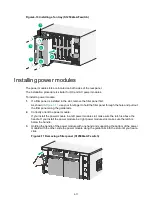
, pull the ejector levers of the MPU outward.
3.
As shown by callout 4 in
, orient the MPU with lettering on it upright. Hold the MPU by
the front panel with one hand and support the bottom with the other. Push the MPU steadily into
the slot along the guide rails.
Keep the MPU parallel to the slot to avoid touching other components in the chassis.
4.
Push the MPU until the brakes on its ejector levers touch the slot edges tightly.
5.
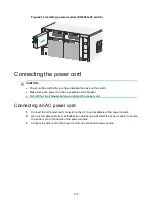
, continue to push the MPU by its middle part on the front
panel until you cannot move it.
6.
, push the ejector levers inward until they come in close
contact with the front panel.
7.
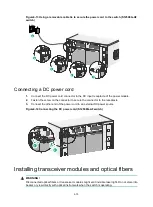
As shown by callout 6 in
, fasten the captive screws on the MPU.
Summary of Contents for S12500G-AF Series
Page 32: ...3 15 Figure3 16 Connecting the grounding cable to a grounding strip 1 2 4 3 6 5 ...
Page 49: ...4 16 Figure4 16 Connecting an SFP DAC cable 1 Pull latch 2 Connector 1 2 ...
Page 92: ...A 12 FigureA 14 Example of a device label ...
Page 104: ...C 6 FigureC 5 Securing the chassis to the pallet base S12504G AF switch 1 1 2 2 1 ...

