2-17
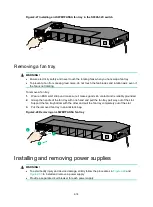
Installing and removing fan trays
CAUTION:
The switch has multiple fan tray slots. To ensure good ventilation of the switch, follow these
guidelines to install and remove fan trays:
•
The switch is provided with the fan tray slots empty. Before powering on the switch, make sure all
fan tray slots have fan trays installed and the fan trays are the same model.
•
Make sure all slots have a module or filler panel installed when the switch is operating.
•
If multiple fan trays fail on an operating switch, do not remove the fan trays at the same time.
Replace the fan trays one after another and finish replacing a fan tray within 3 minutes.
The installation and removal procedures are the same for the LSWM1FANSA and
LSWM1FANSAB,fan trays. The following installation and removal procedures use the
LSWM1FANSA fan tray as an example.
Installing a fan tray
CAUTION:
To prevent damage to the fan tray or the connectors on the backplane, insert the fan tray gently. If
you encounter a hard resistance while inserting the fan tray, pull out the fan tray and insert it again.
IMPORTANT:
Before powering on the switch, make sure the fan tray airflow direction and the preferred airflow
direction of the switch are the same. If they are not the same, the system generates traps and logs.
You can use the
fan prefer-direction
command to configure the preferred airflow direction for the
switch. By default, the preferred airflow direction of the switch is from the port side to the power
supply side.
For more information about the
fan prefer-direction
command, see
H3C S6826 & S9826 Switch
Series Fundamentals Command Reference
.
Select fan trays for the switch as needed. For the available fan trays and their specifications, see
S6826 & S9826 Switch Series Hardware Information and Specifications.
To install a fan tray:
1.
Wear an ESD wrist strap and make sure it makes good skin contact and is reliably grounded.
2.
Unpack the fan tray and verify that the fan tray model is correct.
3.
Orient the fan tray with the "TOP" mark on top. Grasp the handle of the fan tray with one hand
and support the fan tray bottom with the other, and slide the fan tray along the guide rails into
the slot until the fan tray is fully seated in the slot and has a firm contact with the backplane. See


