Installation Manual
H3C SecPath V100-S Security Gateway
Chapter 3 Installing the SecPath V100-S
3-4
3.4 Connecting to the Console Terminal
I. Console port
The security gateway provides one RS232 asynchronous serial console port, through
which you can configure the device. For the attributes of the console port, refer to the
section “1.2.4 Fixed Interface Attributes”.
II. Console cable
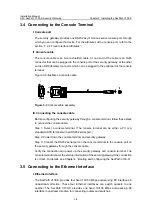
The console cable is an 8-core shielded cable. At one end of the cable is an RJ45
connector that can be plugged to the console port of the security gateway; at the other
end is a DB9 (female) connector, which can be plugged to the serial port of the console
terminal.
Figure 3-3 illustrates a console cable.
A
A
X3
Figure 3-3
Console cable assembly
III. Connecting the console cable
Before configuring the security gateway through a console terminal, follow these steps
to connect the console cable:
Step 1: Select a console terminal. (The console terminal can be either a PC or a
standard ASCII terminal with an RS232 serial port.)
Step 2: Power down the console terminal and security gateway.
Step 3: Connect the RS232 serial port on the console terminal to the console port on
the security gateway through the console cable.
Verify the connection and power up the security gateway and console terminal. The
console terminal shows the startup information of the security gateway if the connection
is correct. For details, see Chapter 4 “Booting and Configuring the SecPath V100-S”.
3.5 Connecting to the Ethernet Interface
I. Ethernet interface
The SecPath V100-S provides four fixed 10/100 Mbps auto-sensing FE interfaces in
downstream direction. These four Ethernet interfaces can switch packets to one
another. The SecPath V100-S provides one fixed 10/100 Mbps auto-sensing FE
interface in upstream direction for connecting routers and switches.


