Installation Manual
H3C SecPath V1000-A Security Gateway
Chapter 3 Hardware Installation
3-2
Caution:
Before you install your device, make sure that:
You have read “Chapter 2 Preparation for Installation” carefully.
The requirements in Chapter 2 are satisfied.
3.2 Mounting the Device
You can install your device on a workbench/tabletop or in a rack.
3.2.1 Tabletop/Workbench-Mounting the Device
If a 19-inch standard rack is unavailable, you can place your security gateway on a
clean workbench/tabletop. To prevent any damage, observe the following:
z
Ensure the table is stable and well earthed.
z
Reserve the clearance of 10 cm (3.9 in.) around the device for adequate
ventilation.
z
Do not place any heavy object on the device.
3.2.2 Rack-Mounting the Device
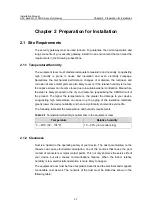
The security gateway can be placed in a 19-inch standard rack. The following table
shows its dimensions:
Table 3-1
Dimensions of the SecPath V1000-A
Model
Dimensions
SecPath V1000-A (W X D X H)
436 x 430 x 44 mm (17.2 x 16.9 x 1.7 in),
excluding the rubber feet
Follow these steps to install the SecPath V1000-A:
Step 1: Check that the rack is stable enough and properly earthed. Attach the
rack-mount brackets to the front or rear of the chassis with screws.
Step 2: Place the device on a shelf in the rack and slide it to a proper position along the
guide rails, reserving a suitable clearance between the device and the guide rails.
Step 3: Fix the brackets to the rack posts with suitable antirust pan-head screws,
making sure that the device is securely fixed.


