15
3
Installing the AP
The WA2600 enhanced series WLAN APs can be directly affixed onto a wall by using the
wall-mounting brackets. This chapter contains the wall-mounting procedure for the
WA2600 enhanced series.
Determining the installation position
Determine the installation position by observing the following:
Leave as few obstacles (such as wall and ceiling) as possible between the AP and
the wireless stations.
Keep the AP far away from electronic devices (such as microwave ovens) that may
generate RF noise.
Install the AP in a place where it will not hinder people’s daily work and life.
Ensure the ceiling is strong enough and the structure is suitable when using ceiling
mounting. Reinforce the ceiling if needed. A padlock is required for ceiling
mounting to prevent falloff due to shock or vibration.
Installing the AP on a wall
This section describes how to install a WA2600 enhanced series AP on a wall and
includes the following subsections:
Installing the wall-mounting bracket on the wall
Installing the AP on the wall-mounting bracket
Optional: locking the AP onto the wall-mounting bracket
Installing the wall-mounting bracket on the wall
1.
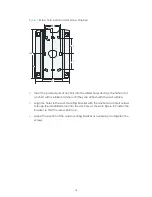
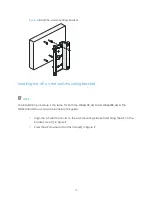
There are eight installation holes in the wall-mounting bracket. Use at least four of
them for the installation. Measure and mark the wall where the AP would be
mounted. Ensure holes correspond to those in the bracket. Using a precision drill
with a 6 mm (0.24 in) bit, drill holes on the markings. For screw hole locations and
sizes, see Figure 7 The arrowhead on the bracket should point upward.


