background image


AP Installation  

The WA2600 enhanced series WLAN APs can be directly affixed onto a wall by using the 
wall-mounting brackets. This section contains the wall-mounting procedure for the 
WA2600 enhanced series.  

Determining the installation position 

Determine the installation position by observing the following:  


Leave as few obstacles (such as wall and ceiling) as possible between the AP and 
the wireless stations.  


Keep the AP far away from electronic devices (such as microwave ovens) that may 
generate RF noise.  


Install the AP in a place where it will not hinder people’s daily work and life.  


Ensure the ceiling is strong enough and the structure is suitable when using ceiling 
mounting. Reinforce the ceiling if needed. A padlock is required for ceiling 
mounting to prevent falloff due to shock or vibration.  

Installing the wall-mounting bracket on the wall 

1.


There are eight installation holes in the wall-mounting bracket. Use at least four of 
them for the installation. Measure and mark the wall where the AP would be 
mounted. Ensure holes correspond to those in the bracket. Using a precision drill 
with a 6 mm (0.24 in) bit, drill holes on the markings. The arrowhead on the bracket 
should point upward. 

2.


Insert the pointed end of anchors into the drilled holes and tap the flat end of 
anchors with a rubber hammer until they are all flush with the wall surface.  

3.


Align the holes in the wall-mounting bracket with the anchors and insert screws 
through the installation holes into the anchors.  

4.


Adjust the position of the wall-mounting bracket as necessary, and tighten the 
screws. 

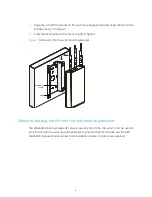
Installing the AP on the wall-mounting bracket 

The installation procedure is the same for both the WA2610E-AGN and WA2620E-AGN. 
The WA2610E-AGN is used as an example in this guide.  

Summary of Contents for WA2600 Series

Page 1: ...Enhanced Series WLAN Access Points Quick Start Guide Abstract This document details the installation procedure for the WA2600 series enhanced WLAN access points Hangzhou H3C Technologies Co Ltd http w...

Page 2: ...press or implied Hangzhou H3C Technologies Co Ltd and its licensors shall not be liable for technical or editorial errors or omissions contained herein Acknowledgments H3C Aolynk H3Care TOP G IRF NetP...

Page 3: ...ation site examination 4 AP Installation 5 Determining the installation position 5 Installing the wall mounting bracket on the wall 5 Installing the AP on the wall mounting bracket 5 Optional Locking...

Page 4: ...choosing the location site WARNING H3C recommends that installation and removal of the unit and its accessories be carried out by qualified personnel Read all of the safety and installation instructi...

Page 5: ...liary tools Ladder and rubber hammer Installation site examination Before installation examine the installation site from the following aspects temperature and humidity requirements power supply and g...

Page 6: ...due to shock or vibration Installing the wall mounting bracket on the wall 1 There are eight installation holes in the wall mounting bracket Use at least four of them for the installation Measure and...

Page 7: ...1 Fix the AP onto the wall mounting bracket 1 2 Expansion scerw Hook Optional Locking the AP onto the wall mounting bracket The WA2600 enhanced series APs have a security slot on the top which can be...

Page 8: ...Identify the silkscreen on the device to avoid confusing the console interface for the Ethernet interface and vice versa The WA2620E AGN supports only non standard PoE power supply the PoE input powe...

Reviews: