8
DEUTSCH
ENGLISH
FRANÇAIS
ITALIANO
ESPAÑOL
NEDERLANDS
PORTUGUÊS
SVENSKA
DEUTSCH
ENGLISH
FRANÇAIS
ITALIANO
ESPAÑOL
NEDERLANDS
PORTUGUÊS
SVENSKA
© HAAG‑STREIT AG, 3098 Koeniz, Switzerland ‑ HS‑Doc. no. 1500.7220589‑04200 – 2019 – 05
5.2 Preparing the patient
•
In order to attain a solid basis for the forehead and chin to rest on, the table height
should be set so that the patient sits bent over forward.
•
To ensure that only the part of the eye being examined is illuminated, the slit
height should be set accordingly in order to avoid distracting streaking of light.
•
Parts which come into contact with the patient should be cleaned with a dry cloth
prior to every use.
•
The lamp must be switched off after every examination.
5.3 Operating the instrument
WARNING!
The device must be switched off after each use. The risk of overheat-
ing increases if a dust cover is used.
•
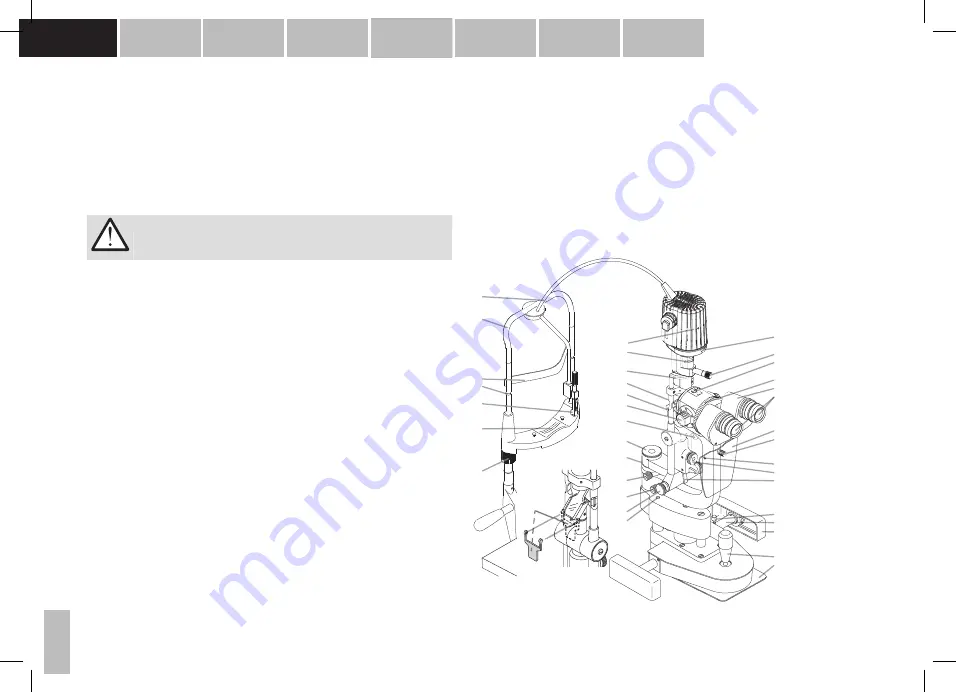
Use the turn screw (7) to set the chin rest (6) so that the patient’s eyes are at the
same height as the black mark (4) on the sides of the head rest.
•
Set the eyepieces (26) in accordance with the examiner’s refraction by turning the
knurled rings and set the eye distance.
•
Adjust the height of the slit lamp by turning the control lever until the light beam is
at eye level.
•
Switch on the illumination by turning the switch on the power supply.
•
The magnification of the stereo microscope is changed using the magnification
changer (13).
•
The rigid control lever (35) gently inclined towards the examiner can be used to
push the entire device until the slit appears approximately focused on the cornea.
This initial setting is verified with the naked eye. Fine tuning is performed by tilting
the control lever while observing via the stereo microscope (25).
•
The slit width is set left or right with the rotating knob (19), as is the angle be-
tween the stereo microscope and illumination. The slit image can be set vertical-
ly, horizontally or diagonally as required by turning the illumination facility on the
handle (23) (locking points at 45°, 90° and 135°; stops at 0° and 180°; scale in
5° increments).
•
To ensure that unimpeded binocular fundus examination is also possible at lateral
angles of between 3° and 10°, a short mirror (11) is used, the illumination turned
90° using the locking screw (23) and tilted in 5° steps using the latch (31), and
the illumination and microscope turned to the central position (0°).
•
Front-lens glasses and contact glasses are used to examine the ocular fundus.
Diffuse illumination:
•
A diffuse illumination is achieved by positioning the diffusor (12) upstream. This
enables overview monitoring and can be used for taking overview images with the
Imaging Module.
Indirect illumination:
•
For observation in regredient light (indirect illumination), the centering screw (30)
is loosened in order to move the slit image out of the center of the visual field.
Tightening the screw centers the slit image again.
Slit tilting:
•
The latch (31) can be used to tilt the illumination in 5° steps. This creates an an-
gled light beam during horizontal slit orientation. Tilting the slit enables reflex-free
examination with contact glasses (fundus and gonioscopy) and magnifying glass-
es.
1
2
3
4
5
6
7
21
22
23
24
25
26
27
28
29
30
31
32
33
34
35
36
9
8
10
12
12
13
14
15
16
17
18
19
20
11
01-IFU_BQ900-7220589-04200_eng.indd 8
07.06.2019 11:30:45


