background image

Operating

16

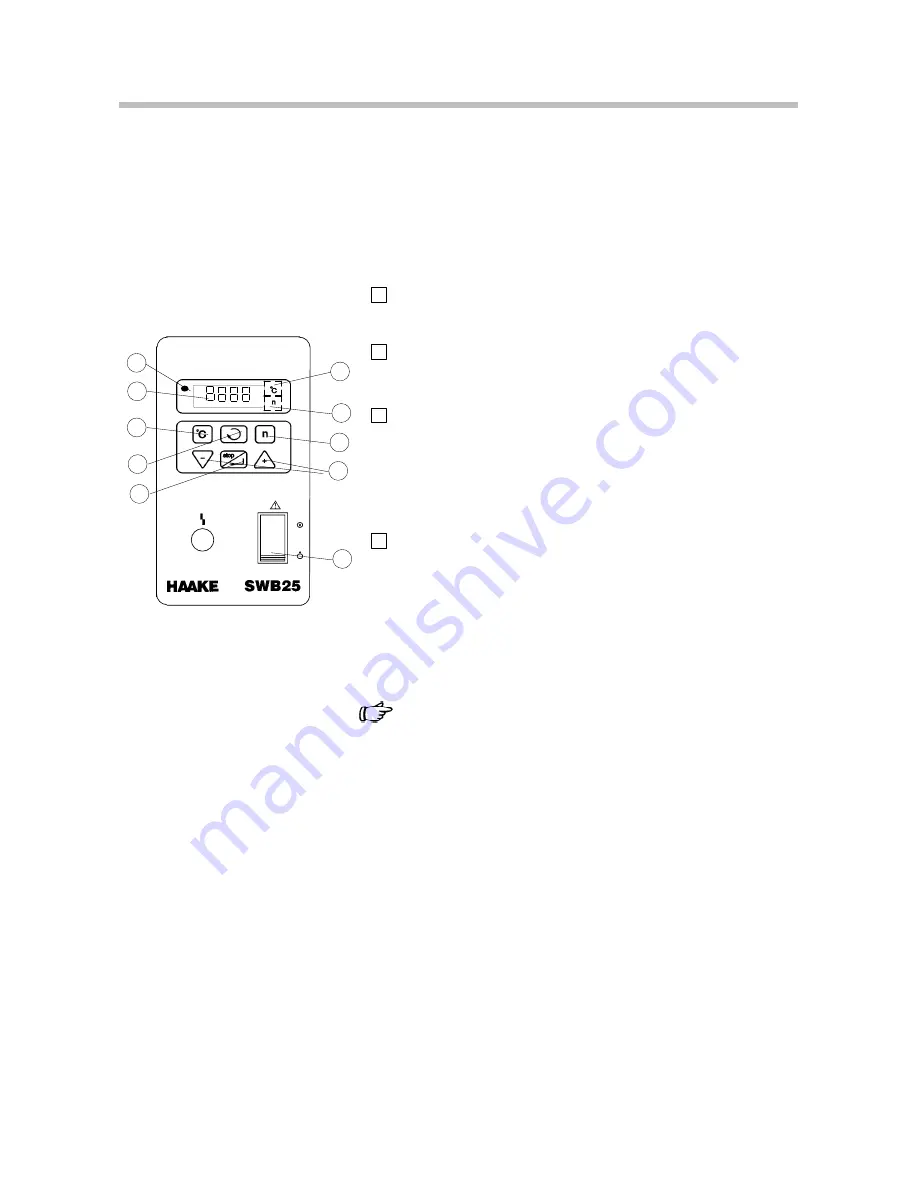
10.6 Adjusting the shaking frequency

Only possible in the speed displaying mode 
(Display 17 ”

n

” is lit).

1

Press the menu button 7:

Small display ”

n

” blinks.

2

Press the shaking frequency button 2:

Displayed shaking frequency in the display.

3

Increase (+) or decrease (–) the value shown in the dis-
play with the buttons 6.

The first shaking frequency change is thereby passed
slowly and thereafter the rate of shaking frequency
change in the display is five times faster.

4

Press the enter button 8.

The selected value is stored as new shaking fre-
quency and activated.

The motor slowly increases the shaking fre-
quency. By pressing the enter button 8 once
again, the actually reached frequency is stored
as new set frequency.

The new value is not saved until the Enter button
has been pressed. The unit continues to use the
old value.

The display 16 automatically switches back to actual sha-
king frequency display after a short time.

16

19

17

18

1

2

6

8

7

3

Summary of Contents for SWB25

Page 1: ...France Dieselstraße 4 53 W Century Road 99 Route de Versailles D 76227 Karlsruhe Paramus NJ 07652 91160 Champlan Tel 49 0 18050HAAKE oder 49 0 721 4094 444 Tel 201 265 7865 Tel 33 1 64 54 0101 Fax 49 0 721 4094 418 Fax 201 265 1977 Fax 33 1 64 54 0187 E mail helpdesk haake de http www haake usa com http www rheo fr ...

Page 2: ...ng the platform to the guide rod 11 8 2 Connecting to a mains socket 11 8 3 Changing the mains plug e g for Great Britain 11 8 4 Fuses on the unit 11 9 Setting up and starting 12 9 1 Attaching clamps for vessels to the platform 12 9 2 Filling in the bath liquid 12 9 3 Ideal operating conditions for the shaking movement 12 9 4 Operational safety 13 9 5 Draining 13 10 Operating 14 10 1 Switching on ...

Page 3: ...tion dial 18 12 2 Setting the excess temperature 18 13 Fault display 19 13 1 Sensor bath short circuit 19 13 2 Motor 19 13 3 Range sensor 19 14 Special Accessories 20 15 Maximum clamp number for the moveable platform for 23 16 Technical Specifications 24 16 1 Unit 24 16 2 Fuse values 24 ...

Page 4: ...an important remark 1 Indicates the next operating step to be carried out and what happens as a result thereof 1 2 Symbols used on the unit Caution Read the instruction manual Adjustment possibility for setting the cut off point for excess temperature protection Instrument in off position Instrument in on position Menu selection Value alteration higher lower Stop Enter key Temperature key Shaking ...

Page 5: ... is why we initiate this monitoring process of important characteristics already during manufacturing and record the results for future reference The Final Test label on the product is a sign that this unit has fulfilled all requirements at the time of final manufactur ing Please inform us if despite our precautionary measures you should find any product defects You can thus help us to avoid such ...

Page 6: ...afe operation due to the outer appearance e g damages A safe operation of the instrument cannot be guaran teed if the user does not comply with this instruction manual Ensure that this manual is always at hand for every unit operator Only use this unit solely for the intended application Repairs alterations or modifications must only be car ried out by specialist personnel Considerable damage can ...

Page 7: ...s I according to VDE 0106 T1 i e protection against electric shocks by grounding all parts which carry the risk of electric contact The device must only be connected to mains recep tacles with a protective ground Protection IP 20 according to EN 60529 i e regarding the protection against accidently touch ing live parts and damage by foreign matter it has been ensured that foreign bodies with a thi...

Page 8: ...otection The unit can only be used with non flammable liquids such as water or water with antifreeze The safety element measures the surface temperature of the heating element If this exceeds a certain temperature due to e g a leakage in the liquid circuit or a liquid shortage the safety element is triggered If a safety feature is triggered fault display lights indicate the fault the safety releva...

Page 9: ...ic fields EN61000 4 4 fast transients EN61000 4 5 surge voltages EN61000 4 6 wire guided HF signals EN61000 4 8 magnetic field of mains frequency EN61000 4 11 voltage drop short time interruption Interference emission CISPR16 class A wire guided interference emission CISPR16 class A radiated interference emission The application in industrial environments is thus possible A declaration of conformi...

Page 10: ...lers 1 Rubber connection piece 1 Instruction manual 1 Warranty card please fill out and return 6 4 Ambient conditions according to DIN EN 61010 indoors max 2000 meters above sea level ambient temperature 5 40 C relative humidity max 80 31 C 50 40 C excess voltage category II contamination level 2 ...

Page 11: ... 7 8 6 15 ÇÇÇÇÇ 1 Main switch 2 Dial for shaking frequency 3 Preset temperature dial 4 Malfunction indicator light 5 Excess temperature dial 6 Changing the value 7 Menu selection key 8 Stop Input key Enter 9 Guide rod 10 Rubber connection 11 Moveable platform 12 Rollers 13 Drain plug nozzle 14 Fuses 15 Mains cable ...

Page 12: ...ble 8 3 Changing the mains plug e g for Great Britain This should only be carried out by qualified spe cialist personnel The mains cable wires have the following colors Brown Live Blue Neutral Green Yellow Earth 8 4 Fuses on the unit All units are equipped with automatic thermally triggered fuses If the fuse has triggered the fuse does not have to be exchanged resetting suf fices a white marking i...

Page 13: ...d in order to warrant ideal operating conditions a Type and level of the bath liquid b Number size and weight of the test vessels c Amplitude of the shaking carriage movement d Number of carriage cycles per time unit shaking frequency The limiting conditions for the shaking movement 1 Too large a shaking movement will cause high waves on the bath surface so that the liquid will splash over the top...

Page 14: ...e 10 of the platform 11 should be removed 9 4 Operational safety The units are provided with an excess temperature safety circuit the cut off temperature of which has to be set at the dial button 5 In case of a temperature control malfunction which could overheat the bath the heater of the water bath will be cut off The malfunction indicator light 4 will then come on 9 5 Draining The unit is drain...

Page 15: ...ossible in the temperture displaying mode Display 17 C is lit 1 Press menu key 7 Select preset temperature set temperature Small display C blinks In display 16 the adjusted preset temperature is shown 10 3 Adjusting the set temperature Only possible in the temperature displaying mode Display 17 C is lit 1 Press the menu button 7 Small display C blinks 2 Press the temperature button 3 Displayed tem...

Page 16: ...isplay 19 flashes on and off during the control phase The display 19 does not light up if the heating is not activated set temperature is lower than the actual temperature The heat transfer is carried out by convection from the heated bath bottom upwards There are therefor small tem perature gradients in the bath from the top to the bottom or from the bath side to the bath middle This should be ac...

Page 17: ...lowly and thereafter the rate of shaking frequency change in the display is five times faster 4 Press the enter button 8 The selected value is stored as new shaking fre quency and activated The motor slowly increases the shaking fre quency By pressing the enter button 8 once again the actually reached frequency is stored as new set frequency The new value is not saved until the Enter button has be...

Page 18: ...e display to preset value adjustment with key 7 Preset value LED 17 blinks fast 2 Change from SOLL to RTA with key 7 c c0 00 appears on display 16 RTA value LED 17 blinks every 2 seconds 3 Change the value shown on the display with the keys 6 up or down The setting range for the temper ature RTA value is 10 C With negative values the display changes from c to 4 Press input key 8 Enter The selected...

Page 19: ...nt has been correctly set 12 2 Setting the excess temperature The cut off point is set with the excess temperature dial 5 with a rough scale of temperature values arranged around it This scale of course can only serve as an approximate setting means for this cut off point However the cut off point can be determined to act exactly if the following procedure is adhered to If for instance a bath liqu...

Page 20: ...tself the normal operation is contin ued 13 2 Motor Motor is set on drive speed setting 0 rpm f there is no rotation at a drive speed setting of 0 the mes sage AL d is shown The display part AL blinks the heater is switched off as long as the defect is present When the motor starts rotating the normal opera tion is continued 13 3 Range sensor When any parameter preset value RTA is out of its scope...

Page 21: ...nformation 333 0642 1 Bath cover roof shaped plastic 827 0310 2 Plastic balls for covering bath 500 balls sufficient for 0 2 m2 000 8581 3 Cooling coil for tap water cooling 333 0259 4 Basic rack without any attachments with special clamping device for shaking platform w o inserts ...

Page 22: ...33 0132 6 2 Inserts for 86 tubes 10 mm ø 2 Inserts for 46 tubes 16 mm ø 2 Inserts for 23 tubes 25 mm ø Per basic rack 4 2 sets 4 pieces 333 0134 333 0135 7 Plastic snappers for the holes of the inserts to accommodate tubes flasks with variable diameters Plastic snappers 50 pieces outside 16 mm ø inside 2 10 mm ø Plastic snappers 25 pieces outside 25 mm ø inside 5 17 mm ø ...

Page 23: ...s up to 64 mm ø for 250 ml flasks beakers up to 85 mm ø for 500 ml flasks beakers up to 105 mm ø for 1000 ml flasks beakers up to 131 mm ø These clamps can be fixed directly to the shaking platform or for quick changing onto the basic rack 333 0259 NOTE If the basic rack 333 0259 is used the four tapered pins have to be assembled first They are screwed into the movable platform in place of the fou...

Page 24: ...Maximum Clamp Number 23 15 Maximum clamp number for the moveable platform for 40 x 25 ml 000 8732 32 x 50 ml 000 1980 18 x 100 ml 000 1982 12 x 250 ml 000 1990 8 x 500 ml 000 1994 5 x 1000 ml 000 1995 ...

Page 25: ...plitude mm 15 Shaking frequency min 1 20 200 continuous Bath opening depth mm 500 x 300 200 Bath capacity l 8 26 Bath vessel stainless steel rust free Dimensions WxLxH mm 650 x 340 x 260 Weight kg 18 Mains supply V Hz 230 50 60 or 115 60 Total wattage VA 1600 16 2 Fuse values Mains voltage Fuse s at the rear panel Fuse s in the unit 230V 2x10 A 1xT 0 63 A 115V 1x16 A 1xT 1 6 A Part No 003 4190 Sub...

Reviews: