background image

  5 


1.6. 

Cleaning the flue gas passes - annual 
maintenance 

First  pull  the  stove  away  from  the  wall  so  as  to  create 
enough room to work at the back.  
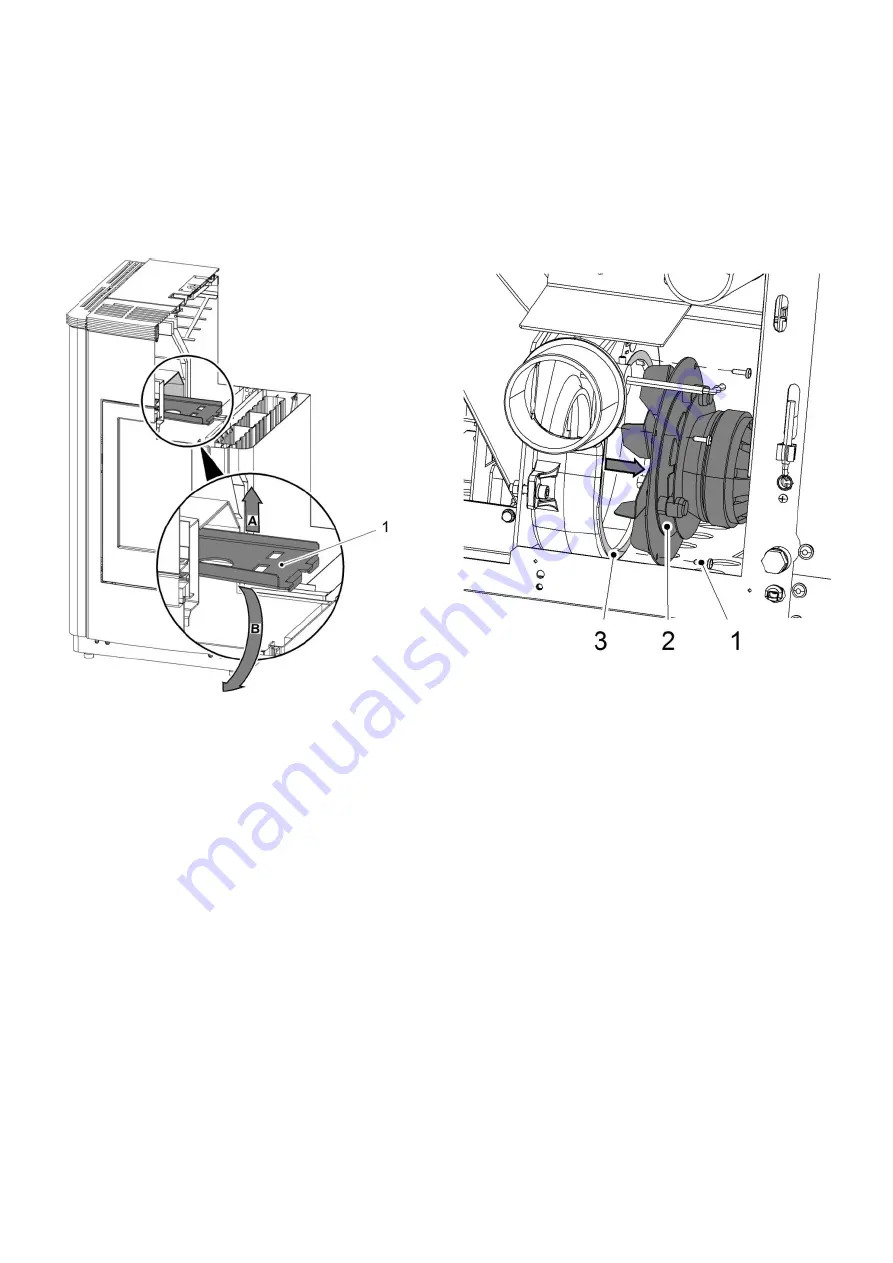
To clean the flue gas passes, proceed as follows: 
Disconnect the flue baffle (1) from the guide by lifting it. 
Draw the right cladding (2) down out of the guide and 
place it down in the ash space. Then the flue baffle can 
be removed and the upper part of the combustion 
chamber can be cleaned. (See Figure 4a). 


Figure 4a:


Removing the flue baffle


Then  remove  the  right  side  wall.  This  is  fixed  with 
screws (1) at the back and at the front with 3 connectors. 
Remove the screws from the back and pull the side wall 
off sideways. (See Figure 4b). 
 

1.7. 

Cleaning the induced draught housing and fan  

This housing is made accessible for cleaning by undoing 
the 4 nuts shown in Figure 5. (See arrows). 
Remove the induced draught motor by pulling it out. 
Now clean the flue gas passes, the induced draught fan 
and  the  flue  tubes  with  a  brush  and  an  ash  vacuum 
cleaner. 
Then  reassemble  the  components  in  reverse  order. 
Make  sure  that  the  seal  is  seated  in  the  right  position 
again. It is essential to replace defective seals. 
Make sure of the electrical connections on the fan motor 
and their correct positions. 


Figure 5: Induced draught fan 

 
1 = Screw 
2 = Blower motor 
3 = Seal 


Summary of Contents for Pelletto III 419.08

Page 1: ...ld combustion pot it must be cleaned See operating instructions If this is not done there will be more and more clinker Then the device will no longer be able to ignite properly Pellets may pile up in the combustion pot In extreme cases this can reach all the way back to the pellet chute Backfire in the pellet container and smouldering in the pellet tank might possibly result This will destroy you...

Page 2: ... combustion chamber function instruction Error F040 3 1 4 Cleaning the combustion pot weekly 3 1 5 Cleaning the pellet container annual maintenance 4 1 6 Cleaning the flue gas passes annual maintenance 5 1 7 Cleaning the induced draught housing and fan 5 2 Technical data 7 3 Replacement parts list 12 4 Circuit diagram 13 ...

Page 3: ...ld soapy water You are advised against using corrosive cleaning agents and solvents since these might damage the surfaces 1 2 Cleaning the glass panel To clean the viewing panel you must first open the stove door Dirt on the glass panel can be removed with a glass cleaner or with a damp sponge on which you have sprinkled some of the wood ash present Environmentally friendly Cleaning the glass pane...

Page 4: ... annual maintenance Heat the pellet stove until the storage tank is completely empty Then the protective grille 1 in the pellet tank may be removed Then clean the tank and the intake of the screw conveyor housing with a vacuum cleaner After cleaning it is essential to put back the protective grille When doing this make sure that no screws fall into the pellet tank so as to avoid consequential dama...

Page 5: ...1 at the back and at the front with 3 connectors Remove the screws from the back and pull the side wall off sideways See Figure 4b 1 7 Cleaning the induced draught housing and fan This housing is made accessible for cleaning by undoing the 4 nuts shown in Figure 5 See arrows Remove the induced draught motor by pulling it out Now clean the flue gas passes the induced draught fan and the flue tubes ...

Page 6: ...wall After completion of the cleaning make sure that when putting back the covers the seals are seated in the right positions It is essential to replace defective seals 1 2 3 4 Pelletto III 419 08 434 08 Pelletto III 419 08C 434 08C ...

Page 7: ...e container pellet tank about 17 kg about 32 kg Duration of burn with one charge min max about 10 hrs 30 hrs about 20 hrs 60 hrs Permitted fuel Low dust wood pellets to Ö Norm Eco standard M 7135 DIN 51731 EN 14961 2 Diameter 6 mm Length max 30 mm Diameter 6 mm Length max 30 mm Room heating capacity to Ö Norm M 7521 max 230 m 3 max 230 m 3 Room heating cap y to DIN 18893 constant heating 250m 3 14...

Page 8: ...8 Figure 6 Dimensions of Pelletto III 419 08 Pelletto III 419 08 C ...

Page 9: ...9 Figure 7 Dimensions of Pelletto III 434 08 Pelletto III 434 08 C ...

Page 10: ...10 Figures 8 Replacement parts Pelletto III 419 08 Pelletto III 419 08 C ...

Page 11: ...11 Figures 9 Replacement parts Pelletto III 434 08 Pelletto III 434 08 C ...

Page 12: ...17 0551908006709 0551908006709 0551908006709 0551908006709 Combustion chamber cladding right 19 0551908005040 0551908005040 0551908005040 0551908005040 Combustion chamber cladding back 18 0551908005039 0551908005039 0551908005039 0551908005039 Draught baffle plate 21 0551908005701 0551908005701 0551908005701 0551908005701 Allen key 6 mm 9001700060005 9001700060005 9001700060005 9001700060005 Stand...

Page 13: ...13 4 Circuit diagram ...

Page 14: ...ed draught 8 9 OC 35 36 Flue gas temperature sensor 37 38 Flame temperature sensor 39 40 Room temperature sensor 41 42 Bottom flame temperature sensor 43 44 Door contact switch 48 50 Flue gas fan rotation speed F1 Fuse T 3 15A ignition induced draught fan screw conveyor motor F3 Fuse T 0 315A operator console ...

Page 15: ...tion stoves for wood and coal Slow combustion stoves and auxiliary ranges for wood coal and oil Fireplace inserts for wood Accessories for stoves and fireplaces Accessories for central oil supply HAAS SOHN Sales in Germany OFENTECHNIK GMBH HAAS SOHN Ofentechnik GmbH Urstein Nord 67 Zur Dornheck 8 A 5412 Puch D 35764 Sinn Fleisbach Email office haassohn com Email info haassohn com http www haassohn...

Reviews: