17
Rossi
Operating instructions − UTD.045.06-2013.00_TR_EN
TR
EN
could cause personal injury or property damage.
Whenever a leakage of lubricant could cause heavy damages, increase
the frequency of inspections and/or envisage appropriate control
devices (e.g.: remote level gauge, lubricant for food industry, etc.).
In polluting surroundings, take suitable precautions against lubri-
cant contamination through seal rings or other.
For outdoor installation or in a hostile environment (atmospheric cor-
rosivity category
C3
according to ISO 12944-2), protect the gear
reducer or gearmotor with a proper dual-compound anticorrosion
paint; added protection may be afforded by applying water-proof
grease (especialIy around the rotary seating of seal rings and at shaft
end access points).
Gear reducers and gearmotors should be protected whenever pos-
sible and by appropriate means from solar radiation and extremes
of weather: protection
becomes essential
when high or low
speed shafts are vertically disposed or when the motor is installed
vertical with fan uppermost.
For ambient temperature greater than +40 °C or less than 0 °C,
consult Rossi.
When gear reducer or gearmotor is supplied with water cooling by
coil or independent cooling unit, see ch 7.
5.2 - Fitting of components to shaft ends
It is recommended that the holes of parts keyed onto shaft ends
should be machined to H7 tolerance; for high speed shaft ends hav-
ing D ≥ 55 mm, tolerance G7 is permissible provided that the load
is uniform and light; for low speed shaft end having D
≤
180 mm,
tolerance must be
K7
if load is not uniform and light.
Before mounting, thoroughly clean mating surfaces and lubricate
against seizure and fretting corrosion.
Attention!
Installing and removal operations should be carried out
with the aid of
jacking screws
and
pullers
using the tapped hole
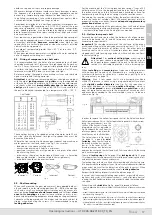
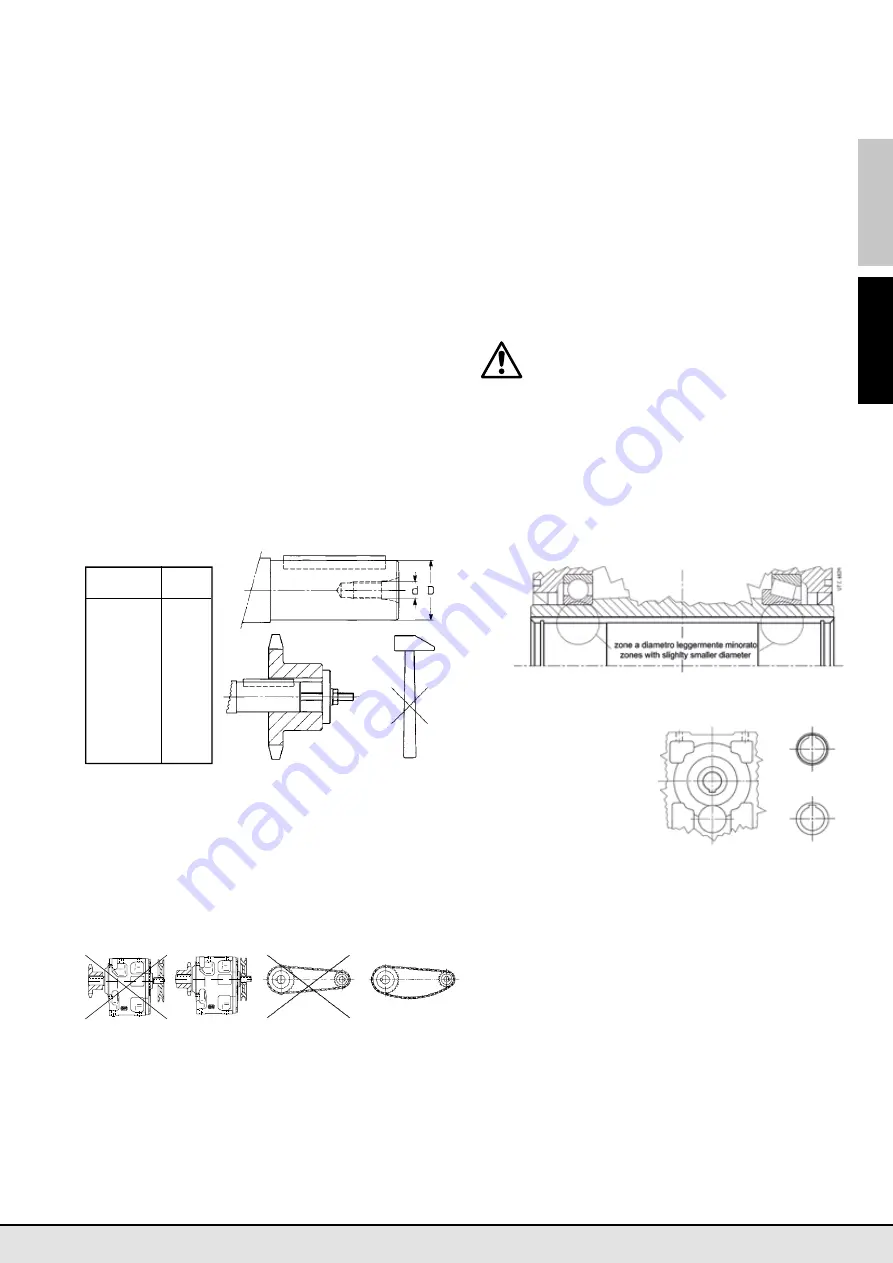
at the shaft butt-end (see table in fig. 2) taking care to avoid impacts
and shocks which may
irremediably damage
the
bearings,
the
circlips
or other parts, for H7/m6 and K7/j6 fits it is advisable that
the part to be keyed is preheated to a temperature of 80
÷
100 °C.
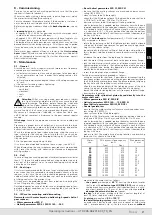
D d
Ø
Ø
11
4
00
M 5
14
÷
19
M 6
24
÷
28
M 8
30
÷
38
M 10
42
÷
55
M 12
60
÷
75
M 16
80
÷
95
M 20
100
÷
110
M 24
125
÷
140
M 30
160
÷
210
M 36
240
÷
320
M 45
Shaft ends
Fig. 2
UT
.C 886
The couplings having a tip speed on external diameter up to 20 m/s
must be statically balanced; for higher tip speeds they must be
dynamically balanced.
Where the transmission link between gear reducer and machine or
motor generates shaft end loads, (see fig. 3), ensure that:
– loads do not rise above catalog values;
– transmission overhang is kept to a minimum;
– gear-type transmissions must guarantee a minimum of backlash
on all mating flanks;
– drive-chains should not be tensioned (if necessary – alternating
loads and/or motion – foresee suitable chain tighteners);
– drive-belts should not be over-tensioned.
Fig. 3
Incorrect
Correct
Incorrect
Correct
UT
.C 666
UT.C 117
5.3 - Shaft-mounting
When shaft mounted, the gear reducer must be supported both axi-
ally and radially (also for mounting positions B3 ... B8) by the machine
shaft end, as well as anchored against rotation only, by means of a
reaction having
freedom of axial movement
and sufficient
clear-
ance in its couplings
to permit minor oscillations always in evi-
dence without provoking dangerous overloading on the gear reducer.
Lubricate with proper products the hinges and the parts subject to
sliding; when mounting the screws it is recommended to apply
locking adhesives
.
For the mounting of the “kit using reaction disc springs” (sizes
≤
125
helical gear units) use the tapped butt end hole on the shaft end of
the driven machine and the flat machined chamfered surface for
compressing and fitting the disc springs into the reaction recess.
Concerning the reaction system, follow the project indications sta-
ted in the technical catalogs Rossi. Whenever personal injury or
property damage may occur, foresee
adequate supplementary
protection devices
against:
– rotation or unthreading of the gear reducer from shaft end of driven
machine following to accidental breakage of the reaction arrangement;
– accidental breakage of shaft end of driven machine.
5.4 - Hollow low speed shaft
For machine shaft ends onto which the hollow shafts of gear reduc-
ers are to be keyed, h6, j6, and k6 tolerances are recommended,
according to requirements.
Important!
The shoulder diameter of the shaft end of the driven
machine abutting with the gear reducer must be at least 1,18
÷
1,25
times the internal diameter of hollow shaft. For other data on
machine shaft end, in case of standard hollow low speed shaft,
stepped shaft, with locking rings or bush, with shrink disc see Rossi
technical catalogs.
Attention!
For
vertical ceiling-type
mounting and
only for gear reducers equipped with locking rings or
bush, gear reducer support is due only to friction, for this
reason it is advisable to provide it with a fastening sys-
tem.
When
installing
and
removing
gear reducers and gearmotors
with hollow low speed shaft incorporating a circlip groove –
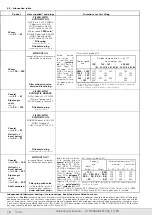
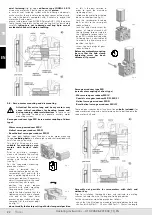
whether with keyway or shrink disc – proceed as per fig. 4a and
4b, respectively, on page 14.
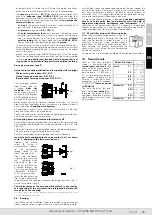
Warning
. Even if low speed shafts are principally machined
within H7 tolerance, a check using a plug could detect two areas
with
slightly smaller diameters
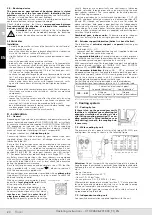
(see Fig. 5a): this reduction is
intentional and does not affect the
quality of keying
- which in
fact will be
improved
in terms of
duration
and
precision
- and it
does not represent an obstacle to the assembly of a machine shaft
end executed according to the usual methods, such as to the one
shown on Fig. 4a.
Fig. 5a
In order to remove the hollow low speed shaft of the helical and bevel
helical gear reducers (this is the first operation to perform when disassem-
bling the gear reducer) turn the
shaft until the keyway is fac ing the
intermediate shaft as indicated in
fig. 5b and push the shaft from the
reference groove side (circumfer-
encial keyway on shaft shoulder).
The system shown in fig. 4c and
4d, page 14, is good for
axial
fastening
; when the shaft end of
the driven machine has no shoul-
der (as in the lower half of the
drawing) a spacer may be located
between the circlip and the shaft end itself. Parts in contact with the circlip
must have sharp edges.
The use of
locking rings
(fig. 4e, page 14) or
locking bush
(fig. 4f page
14) will permit easier and more accurate installing and removing and elimi-
nate backlash between the key and keyway.
The locking rings or bush are fitted after mounting and after having care-
fully degreased the coupling surfaces. Do not use molybdenum bisulphide
or equivalent lubricant for the lubrication of the parts in contact. When
tightening the bolt, we recommend the use of a
locking adhesive
.
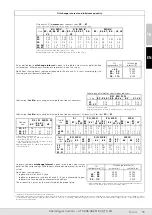
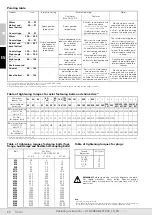
Respect the tightening torques stated in the table on page 24.
In case of axial fastening with locking rings or bush – especially when hav-
ing heavy duty cycles, with frequent reversals – verify, after some hours of
running, the bolt tightening torque and eventually apply the locking adhe-
sive again.
When fitting with
shrink disc
(fig. 4g, page 14) proceed as follows:
– carefully degrease the surfaces of hollow shaft and shaft end of driven machine to be
fitted;
– mount the gear reducer onto the shaft end of driven machine following the method
indicated in fig. 4a, page 14;
– gradually and uniformly tighten the screws of shrink disc by a continuous sequence
(not crossing) and during several phases up to a torque stated in the table on page 24;
– at operation end verify the screw tightening torque by means of a dynamometric key
(flat, when it is mounted onto machine end).
groove side
d
opposite side to groove
Fig. 5b
UT.C 322


