background image

Three Piece High Pressure Ball Valves 

 H25 Valves Series


Three  Piece High Pressure  Ball Valves 

 H25 Valves Series


11 


Assembly


Spring return actuator 

For Normally Closed (NC) valve (valve closed on air


failure), turn the valve to its closed position.  
For Normally Open (NO) valve (valve opened on air 
failure), turn the valve to its open position. 

Double acting actuator 

Valve position is irrelevant. 
 
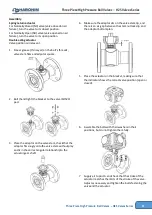
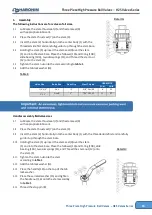
1.


Smear grease (thin Layer) on the bolt’s threads, 

valve stem flats and adaptor square. 


2.


Bolt (hand tight) the bracket to the valve ISO5211 
pad. 


3.


Place the adaptor on the valve stem, check that the 
adaptor fits snugly onto the valve stem without play 
and is in the correct angular relationship to the 
actuator gear shaft. 


4.


Make sure the adaptor sits on the valve stem tip, and 
there is an air gap between the stem nut lock clip and 
the adaptor bottom plan. 


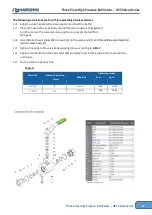
5.


Place the actuator on the bracket, making sure that 
the indicator shows the correct valve position (open or 
closed). 


6.


Assemble the bolts with their washers in their 
positions, but do not tighten them fully. 


7.


Supply air to port A and check that the stroke of the 
actuator matches the limits of the stroke of the valve.  
Adjust as necessary and tighten the bolts fastening the 
valve and the actuator. 


Summary of Contents for H25 Series

Page 1: ...Three Piece HighPressure BallValves H25 ValvesSeries Installation Operating Maintenance Three Piece High Pressure Ball Valves H25 Valves Series REV00 03 23 Itemnumber YP0007941...

Page 2: ...manuals for additional product safety information or contact Habonim Keep hands and objects away from the valve ports at all times Actuated valves could be accidentally operated resulting in serious...

Page 3: ...capabilities date hour name andsignature of the responsible engineer air pressure onsite time toclosethevalve timetoopenthevalve The combined corrosion anderosionallowanceforthevalvebody wallthickness...

Page 4: ...n dryair according toISO 4414 The air compressor must incorporate a filteron the intakesystemand contain only lubricants that are resistant toignition orcarbonization at anticipatedtemperatures The ai...

Page 5: ...arts asstatedinthismanual Where indoubt please consultwithHabonim Anyunstable fluidorgasshouldbe identified byitsmanufacturerandmustnotbeused withHabonim valves CAUTION The valves should be used in aw...

Page 6: ...ndsshould notbe removed until immediately prior to installation 5 1 6 Visualinspection shouldbeperformed onasemi annualbasisandresultsrecorded 6 Installation The installation procedure forHabonimballv...

Page 7: ...sfortheEuropeanmarketandabove1 carry the CEmarkwiththeinformation requiredbythe PED 6 2 3 The valve markingsthatare accordingtoAPI 6Dstandardarepresentedinorderto provide the user fulltraceability and...

Page 8: ...nin a normal vibrating environment Wheninstalling a valve in a high vibrating environmentsuchasforan off roadapplication please contact Habonim 6 4 Threaded End Valves 6 4 1 Valveswiththreadedendsshou...

Page 9: ...ine service itmustbe ensuredthatitisclosedwithablindend connection andthe valve issecuredagainstbeingopened unintentionally WARNING Never look intothe valve bore while the valveis in a flow line Press...

Page 10: ...ated seal wear and high valve operating torque 7 2 It is strongly recommendedtotightenthe stemnuttorqueaccordingtovalue inTable1inthe Disassembly andassembly manualevery15 000cycles 7 3 If the valveis...

Page 11: ...s are in the fail close position 1 Remove the air hose or the solenoidvalve fromthe actuator 2 Release one turn the boltsconnectingthe bracket and the actuator bottomplan 3 Remove completelythe boltsc...

Page 12: ...valve ISO5211 pad 3 Place the adaptor onthe valve stem checkthat the adaptor fitssnugly ontothe valve stemwithoutplay and is in the correct angular relationshipto the actuator gear shaft 4 Make sure...

Page 13: ...stmentscrewsare lockedin place by usingLoctite221 any change of screwsposition must be repeatedwithrenewalof the glue overthe screws thread 9 Tightenall bracket bolts withsuitable spanner 10 Hold the...

Page 14: ...hPressure BallValves H25 ValvesSeries Three Piece High Pressure Ball Valves H25 Valves Series 13 Disassembly Assembly Manual Three Piece High Pressure BallValves Series included H25 Series Sizesinclud...

Page 15: ...nd objects away from the valve ports at all times Actuated valves could be accidentally operated resulting in serious injury or valve damage Before removing a valve from the line always make sure the...

Page 16: ...hasalsobeen dischargedfromthevalvecavity Setthe valve to openposition Remove the dowelpins Carefully removetheendsfromthevalvebody Remove anddiscardthe seats bodysealsandallthe valve parts Setthe valv...

Page 17: ...dlesassemblyforall valvesizes 3 7 Lubricate the stemthrustseal 7 andthestemseal 9 withappropriate lubricant 3 8 Place the stemthrustseal 7 onthestem 4 3 9 Insertthe stem 4 horizontallyintothe centerbo...

Page 18: ...nd turnthe stemsothe valveisatopenposition to preventthe ballfrom fallingout 3 18 Assemblebothseals 6A 6B andseats 5 onthe valve ends 2 andthreadthe assembledend into the valve body 1 3 19 Tightenthe...

Reviews: