248
Idrifttagning
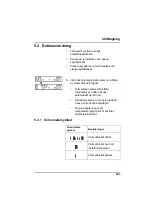
5.2.2 Klocksymbol
5.2.3 Pipfunktioner
5.2.4 Stoppfunktion
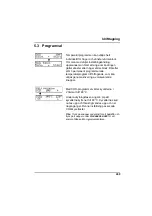
Med stoppfunktionen kan
temperaturprogrammet avbrytas när som helst.
1.
Välj det program som ska stoppas.
2.
Tryck på knapper under
STOPP
.
Obs: Tryck på knapper under
PILKNAPPEN UPP
fortsätter temperaturprogrammet igen där det
avbröts.
Klocksymbol
Beskrivningar
Återstående tid räknas ner
till noll.
Pipfunktioner
Beskrivningar
1 pip
Termostaten är driftberedd
efter initialisering.
2 pip
Inställd temperatur
uppnådd.
3 pip
Temperaturprogrammet
slut.
4 pip
COD-program -
avkylningsfas 80 °C - ta ur
kyvetterna och vänd dem
upp och ned några gånger.
Summary of Contents for LT 200
Page 1: ...DOC022 98 00742 JAN06 LT 200 ...
Page 3: ...2 ...
Page 5: ...4 Thermostat LT 200 ...
Page 7: ...6 ...
Page 17: ...16 Allgemeine Informationen ...
Page 21: ...20 Installation ...
Page 23: ...22 Software Menü Übersicht ...
Page 35: ...34 Wartung ...
Page 37: ...36 Fehler bzw Displaymeldungen ...
Page 43: ...42 ...
Page 47: ...46 Specifications ...
Page 53: ...52 General Information ...
Page 57: ...56 Installation ...
Page 59: ...58 Operation ...
Page 71: ...70 Maintenance ...
Page 73: ...72 Troubleshooting ...
Page 75: ...74 Contact Information ...
Page 77: ...76 Warranty liability and complaints ...
Page 79: ...78 ...
Page 89: ...88 Introduction Informations générales ...
Page 93: ...92 Installation ...
Page 95: ...94 Menu ...
Page 105: ...104 Mise en service ...
Page 109: ...108 Entretien ...
Page 111: ...110 Dépannage ...
Page 117: ...116 ...
Page 119: ...118 Indice Sezione 8 Come ordinare 149 Sezione 9 Garanzia responsabilità e reclami 151 ...
Page 127: ...126 Introduzione Generalità ...
Page 131: ...130 Installazione ...
Page 133: ...132 Menu ...
Page 143: ...142 Messa in servizio ...
Page 147: ...146 Manutenzione Figura 5 Cambiare le coperture protettive Punto 2 ...
Page 149: ...148 Diagnostica ...
Page 151: ...150 Come ordinare ...
Page 155: ...154 ...
Page 169: ...168 Instalación ...
Page 171: ...170 Menú ...
Page 181: ...180 Puesta en marcha ...
Page 185: ...184 Mantenimiento Figura 5 Cambio de las tapas de protección Paso 2 ...
Page 187: ...186 Localización y resolución de fallos ...
Page 189: ...188 Cómo cursar pedidos ...
Page 193: ...192 ...
Page 203: ...202 Algemene informatie ...
Page 207: ...206 Installatie ...
Page 209: ...208 Menu ...
Page 221: ...220 Onderhoud Afbeelding 5 Vervanging van de beschermkappen Stap 2 ...
Page 223: ...222 Problemen oplossen ...
Page 225: ...224 Hoe te bestellen ...
Page 229: ...228 ...
Page 231: ...230 Innehåll Avsnitt 8 Beställningar 259 Avsnitt 9 Garanti ansvar och reklamationer 261 ...
Page 233: ...232 Teknisk specifikation ...
Page 239: ...238 Allmän information ...
Page 243: ...242 Installation ...
Page 245: ...244 Meny ...
Page 257: ...256 Underhåll ...
Page 259: ...258 Felsökning ...
Page 261: ...260 Beställningar ...
Page 265: ...264 ...
Page 267: ...266 Indhold Afsnit 8 Bestilling 295 Afsnit 9 Garanti erstatningspligt og reklamation 297 ...
Page 275: ...274 Indledning ...
Page 278: ...277 Installation Figur 2 Bagside LT 200 termostat 1 Afbryder 3 Typeskilt 2 Strømstik ...
Page 279: ...278 Installation ...
Page 281: ...280 Menu ...
Page 289: ...288 Almindelig drift ...
Page 293: ...292 Vedligeholdelse ...
Page 295: ...294 Fejlfinding ...
Page 297: ...296 Bestilling ...
Page 301: ...300 ...
Page 303: ...302 Spis treœci Rozdział 8 Jak zamawiać 331 Rozdział 9 Gwarancja rękojmia i reklamacje 333 ...
Page 311: ...310 Informacje ogólne ...
Page 315: ...314 Instalacja ...
Page 317: ...316 Menu ...
Page 329: ...328 Konserwacja Rysunek 5 Wymiana pokryw ochronnych Krok 2 ...
Page 331: ...330 Wykrywanie i usuwanie usterek ...
Page 333: ...332 Jak zamawiać ...

