background image

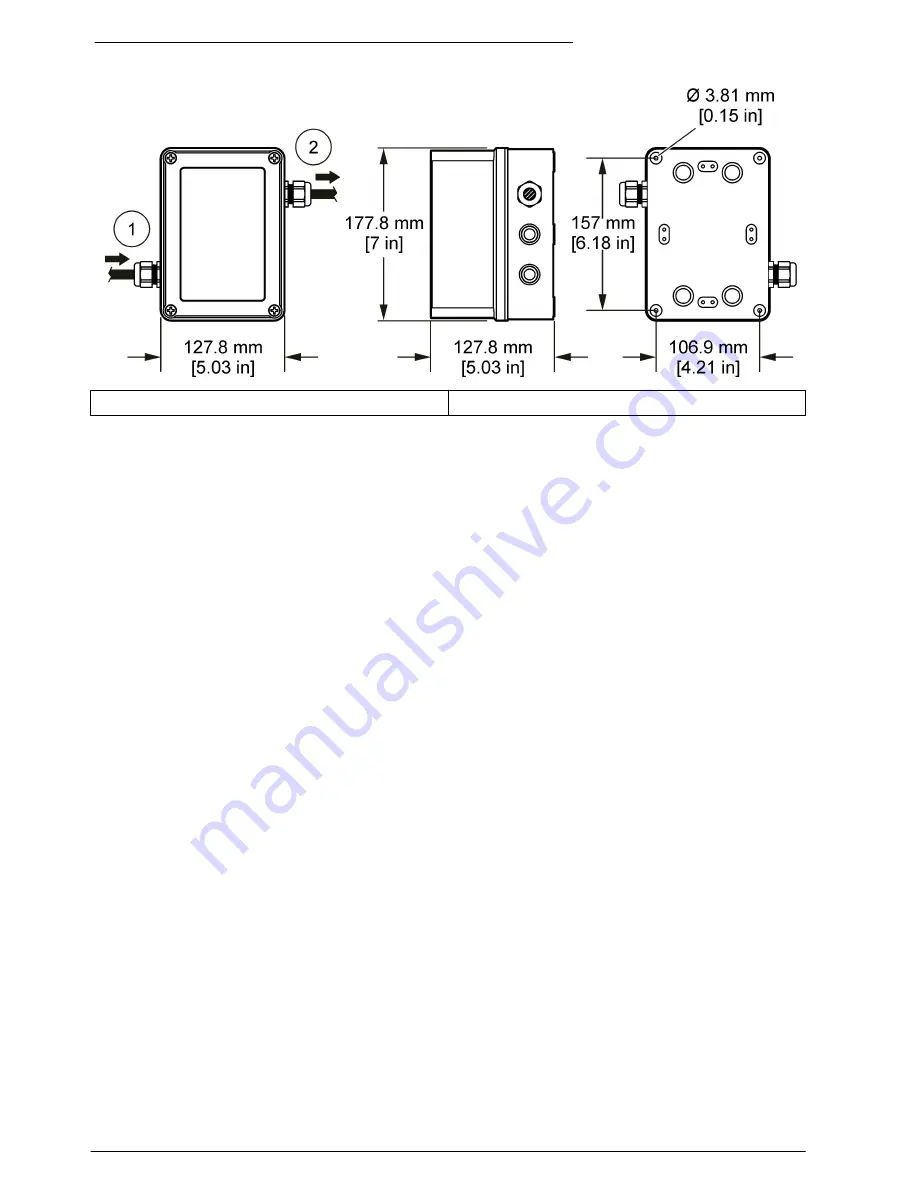
Figure 1  Power supply—front, side and back-view dimensions

1   

AC mains power in

2   

DC power out

Wiring the DC Flo-Station for power

The SELV power supply is intended to be wired to a DC Flo-Station only. DC-powered Flo-Stations
have a fixed 2-terminal connector. AC mains-powered units have a removable connector for the
neutral and line wires. Use a screwdriver to secure all wiring connections.

1.

Remove the bottom cover from the Flo-Station.

2.

Insert the power cable from the SELV power supply through the strain relief fitting in the bottom of
the Flo-Station enclosure.

3.

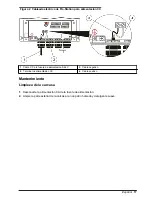
Install the negative wire (black) into the left side of the power terminal first. Then install the
positive wire (white) in the right side of the power terminal. Refer to 

Figure 2

. Tighten each wire

and then tug gently to make sure the connection is tight.

4.

Tighten the strain relief to secure the cable.

5.

Seal any unused openings in the enclosure with conduit-sealing plugs.

6.

Install the bottom cover.

7.

Apply the AC mains power to the SELV power supply and make sure that the Flo-Station is
powered on.

6


English

Summary of Contents for 6632500

Page 1: ...DOC276 97 80120 SELV power supply 04 2012 Edition 2 User Instructions Instructions d utilisation Instrucciones para el usuario...

Page 2: ...English 3 Fran ais 8 Espa ol 13 2...

Page 3: ...he right to make changes in this manual and the products it describes at any time without notice or obligation Revised editions are found on the manufacturer s website Safety information N O T I C E T...

Page 4: ...en noted on the product identifies the location of a fuse or current limiting device Electrical equipment marked with this symbol may not be disposed of in European public disposal systems after 12 Au...

Page 5: ...the receiving antenna for the device receiving the interference 5 Try combinations of the above Product overview D A N G E R Electric shock hazard The power supply must be connected to an electrical...

Page 6: ...2 Insert the power cable from the SELV power supply through the strain relief fitting in the bottom of the Flo Station enclosure 3 Install the negative wire black into the left side of the power termi...

Page 7: ...wer 1 DC cable from SELV power supply 3 Negative wire 2 DC power terminal 4 Positive wire Maintenance Cleaning the case 1 Disconnect AC power to the power supply 2 Clean the outside of the case with a...

Page 8: ...n d faut ou d une omission dans ce manuel Le constructeur se r serve le droit d apporter des modifications ce manuel et aux produits d crits tout moment sans avertissement ni obligation Les ditions r...

Page 9: ...une prise connectez la terre positive cette borne le kit de cordon am ricain contient une connexion la terre Ce symbole indique la pr sence de dispositifs sensibles aux d charges lectrostatiques ESD e...

Page 10: ...non la source des perturbations 2 Si l quipement est branch sur le m me circuit de prises que l appareil qui subit des interf rences branchez l quipement sur un circuit diff rent 3 loigner l quipement...

Page 11: ...e pour c bles neutres et de ligne Fixez tous les raccords des c bles l aide d un tournevis 1 Retirez le capot inf rieur du Flo Station 2 Ins rez le c ble d alimentation de l alimentation lectrique SEL...

Page 12: ...de l alimentation lectrique SELV 3 Fil n gatif 2 Borne d alimentation CC 4 Fil positif Maintenance Nettoyage du bo tier 1 D branchez l alimentation CA de l alimentation lectrique 2 Nettoyez la face e...

Page 13: ...fecto u omisi n en este manual El fabricante se reserva el derecho a modificar este manual y los productos que describen en cualquier momento sin aviso ni obligaci n Las ediciones revisadas se encuent...

Page 14: ...producto identifica la ubicaci n de un fusible o de un limitador de corriente El equipo el ctrico marcado con este s mbolo no se podr desechar por medio de los sistemas europeos p blicos de eliminaci...

Page 15: ...ndo la interferencia 4 Cambie la posici n de la antena del dispositivo que recibe la interferencia 5 Trate combinaciones de las opciones descritas Descripci n general del producto P E L I G R O Riesgo...

Page 16: ...es de los cables 1 Quite la tapa inferior de la Flo Station 2 Inserte el cable de corriente de la fuente de alimentaci n SELV a trav s del pasacables de la parte inferior de la carcasa de Flo Station...

Page 17: ...fuente de alimentaci n SELV 3 Cable negativo 2 Terminal de alimentaci n CC 4 Cable positivo Mantenimiento Limpieza de la carcasa 1 Desconecte la alimentaci n CA de la fuente de alimentaci n 2 Limpie l...

Page 18: ......

Page 19: ......

Page 20: ...ma Flow Products in France and the UK FLOWTRONIC SA Rue J H Cool 19a B 4840 Welkenraedt Belgium Tel 32 0 87 899 799 Fax 32 0 87 899 790 www flow tronic com France and UK Sigma Flow Products Only HACH...

Reviews: