42
Operation
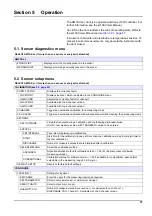
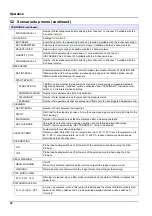
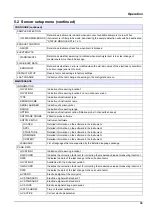
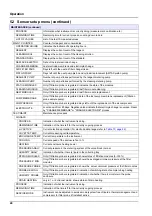
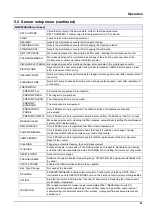
5.2.1 System setup menu
For more information on System Setup (current outputs, relays and
network interfaces), refer to the sc1000 user manual.
5.3 Calibration process
Note:
Make sure that all solutions are available to avoid incorrect
measurements.
1.
To start an automatically calibration select
CALIBRATION>CALIBRATE>AUTOCAL>SET INTERVAL.
OR
1.
To start a calibration manually select
CALIBRATION>CALIBRATE.
Note:
Press START to confirm and start the calibration process.
After the next measurement and the 5 minutes waiting time, the
calibration will automatically start and proceed with all
necessary standards.
Depending on the number of standards requiring calibration, a
cycle may take up to 40 minutes. After a successful calibration, the
instrument automatically returns to the measurements.
Note:
When the instrument detects and displays a warning, the
measurement process will continue. Refer to
troubleshoot the warning.
Note:
When the instrument detects and displays an error, the instrument
stops measuring. Refer to
5.4 Cleaning process
For information about the cleaning interval refer to
Note:
Make sure that the cleaning solution is available that the instrument
can work properly.
1.
To configure an automatical cleaning interval select
CONFIGURE>CLEANING>SET INTERVAL.
OR
1.
To start a manual cleaning cycle select
MAINTENANCE>CLEANING.
Note:
Press START to confirm and start the cleaning process.
A cleaning cycle may take up to 10 minutes and then the
instrument returns automatically to the measuring mode.
Summary of Contents for AMTAX sc
Page 2: ......
Page 7: ...7 Specifications Figure 1 Instrument dimensions AMTAX sc...
Page 12: ...12 General Information...
Page 36: ...36 System Start Up...
Page 44: ...44 Operation...
Page 56: ...56 Maintenance...
Page 64: ...64 Troubleshooting...
Page 69: ...69 Replacement Parts and Accessorie Figure 23 Analyzer enclosure AMTAX indoor sc...
Page 70: ...70 Replacement Parts and Accessorie Figure 24 Analyzer panel overview...
Page 71: ...71 Replacement Parts and Accessorie Figure 25 Analyzer panel front view details...
Page 72: ...72 Replacement Parts and Accessorie Figure 26 Analyzer panel back view details...
Page 76: ...76 Warranty and liability...

