51
Maintenance
Membrane cap and electrolyte replacement:
Note:
After the membrane cap and electrolyte are replaced, it takes up to
6 hours before optimum performance is achieved.
The instrument calibrates for the first time after warming up the
sample and reagent in the measuring chamber for 5 minutes. After
a second calibration one hour later, the instrument changes to the
adjusted calibration cycle.
Electrode replacement:
Note:
After inserting a new electrode the instrument needs up to 12 hours
(one night) to achieve the optimum performance.
The instrument calibrates two times after warming up the sample
and reagent in the measuring chamber for 5 minutes. After two
hours operating time in the measuring mode the next calibration
follows and after four hours it calibrates for the last time. Then the
instrument changes to the adjusted calibration cycle.
Note:
There is
no warning concerning the electrode slope during the
membrane and electrode replacement process. If there is an electrode
slope outside the range from –50 mV to –67 mV, an error message may
occur.
Important Note:
After inserting a new electrode or restarting the
instrument, the values for the standard calibration change greatly,
but after approximately two days the mV-values for the standards
should increase slight with the evaporation of the electrolyte. The
slope remains constant while both standard values increase
parallel.
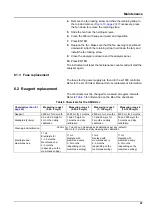
9
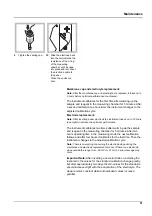
Tighten the sealing cap.
10
Slide the electrode back
into the cell, towards the
resistance of the o-ring
of the measuring
chamber, until it snaps
into place and reconnect
the electrode cable to
the panel.
Close the enclosure
door.
Summary of Contents for AMTAX sc
Page 2: ......
Page 7: ...7 Specifications Figure 1 Instrument dimensions AMTAX sc...
Page 12: ...12 General Information...
Page 36: ...36 System Start Up...
Page 44: ...44 Operation...
Page 56: ...56 Maintenance...
Page 64: ...64 Troubleshooting...
Page 69: ...69 Replacement Parts and Accessorie Figure 23 Analyzer enclosure AMTAX indoor sc...
Page 70: ...70 Replacement Parts and Accessorie Figure 24 Analyzer panel overview...
Page 71: ...71 Replacement Parts and Accessorie Figure 25 Analyzer panel front view details...
Page 72: ...72 Replacement Parts and Accessorie Figure 26 Analyzer panel back view details...
Page 76: ...76 Warranty and liability...

