47
Maintenance
4.
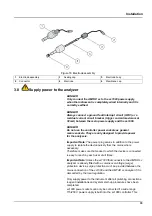
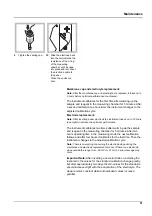
Remove the fan locking screw and slide the retaining strap to
the top and remove (
). If necessary, press
the fan down to remove the retaining strap.
5.
Slide the fan from the holding screws.
6.
Clean the filter with soap and water and reposition.
7.
Press ENTER.
8.
Replace the fan. Make sure that the fan opening is positioned
downward. Attach the retaining strap (hold down the fan) and
install the fan locking screw.
9.
Close the analyzer enclosure and the analysis panel.
10.
Press ENTER.
The instrument will reset the maintenance counter and will start the
analyzer again.
6.1.3 Fuse replacement
The fuses for the power supply are found in the sc1000 controller.
Refer to the sc1000 User Manual for fuse replacement information.
6.2 Reagent replacement
The chemicals must be changed or renewed at regular intervals.
Refer to
for information on the life of the chemicals.
Table 5 Chemicals for the AMTAX sc
Chemical (
Measuring range 1
(0.02–5 mg/L)
Measuring range 2
(0.05–20 mg/L)
Measuring range 3
(1–100 mg/L)
Measuring range 4
(10–1000 mg/L)
Reagent
2500 mL for 3 month
2500 mL for 3 months
2500 mL for 2 months
2500 mL for 2 months
Standards (2 liters):
0.5 and 2.5 mg/L for
2 month on daily
calibration
1 and 10 mg/L for
3 months on daily
calibration
10 and 50 mg/L for
3 months on daily
calibration
50 and 500 mg/L for
3 months on daily
calibration
Cleaning and calibration
250 mL for 1 month on 3 cleanings and calibrations per day (default)
250 mL for 3 months on daily cleaning and calibration
Electrolyte and
membrane cap
11 mL
Electrolyte for
1–1.5 months;
Membrane cap:
2–3 months
(depending on the
membrane soiling)
11 mL
Replace with
membrane every
2–3 months
(depending on the
membrane soiling)
11 mL
Replace with
membrane every
2–3 months
(depending on the
membrane soiling)
11 mL
Replace with
membrane every
2–3 months
(depending on the
membrane soiling)
Summary of Contents for AMTAX sc
Page 2: ......
Page 7: ...7 Specifications Figure 1 Instrument dimensions AMTAX sc...
Page 12: ...12 General Information...
Page 36: ...36 System Start Up...
Page 44: ...44 Operation...
Page 56: ...56 Maintenance...
Page 64: ...64 Troubleshooting...
Page 69: ...69 Replacement Parts and Accessorie Figure 23 Analyzer enclosure AMTAX indoor sc...
Page 70: ...70 Replacement Parts and Accessorie Figure 24 Analyzer panel overview...
Page 71: ...71 Replacement Parts and Accessorie Figure 25 Analyzer panel front view details...
Page 72: ...72 Replacement Parts and Accessorie Figure 26 Analyzer panel back view details...
Page 76: ...76 Warranty and liability...

