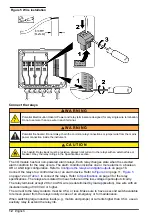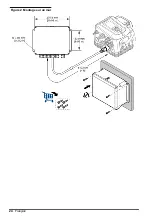
Figure 5 Wire installation
Connect the relays
W A R N I N G
Potential Electrocution Hazard. Power and relay terminals are designed for only single wire termination.
Do not use more than one wire in each terminal.
W A R N I N G
Potential fire hazard. Do not daisy-chain the common relay connections or jumper wire from the mains
power connection inside the instrument.
C A U T I O N
Fire hazard. Relay loads must be resistive. Always limit current to the relays with an external fuse or
breaker. Obey the relay ratings in the Specifications section.
The I/O module has four non-powered alarm relays. Each relay changes state when the selected
alarm condition for the relay occurs. The alarm condition includes one or more alarms in a boolean
OR or AND logic configuration. Refer to
Configure the relays and digital outputs
on page 16.
Connect the relays to a control device or an alarm device. Refer to
on page 11,
on page 12 and
to connect the relays. Refer to
on page 3 for the relay
specifications. The relays are isolated from each other and the low-voltage input/output circuitry.
The relay terminals accept 20 to 14 AWG wire (as determined by load application). Use wire with an
insulation rating of 300 VAC or higher.
The current to the relay contacts must be 0.5 A or less. Make sure to have a second switch available
to remove power from the relays locally in case of an emergency or for maintenance.
When switching large inductive loads (e.g., motors and pumps) or currents higher than 0.5 A, use an
auxiliary relay to extend the relay life.
12
English
Summary of Contents for IO9000
Page 2: ...English 3 Français 19 Español 37 Português 54 中文 72 日本語 88 2 ...
Page 7: ...Figure 2 Wall mounting English 7 ...
Page 8: ...Figure 3 Mounting locations on the sampler 8 English ...
Page 24: ...Figure 2 Montage sur un mur 24 Français ...
Page 25: ...Figure 3 Emplacements de montage sur l échantillonneur Français 25 ...
Page 42: ...Figura 3 Ubicaciones de montaje en el tomamuestras 42 Español ...
Page 59: ...Figura 2 Montagem na parede Português 59 ...
Page 60: ...Figura 3 Locais de montagem no amostrador 60 Português ...
Page 76: ...图 2 墙面安装 76 中文 ...
Page 77: ...图 3 采样仪上的安装位置 中文 77 ...
Page 79: ...拆下护盖 按照如下图示步骤拆下护盖 布线概述 图 4 显示了布线连接以及保险丝位置 请参阅 图 5 准备和安装电线 中文 79 ...
Page 93: ...図 3 サンプラーの取り付け場所 日本語 93 ...
Page 105: ......


