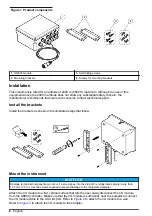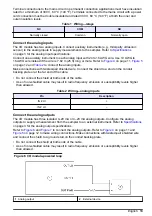
Figure 1 Product components
1
IO9000 module
3
Self-drilling screws
2
Mounting brackets
4
Screws for mounting brackets
Installation
This instrument is rated for an altitude of 2000 m (6562 ft) maximum. Although the use of this
equipment above the 2000 m altitude does not show any substantial safety concern, the
manufacturer recommends that users with concerns contact technical support.
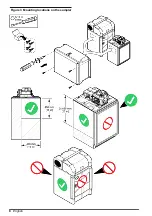
Install the brackets
Install the brackets as shown in the illustrated steps that follow.
Mount the instrument
N O T I C E
Damage to internal components can occur if a screw goes into the side of the refrigerated sampler more than
12.5 mm (0.5 in.). Use the screws supplied to prevent damage to the refrigerated sampler.
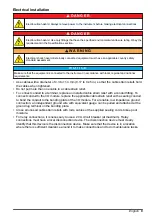
Attach the I/O module to a flat, vertical surface that lets the user easily disconnect the I/O module
from the AS950 controller. Make sure that the I/O module is sufficiently near the sampler to connect
the I/O module cable to the AUX I/O port. Refer to
to attach the I/O module to a wall.
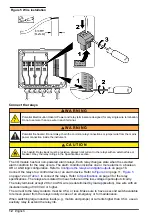
Refer to
to attach the I/O module to the sampler.
6
English
Summary of Contents for IO9000
Page 2: ...English 3 Français 19 Español 37 Português 54 中文 72 日本語 88 2 ...
Page 7: ...Figure 2 Wall mounting English 7 ...
Page 8: ...Figure 3 Mounting locations on the sampler 8 English ...
Page 24: ...Figure 2 Montage sur un mur 24 Français ...
Page 25: ...Figure 3 Emplacements de montage sur l échantillonneur Français 25 ...
Page 42: ...Figura 3 Ubicaciones de montaje en el tomamuestras 42 Español ...
Page 59: ...Figura 2 Montagem na parede Português 59 ...
Page 60: ...Figura 3 Locais de montagem no amostrador 60 Português ...
Page 76: ...图 2 墙面安装 76 中文 ...
Page 77: ...图 3 采样仪上的安装位置 中文 77 ...
Page 79: ...拆下护盖 按照如下图示步骤拆下护盖 布线概述 图 4 显示了布线连接以及保险丝位置 请参阅 图 5 准备和安装电线 中文 79 ...
Page 93: ...図 3 サンプラーの取り付け場所 日本語 93 ...
Page 105: ......


