29
Installation
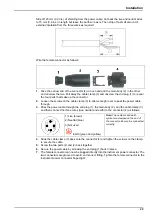
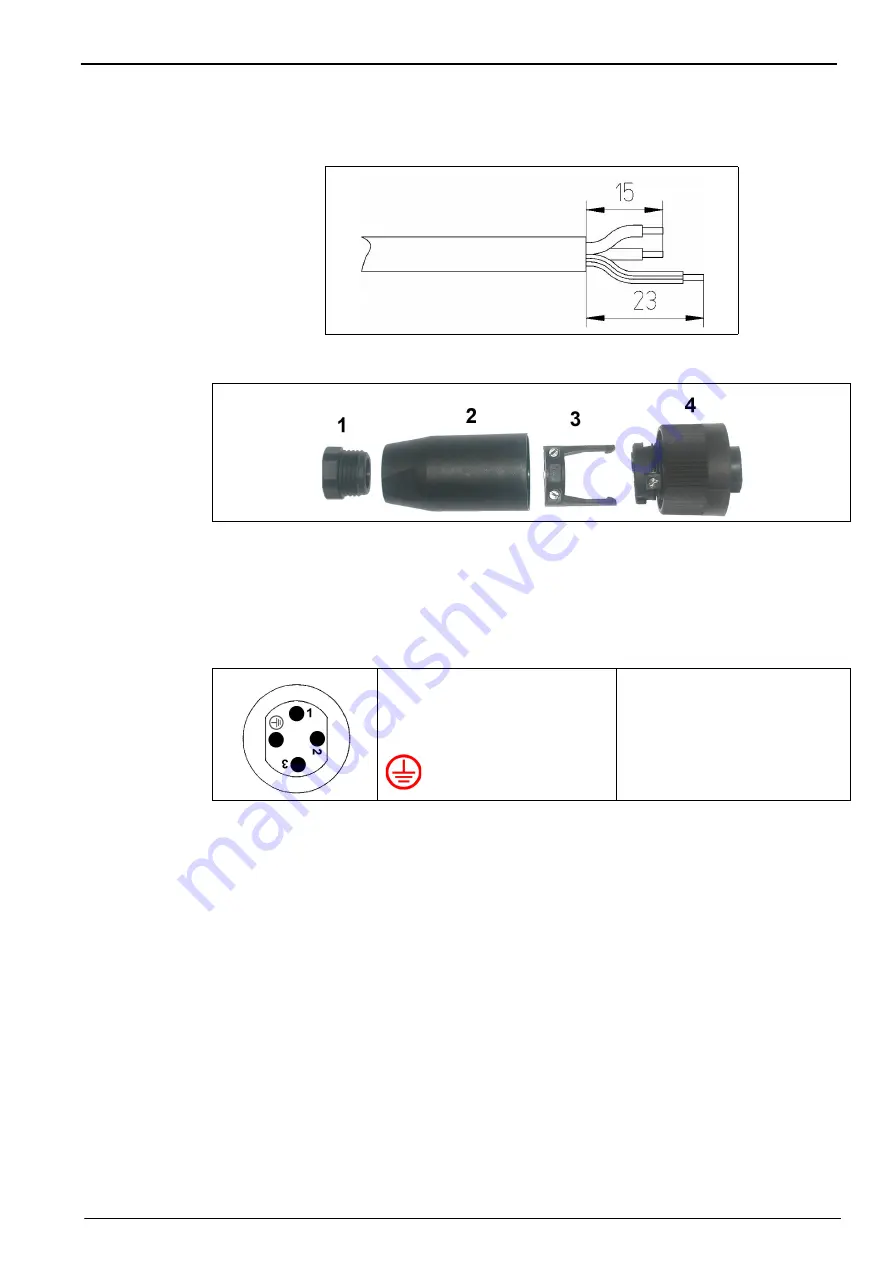
Strip off 23 mm (0.9 ins.) of shielding from the power cable. Cut back the live and neutral wires
to 15 mm (0.6 ins.) in length but leave the earth wire as is. Then strip off a small amount of
external insulation from the three wires as required:
Wire the female connector as follows:
1.
Take the narrow end of the connector (4) in one hand and the main body (2) in the other
and unscrew the two. Pull away the cable clamp (3) and unscrew the end plug (1) to reveal
the four parts that make up the connector.
2.
Loosen the screws on the cable clamp (3) to allow enough room to pass the power cable
through.
3.
Pass the power cable through the end plug (1), the main body (2), and the cable clamp (3),
and then connect the three wires (live, neutral and earth) to the connector (4) as follows:
4.
Slide the cable clamp (3) back onto the connector (4) and tighten the screws on the clamp
to secure the cable.
5.
Screw the two parts (4) and (2) back together.
6.
Secure the power cable by screwing the end plug (1) back in place.
7.
The female connector can now be plugged directly into the instrument power connector. The
two connectors are grooved to avoid an incorrect fitting. Tighten the female connector to the
instrument power connector finger-tight.
1) Live (brown)
2) Neutral (blue)
3) Not used
Earth (green and yellow)
Note:
The numbers and earth
symbol are stamped on the end of
the connector. Ensure it is connected
correctly.
Summary of Contents for Orbisphere 51 Series
Page 5: ...4 Table of Contents...
Page 19: ...18 Specifications...
Page 48: ...47 Section 6 View Menu Figure 33 View menu...
Page 52: ...51 Section 7 Measurement Menu Figure 36 Measurement menu...
Page 66: ...65 Section 9 Inputs Outputs Menu Figure 40 Inputs Outputs menu...
Page 68: ...67 Inputs Outputs Menu 9 4 Analog outputs Figure 41 Analog outputs menu...
Page 75: ...74 Inputs Outputs Menu...
Page 91: ...90 Communication Menu...
Page 94: ...93 Section 12 Products Menu Figure 44 Products menu...
Page 97: ...96 Global Configuration Menu...
Page 98: ...97 Section 14 Services menu Figure 46 Services menu Part 1...
Page 99: ...98 Services menu Figure 47 Services menu Part 2...
Page 103: ...102 Services menu...


