background image

69

Inputs/Outputs Menu

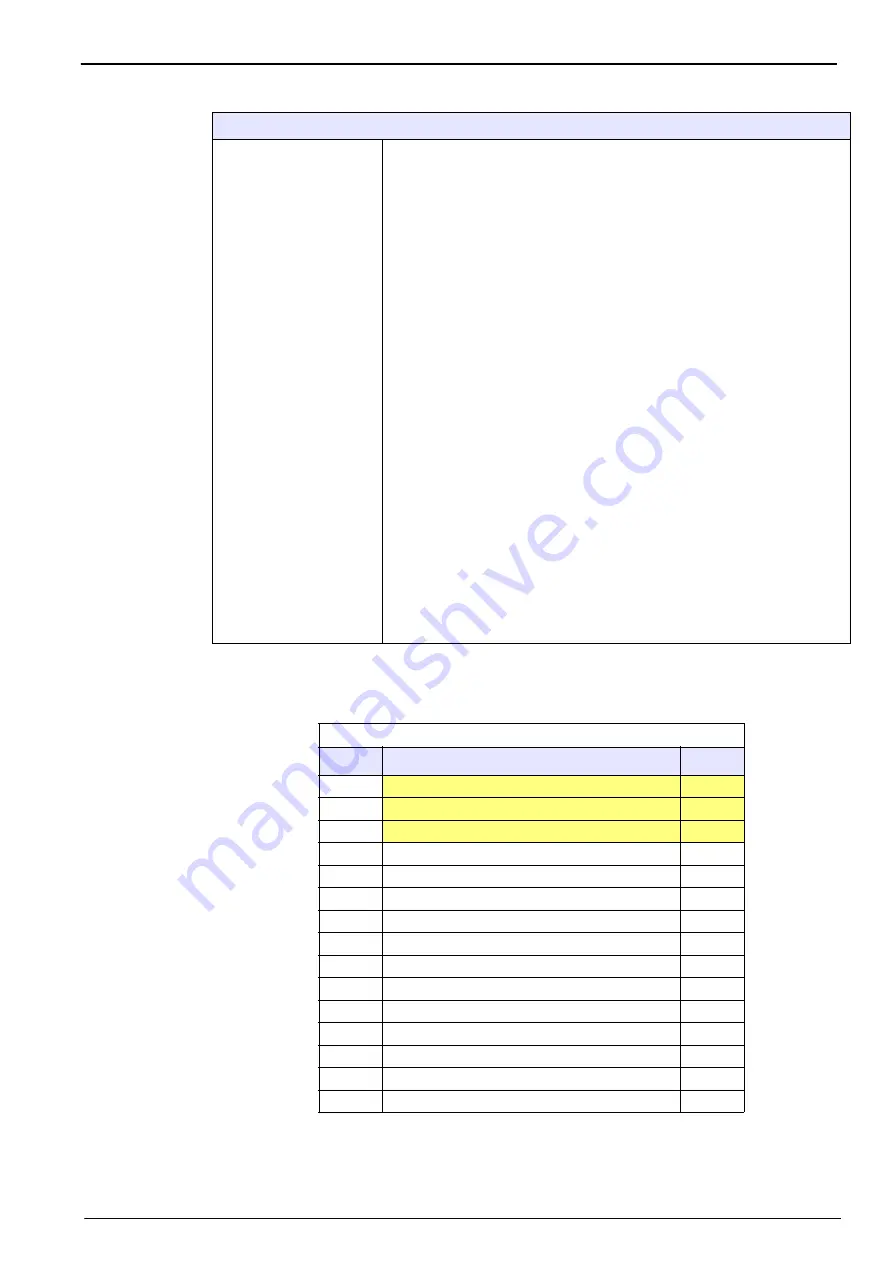
The following table lists the default configuration. The first three events on the list are pre-set 
and only the priority can be changed:

Analog outputs (continued)

Channel configuration

For each of the three analog output channels, set the type of measurement 
that will be transmitted through this channel, and the output characteristics.

Meas. type

: Select between the type of measurements available in the 

rolling list.

Characteristics

: Select either Linear, Tri-linear or None. Refer to 

Analog output characteristics on page 71

.

Limits

: Press the configure button to adjust the analog output set points 

for each output. Enter values in the appropriate text boxes. In Linear 
mode, only the ML and MH values can be adjusted. Tri linear mode 
allows all limits to be adjusted, and the None mode denies access to this 
screen.

The authorized user may define a maximum of 12 customized events for 
each of the three outputs on each channel and change the order of priority 
of all events.

Note: 

This only applies to Tri linear and Linear outputs. It is not available if 

the output characteristic is set to None.

Configure the events that should be signaled at the corresponding current 
shown in the right column. 

Only one event signal at a time can be sent via the current output. As 
there is a possibility to have several events at the same time, an order of 
priority must be set. This order has been set by default, but it can be 
modified to suit particular needs and conditions. Touch the priority 
number in the left column and edit it.

The shaded events in the list have preset outputs and only the priority 
can be changed. The other events can be customized by the user. 
Touch a white text box to call up the rolling list. Select an event from this 
list and press 

OK

. Then adjust the priority as required.

Note: 

When an event occurs, measurement information is superseded by 

the event information on the output.

Table 2  Extended event table

Priority

Event

I [mA]

0

Sensor out

0.25

1

External pressure sensor out

0.50

2

Interfering gas error

0.75

3

Custom Event 1

1.00

4

Custom Event 2

1.25

5

Custom Event 3

1.50

6

Custom Event 4

1.75

7

Custom Event 5

2.00

8

Custom Event 6

2.25

9

Custom Event 7

2.50

10

Custom Event 8

2.75

11

Custom Event 9

3.00

12

Custom Event 10

3.25

13

Custom Event 11

3.50

14

Custom Event 12

3.75

Summary of Contents for Orbisphere 51 Series

Page 1: ...DOC024 52 93116 ORBISPHERE Model 51x Analyzer with K1200 and TC Sensors USER MANUAL 02 2020 Edition 7...

Page 2: ...unting 22 3 3 4 Connection panel bottom of instrument 23 3 4 Panel mount instrument 25 3 4 1 Instrument dimensions 25 3 4 2 Mounting 26 3 4 3 Connection panel bottom of instrument 27 3 5 Connection to...

Page 3: ...alibration high range sensors only 61 8 1 4 High level adjustment 61 8 1 5 Sensor verification 61 8 2 TC gas sensor calibration 62 8 2 1 Calibration errors TC sensors 63 8 2 2 Interference calibration...

Page 4: ...maintenance 103 15 2 1 Equipment required 103 15 2 2 Sensor spot removal 103 15 2 3 Sensor spot replacement 104 15 3 TC sensor maintenance 105 15 3 1 Maintenance schedule 105 15 3 2 Testing the sensor...

Page 5: ...4 Table of Contents...

Page 6: ...ting up or operating this analyzer Pay particular attention to all warning and caution statements Failure to do so could result in serious injury to the operator or damage to the equipment To ensure t...

Page 7: ...the person carrying out the repair It renders the warranty null and void and could compromise the correct working of the analyzer and the electrical integrity or the CE compliance of the analyzer DAN...

Page 8: ...l shock and or electrocution exists and indicates that only individuals qualified to work with hazardous voltages should open the enclosure or remove the barrier This symbol when noted on the product...

Page 9: ...r glementation europ enne directive UE 2002 96 EC les utilisateurs de mat riel lectrique en Europe doivent d sormais retourner le mat riel us ou p rim au fabricant pour limination sans frais pour l u...

Page 10: ...htlijn 2002 96 EC dienen gebruikers van elektrische apparaten voortaan hun oude of afgedankte apparatuur kosteloos voor recycling of vernietiging naar de producent terug te brengen Nota Als u apparatu...

Page 11: ...t marked with the above symbol may not be disposed of in European public disposal systems after 12 August 2005 Hach will offer to take back free of charge to the customer any old unserviceable or redu...

Page 12: ...rating ETL conforming to UL 61010 1 and CSA 22 2 No 61010 1 Enclosure ratings IP 65 Totally protected against dust Protected against low pressure jets of water from all directions NEMA4X wall mount on...

Page 13: ...per instrument 1A 30 VAC or 0 5A 50 VDC on a resistance load Normally closed NC NO relay also available when instrument is turned on Opens when a system alarm is detected and when it does not receive...

Page 14: ...pb or 2 whichever is the greater 0 02 mbar or 20 ppm gas or 2 whichever is the greater High range sensors 0 02 ppm or 3 whichever is the greater 0 5 mbar or 500 ppm gas or 3 whichever is the greater A...

Page 15: ...ading or 25 ppb or 0 4 cc kg or 20 mbar The greater of 2 of reading or 0 3 ppm or 0 25ml l or 15 mbar Accuracy sample temp 0 50 C independent of calibration temperature The greater of 3 of reading or...

Page 16: ...every minute the measurement display the relays and the analog outputs are frozen for up to 2 minutes Then the reset shuts down the instrument for 10 seconds and the start up procedure is performed A...

Page 17: ...chan 2 X X X Measurement file X X Calibration chan 3 X X X Verification chan 1 X X X Calibration 0 1 2 3 4 Verification chan 2 X X X Gas sensor X X X Verification chan 3 X X X Interferences X X X Con...

Page 18: ...ppb Liquid Water Display resolution TC sensor XX XX Display resolution LDO sensor XXX X Storage mode Rolling buffer User offset Disabled Out of range protection Enabled Temp unit C Pressure unit bar...

Page 19: ...18 Specifications...

Page 20: ...nect AC power to a 5 VDC powered model WA RN IN G Potential Electrocution Hazard Always disconnect power to the instrument when making electrical connections WA RN IN G Potential Electrocution Hazard...

Page 21: ...5 C This is critical to ensure long term stability Refer to section 7 2 on page 52 10 Set the measurement interval according to your response time needs Refer to section 7 2 on page 52 11 Enable the...

Page 22: ...21 Installation 3 3 Wall mount and pipe mount instruments 3 3 1 Instrument dimensions Figure 1 Wall and pipe mount instrument dimensions in millimeters...

Page 23: ...rument angle for better screen vision and lock both side screws Figure 2 Wall mount bracket Figure 3 Pipe mount diagram Assemble the pipe mount bracket to the U bracket using the two screws provided A...

Page 24: ...everse order to install the cable protection Make sure the 4 pins are securely in place Front panel door A square key is provided to open the instrument front panel locks The two locks are located on...

Page 25: ...B 4 pin connector reserved for Hach service technicians 3 Ethernet cable gland 4 K1200 Sensor connection 5 TC Sensor connection 6 USB A host connector for mass storage device 7 External pressure senso...

Page 26: ...25 Installation 3 4 Panel mount instrument 3 4 1 Instrument dimensions Figure 7 Panel mount instrument dimensions in millimeters...

Page 27: ...joint pliers 4 Slide the instrument in the bracket frame The instrument should go over the four T pins Rotate the 4 fast locking screws on both sides of the front panel and slide it in 5 Rotate the 4...

Page 28: ...the instrument cover 5 Slip the cables through the instrument back panel cable glands 6 Connect the cables to the instrument electronic boards 7 Tighten the cable glands 8 Reinstall the instrument cov...

Page 29: ...irectly into the instrument power connector The two connectors are grooved to avoid an incorrect fitting Tighten the female connector to the instrument power connector finger tight If no power cable w...

Page 30: ...through 3 Pass the power cable through the end plug 1 the main body 2 and the cable clamp 3 and then connect the three wires live neutral and earth to the connector 4 as follows 4 Slide the cable cla...

Page 31: ...attach the connectors to the boards by pushing them firmly in place levers up 3 6 3 Main board connections NOTICE Potential Instrument Damage Delicate internal electronic components can be damaged by...

Page 32: ...gure 16 Connector J7 Figure 17 Connector J8 Connector J7 inputs outputs Measurement alarms relays 1 Common 2 Output relay 1 3 Output relay 2 4 Output relay 3 Note Relays N O or N C depends on the jump...

Page 33: ...ellow Input ext press sensor P 15 White Output ext press sensor 16 Brown Ground GND Note On multi channel systems the external pressure sensor must be wired to the channel 1 measurement board but the...

Page 34: ...steel line to connect the pressure regulator and thermal conductivity sensor to the purge gas supply Swagelok connectors 6 mm or 1 4 are provided A short length of plastic tube is supplied for the pur...

Page 35: ...n a horizontal pipe section or on flow ascending vertical pipe minimum of 15 meters away from the pump s discharge side in a place where the sample flow is stable and rapid and as far as possible from...

Page 36: ...he attaching collar Connect the sensor cable Check for leaks replace O rings if product leaks are visible 3 8 5 Sensor removal If not using the ORBISPHERE 32003 insertion extraction valve refer to The...

Page 37: ...dation To facilitate sensor removal and installation we suggest installing the socket in a location where the liquid can be drained quickly and easily By creating a one meter long piece of pipe Figure...

Page 38: ...3095 sensor housing Another type of sensor housing the ORBISPHERE 33095 housing is available for use with the K1200 sensor but requires that the sample flow be turned off prior to insertion or removal...

Page 39: ...e to its location in the sample The device is designed to hold a 1 liter gas cylinder as shown above but is fully compatible for use with other kinds of gas cylinders When using other types of gas cyl...

Page 40: ...arameter flow chamber Note Suitable only for gaseous media The ORBISPHERE 32002 xxx multi parameter flow chamber can accommodate one or two sensors and one sample pressure sensor If only one gas senso...

Page 41: ...crews supplied The pressure sensor must be on top Note A user manufactured spacer 15 mm thick may be used between the flow chamber and support for improved access for sensor removal Shown here with ga...

Page 42: ...the display calls a related function similar to a shortcut 4 2 1 Function keys on the header bar Figure 25 Numeric view All the measurement configuration calibration and standard service routines can...

Page 43: ...rent date and time This is also a shortcut to the date and time setting window Call the contextual menu This menu is in the header bar and its content is related to the view displayed Opens the main m...

Page 44: ...ed field name is displayed along with units where applicable Figure 29 Identification window Once the access rights have been set refer to User management on page 92 it is necessary to log in as an au...

Page 45: ...menu structure This is the structure of the main menu which is used to control every functionality of the instrument These submenus are detailed in the following sections of this Operator Manual Figu...

Page 46: ...e default login credentials and add users and user access rights 1 Push OK when the message to change the default login credentials shows on the display 2 Push the padlock icon on the header bar of th...

Page 47: ...ry code shows on the login window The supplied login credentials expire in one day Make sure to change the login credential with known values Figure 32 Recovery code 5 Push on the row of the default u...

Page 48: ...47 Section 6 View Menu Figure 33 View menu...

Page 49: ...measured and the channel configuration Statistic view This feature offers statistical data that matches with Total Quality management tools Statistics is a tool to better analyze how a process behave...

Page 50: ...frequency distribution is skewed to the left if the lower tail is longer than the upper tail and skewed to the right if the upper tail is longer than the lower tail Distributions of positive valued r...

Page 51: ...yed Clean button Clear the slope displayed The slope restarts from the left side Diagnostic view configuration Select the channel to be displayed in the diagnostic window and press OK Statistic view c...

Page 52: ...51 Section 7 Measurement Menu Figure 36 Measurement menu...

Page 53: ...plays a HOT alarm message The system resumes when temperature drops to 90 of the specified cutoff temperature Thermal cut off options Disabled enabled Thermal cut off temperature To be set according t...

Page 54: ...calibrated before applying this feature Offset enabled Check this box to enable the user measurement offset option If checked enter an offset value or a target value Offset value Enter an offset valu...

Page 55: ...22 units Delay The delay in seconds before alarms go on whenever concentration values go above High alarms or below Low alarms Set this to a minimum value but enough to avoid alarms for non representa...

Page 56: ...he default helium interference is zero hence must be calibrated in the calibration menu prior to enabling either method below Interfering He constant Use if a method is available to remove all the H2...

Page 57: ...memory Delay in seconds between two data file transfers from volatile memory into non volatile memory The last data file erases the previous one This field is only available if the Auto save in flash...

Page 58: ...57 Section 8 Calibration menu Note The amplifiers calibration option is reserved for Hach service technicians only and is therefore not explained in this manual Figure 38 Calibration menu...

Page 59: ...talled configured and the channel has been set up You must also ensure that you have the correct access rights to access the calibration menu The temperature sensor is factory calibrated and can only...

Page 60: ...Gas sensor calibration menu to check the calibration parameters Ensure the parameters are set up as illustrated left Auto calibration This option is not available for the K1200 sensor Manual calibrati...

Page 61: ...mmended to leave these parameters at their default values and not change them These values apply to manual calibrations with the Auto End parameter set Start period is the minimum time period that mus...

Page 62: ...mpt also fails then refer to your Hach representative for advice Note If the Auto End parameter is set refer to Calibration configuration on page 60 then the calibration will be deemed successful when...

Page 63: ...count the influence of interferences during calibration By default the same interferences as during measurement are selected Press OK to start calibration Calibration results A calibration screen will...

Page 64: ...when exposing TC sensor to sample with the amount of interfering helium only Hence remove all the H2 from the sample via process like recombination with the remaining gas being helium only Interferin...

Page 65: ...Any pressure can be used for P1 and P2 but for an accurate calibration P1 and P2 should be as different as possible One point calibration Connect a certified absolute pressure gauge to the sample line...

Page 66: ...65 Section 9 Inputs Outputs Menu Figure 40 Inputs Outputs menu...

Page 67: ...e relays per channel can be triggered by several standard events or a combination of events custom The relays output can be used to turn on a beacon horn or PLC Refer to Connections to electronic boar...

Page 68: ...67 Inputs Outputs Menu 9 4 Analog outputs Figure 41 Analog outputs menu...

Page 69: ...g output are similar to the 0 20 mA features For some events sensor out purge failure etc the actual measurement is not significant but the PLC needs to know how the analog output behaves in these cas...

Page 70: ...t available if the output characteristic is set to None Configure the events that should be signaled at the corresponding current shown in the right column Only one event signal at a time can be sent...

Page 71: ...erometer before pressing the Continue button Calibration of the selected analog output channel is completed Proceed in the same way for the other analog output channels available Direct test Test to c...

Page 72: ...Settings must be made in balancing these aspects Settings For the output set ML and MH in the current measuring unit e g C for a temperature output When a compound unit is selected the smallest unit...

Page 73: ...conditions As before the downside is that any measure below or over the Range 1 2 and 3 will have the same signal locked at 4 mA and 20 mA respectively but Range 1 2 and 3 should cover a larger range...

Page 74: ...MH ML 20 AOH AOL 1010 3 20 I AOH M MH MHH MH I AOH 20 AOH R MHH MH 20 20 AOH 1010 0 5 V 1 AOL U 0 M MLL ML MLL U AOL R ML MLL 5 AOL 1010 2 AOH U AOL M ML MH ML U AOL AOH AOL R MH ML 5 AOH AOL 1010 3 5...

Page 75: ...74 Inputs Outputs Menu...

Page 76: ...nnected to a RS 485 bus single twisted pair Optionally it can be connected to a fieldbus module gateway The RS 485 menu allows to select between RS485 simple or Profibus DP communication protocol depe...

Page 77: ...or diagnostic purpose Note In case of problem verify first that jumper J3 is not installed on the mother board default configuration Send data This dialog box is used to send text files to an external...

Page 78: ...k in hexadecimal format The values are not described here Refer to List of events and alarms on page 109 Example of one measurement CH1 697 176 mbar 20 1 C 0 982 bar C00 2 If the option Mode expert is...

Page 79: ...mm 15 02 18 15 20 Operator jp Operator ID 3 Calibration coefficient 18 23 mV bar Ratio with ideal membrane 107 22 Ratio with last calibration 106 32 Stability 0 337 Calibration value 965 000000 Gas un...

Page 80: ...0 000 2261 3 2 17 21 14 57 75 044 20 1 400 26 041 1 005 0 000 2256 4 2 17 21 14 47 75 047 20 1 400 26 038 1 005 0 000 2251 5 2 17 21 14 37 75 050 20 1 400 26 054 1 005 0 000 2246 Configuration report...

Page 81: ...onfigure 3 Configure the parameters Baud rate Parity Nb of stop bits Byte size Menu File Properties Configure Use the same parameters for the instrument and the PC 4 Configure the Font Courier 10 Menu...

Page 82: ...whatever the number of channels configured for the instrument 1 Install the PROFIBUS DP module and the jumper J3 on the main board location highlighted in the illustration below 2 Select the menu Con...

Page 83: ...use Name Type Size Offset Barometric pressure Input float 32 bits 0 Barometric pressure unit Input byte 8 bits 4 Channel 1 gas concentration Input float 32 bits 5 Channel 1 gas unit Input byte 8 bits...

Page 84: ...value not updated 0x80000000 bit mask Gas unit Value Temperature unit Value Barometric pressure unit Value bar 0 K 0 bar 0 mbar 1 C 1 mbar 1 Pa 2 F 2 psia 2 kPa 3 atm 3 hPa 4 Pa 4 psia 5 kPa 5 atm 6 h...

Page 85: ...Size Offset Channel 1 Offset Channel 2 Offset Channel 3 Input command toggle ICT Input byte 8 bits 28 51 74 Input command status ICS Input byte 8 bits 29 52 75 Input command data byte 1 ICD1 Input byt...

Page 86: ...lect the export option to export data from the instrument to the storage device This will export all stored data measurements calibrations product list access table etc For both import and export opti...

Page 87: ...displayed as illustrated left The changes must be confirmed after which the instrument must be powered down and powered up again for the changes to take effect Note The IP Diagnostics button at the bo...

Page 88: ...ination has been entered the initial web page will be displayed giving a list of options Click on any of these options and the data will be displayed on the PC screen The following shows an example of...

Page 89: ...ion reports are required Choose to print the last report or all reports for the selected channel s User actions Define the date and time criteria for which user action logs are required Configuration...

Page 90: ...ation option if cyclic measurements are required Error message Meaning Printer not available Indicates that no printer has been detected Check that the printer is connected to the USB A port and is po...

Page 91: ...90 Communication Menu...

Page 92: ...tributed to his ID by the Manager Refer to Security level table on page 16 At startup all menus are locked and a valid ID and password combination is required to get access beyond the standard measure...

Page 93: ...r all user actions log file Confirm to clear the log file This functionality is aimed at clearing demo or test logs for example The log file is a rolling buffer recording the past 100 actions User man...

Page 94: ...93 Section 12 Products Menu Figure 44 Products menu...

Page 95: ...output on page 84 for details Select the product 0 99 to be analyzed or use the Next and Previous buttons to scroll sequentially through the existing product list Alternatively use the Search facility...

Page 96: ...o re enter all the parameters when using the instrument for a different application Save Define the index 1 9 to save the current configuration Use the Next and Previous buttons to scroll sequentially...

Page 97: ...96 Global Configuration Menu...

Page 98: ...97 Section 14 Services menu Figure 46 Services menu Part 1...

Page 99: ...98 Services menu Figure 47 Services menu Part 2...

Page 100: ...isplays measurement information with a status OK or NOK alongside A status of NOK indicates the value is outside of the acceptable minimum or maximum value To view the acceptable range limits press th...

Page 101: ...n finished Note This can also be called through the brightness icon on the main display Buzzer Adjust the sounds available on the instrument When screen tap is enabled a click sound is heard each time...

Page 102: ...he battery level becomes too low and needs to be replaced Software download For Hach technician use only Used when reloading the software for new versions This ends the application User must stop and...

Page 103: ...102 Services menu...

Page 104: ...se 15 2 1 Equipment required 15 2 2 Sensor spot removal CAUTION Personal Injury Hazard Any instrument maintenance should be carried out by a qualified Hach Service Technician Please contact your local...

Page 105: ...ratching or damaging the sensor spot the black surface on the sensor head during this process 1 Push the maintenance tool square sides upmost as far down as possible over the new sensor spot Continue...

Page 106: ...iginal values replace the membrane 15 3 3 Membrane replacement To remove the membrane follow the steps below 1 Place the thermal conductivity sensor vertical with the head up Remove the plastic storag...

Page 107: ...te Distinguish the membrane from the protection paper Membrane is transparent translucent Protection paper is opaque 4 Place the membrane holding ring on installation tool tip 5 Insert the installatio...

Page 108: ...e grille during the tightening process 9 Always store the sensor in a dry environment with the storage cap installed Note A sensor that has been taken apart or serviced must always be calibrated Allow...

Page 109: ...l situation There are three levels of abnormal conditions Note Use the Diagnostic view for troubleshooting Refer to Sensor diagnostics on page 99 Note If the RTC battery is running low the date and ti...

Page 110: ...is above Alarm HighHigh limit 0x00000080 Calibration required The calibration of the sensor is required 0x00000100 Service required The sensor requires a service 0x00000200 Hold The measurement is fr...

Page 111: ...ould be stored in suitable premises free of dust condensation and chemical evaporation In cold weather avoid sudden temperature change like when entering a warm room and give the instrument enough tim...

Page 112: ...3263 IP65 sealing kit for 410 and 510 panel instruments LQV161 52 20000 Thermal printer USB for 410 51x controller EU LQV161 53 20000 Thermal printer USB for 410 51x controller USA LQV161 66 20000 The...

Page 113: ...et 28x2 and 32x2mm 32605 Safety Purge Backup Unit for TC sensors 32557 External temperature sensor for in line use supplied with 4 pin LEMO connector for TC sensors equipped with sensor adapter 32558...

Page 114: ...tion cap Includes membranes 29561A membrane holding ring 29228 01 kit 29082 for protection cap and tools for sensor maintenance 32760 Maintenance kit for carbon dioxide nitrogen TC sensors with protec...

Page 115: ...eel 316 with 8 mm fittings Supplied with EPDM O rings 32002 010 Multi parameter flow chamber in stainless steel with 6 mm fittings Supplied with EPDM O rings 32002 011 Multi parameter flow chamber in...

Page 116: ...ascal kilo Pascal ppb parts per billion by weight ppm parts per million by weight same as mg kg ppm Vb parts per million per volume barometric pressure referenced Vbar 10 000 ppm Ve parts per million...

Page 117: ...x 20 000 bps A converter is required to interface RS 232 with RS 422 or RS 485 RS 422 RS 422 is intended for point to point communications It provides much longer transmission distance but less signal...

Page 118: ...ders hach com www hach com HACH LANGE GMBH Willst tterstra e 11 D 40549 D sseldorf Germany Tel 49 0 2 11 52 88 320 Fax 49 0 2 11 52 88 210 info de hach com www de hach com HACH LANGE S rl 6 route de C...

Reviews: