background image

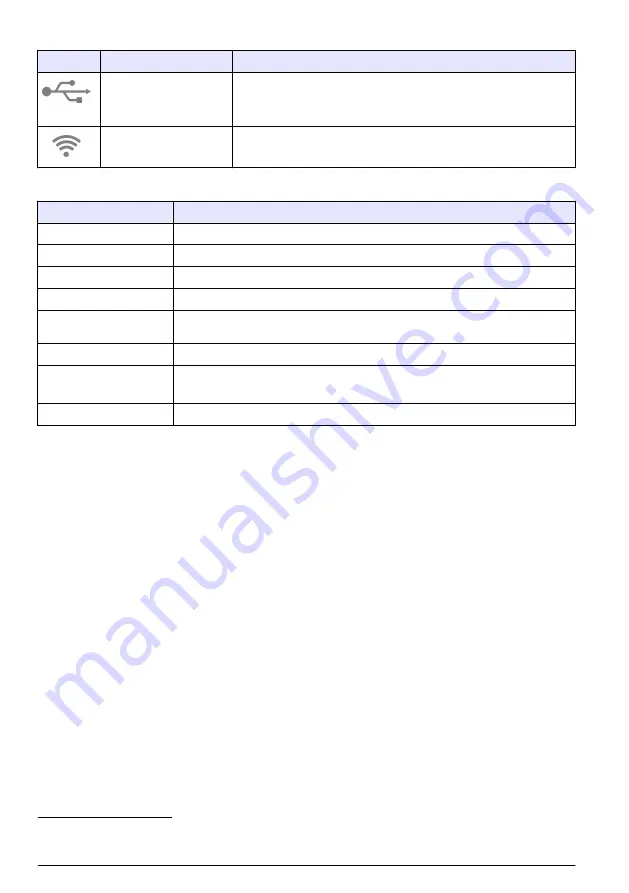
Table 5  Icon descriptions (continued)

Icon

Description

Status

USB connection

Off: no USB flash drive connected
Blue on: USB flash drive connected
Flashes blue: data transmission

WiFi connection

Off: no WiFi connection
Blue on: Controller connected to a WiFi access point.

Table 6  Sensor Status LED descriptions

LED status

Description

Blue on

The sensor is in operation with no warnings, errors or reminders.

Flashes blue

Sensor connection to cloud in progress.

Amber on

The sensor is in operation with active warnings or reminders.

Flashes amber (1-channel) The outputs of the channel are on hold.

Flashes amber (2-channel) The channels of the two sensors are on hold or no sensors are connected on the

two channels.

Red on

The measurement value is not correct because of sensor error.

Flashes red

Sensor connection issue

11

The sensor type is not supported by the cloud.

Off

No connected sensor (if the sensor on the other channel is connected)

Startup

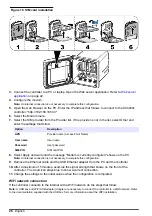
Connect the power cord to an electrical outlet with protective earth ground or set the circuit breaker
for the controller to on.

Web server application

The controller has a web server application that gives access to configuration and diagnostic
features. Connect the controller to a PC or laptop to operate with the web server application.

Note: If the supplied SIM card is used with purchased data plans, access to the web server application is not
necessary.

Connect the controller to a PC or laptop

Connect the controller to a PC or laptop with a Microsoft Windows operating system.

Note: Make sure that the PC or laptop is not connected to a LAN.

Items to collect:

• PC or laptop
• USB Ethernet adapter
• RJ45 Ethernet cable

1.

Connect the Ethernet cable to the PC. Refer to 

Figure 14

.

2.

Connect the other end of the Ethernet cable to the USB Ethernet adapter.

3.

Connect the USB Ethernet adapter to the USB port on the controller.

11

Make sure that only two sensors are installed in the controller. Refer to 

Troubleshooting

on page 29.

22


English

Summary of Contents for SC4200c

Page 1: ...DOC343 52 90586 SC4200c 06 2019 Edition 7 User Manual...

Page 2: ......

Page 3: ...er connections 14 Open the controller cover 14 Remove the high voltage barrier 14 Wiring for power 15 Connect conduit or a power cord 16 Connect the high voltage relays 17 Install an expansion module...

Page 4: ...Cleaning the controller 29 Troubleshooting 29 LED status 29 Connection problems 30 Replacement parts and accessories 30 Table of Contents 2...

Page 5: ...each analog output module1 Analog input 0 20 mA or 4 20 mA on each analog input module Digital communication Profibus DPV1 card1 optional Modbus TCP IP Network connection2 LAN version Two Ethernet co...

Page 6: ...tially or imminently hazardous situation which if not avoided could result in death or serious injury C A U T I O N Indicates a potentially hazardous situation that may result in minor or moderate inj...

Page 7: ...ansmitters N O T I C E This is a Class A product intended for use in an industrial environment In a domestic environment this product may cause radio interference in which case the user may be require...

Page 8: ...si le brouillage est susceptible d en compromettre le fonctionnement United States FCC Contains RF Module FCC ID RI7LE910NAV2 or FCC ID RI7LE910SVV2 Modifications not expressly approved by this compan...

Page 9: ...2 channel controller for digital sensors Refer to Figure 1 The controller is configured and operated with a Mobile sensor management MSM software The MSM software is accessible through a web applicati...

Page 10: ...r 3 SIM card4 8 Electrical connections and fittings 4 Expansion module5 9 Cover for module installation 5 Additional expansion module slots 10 High voltage barrier 4 Dependent on controller configurat...

Page 11: ...ation gasket for pipe mount 11 Pan head screws M5 x 0 8 x 15 mm 4x 5 Vibration isolation washer for pipe mount 4x 12 Pan head screws M5 x 0 8 x 100 mm 4x 7 6 Bracket for wall and pipe mounting 6 13 Sc...

Page 12: ...0 m 6562 ft maximum Use of this instrument at an altitude higher than 2000 m can slightly increase the potential for the electrical insulation to break down which can result in an electric shock hazar...

Page 13: ...ttach the controller upright to a pole or pipe horizontal or vertical Make sure that the pipe diameter is 19 to 65 mm 0 75 to 2 5 in Refer to the illustrated steps in Figure 4 and Product components o...

Page 14: ...re to use the template in the up position to install the controller vertical Refer to Figure 5 Note If using the bracket optional for panel mounting push the controller through the hole in the panel a...

Page 15: ...re 6 Electrical connectors and fittings 1 Strain relief fitting for relay 5 Digital SC connector Sensor 1 Channel 1 2 Strain relief fitting for modules 6 Digital SC connector Sensor 2 Channel 2 3 Ethe...

Page 16: ...ds Only qualified personnel must conduct the tasks described in this section of the document D A N G E R Electrocution hazard Always remove power to the instrument before making electrical connections...

Page 17: ...disconnect all the electrical current carrying conductors Mains connection must keep supply polarity The separable plug is the disconnect means for cord connected equipment W A R N I N G Electrical s...

Page 18: ...pin type terminal on the end A power cable with a three prong plug with ground connection that is applicable to the supply connection Connected through a cable gland strain relief that holds the powe...

Page 19: ...otective earth ground Green Green with yellow stripe Connect the high voltage relays D A N G E R Electrocution hazard Always remove power to the instrument before making electrical connections W A R N...

Page 20: ...solated from each other and the low voltage input output circuitry The relay terminals accept 0 75 to 2 5 mm2 18 to 12 AWG wire as determined by load application Use wire with an insulation rating of...

Page 21: ...IP Modbus TCP IP is a standard for industrial communications The Modbus TCP IP protocol connects computers to measurement and control systems that use the TCP IP protocol for data transmission This t...

Page 22: ...controller cover Tighten the cover screws with a maximum torque of 1 4 Nm 12 4 in lb Refer to Figure 7 on page 14 Connect a digital sc sensor W A R N I N G Explosion hazard This manual is only for in...

Page 23: ...e front panel has icons at the top that shows the controller condition Refer to Table 5 The sensor status LED shows the condition of each sensor Refer to Table 6 Refer to Troubleshooting on page 29 to...

Page 24: ...e sensor on the other channel is connected Startup Connect the power cord to an electrical outlet with protective earth ground or set the circuit breaker for the controller to on Web server applicatio...

Page 25: ...Connection then select Properties 3 Highlight Internet Protocol Version 4 TCP IPv4 then select Properties 4 Select Use the following IP address Enter the settings that follow Option Description IP add...

Page 26: ...dition Versions Shows the software version of the controller Logs and History Shows the historical data i e configuration and log events of the controller Restart Sets the controller to off and on aga...

Page 27: ...default gateway 7 Select Network connection sharing to share the internet connection of the instrument with other controllers Note When this setting is selected the two ports are switched together and...

Page 28: ...IN SIM card PIN 8 Select Apply and wait until the message Modem is currently configured shows on the PC Note An internet connection is not necessary to complete this configuration 9 Remove the Etherne...

Page 29: ...Diagnostic data of the controller Use the USB connection to download data from the controller As an alternative the data download procedure is also available through the user interface on the MSM sof...

Page 30: ...s removed close the slot cover and tighten the cover screws Tighten the cover screws with a maximum torque of 1 4 Nm 12 4 in lb Figure 17 USB flash drive connection Set the SC sensors on hold Use the...

Page 31: ...MSM and to the sensor user manual There is a communication failure between the sensor and the controller Examine the sensor and the sensor cable for damage If damage is found contact technical support...

Page 32: ...ontroller to on again Contact technical support if the LED stays red again The cloud connection LED stays off Sometimes the LED flashes blue for a short time No access to internet Cellular internet ac...

Page 33: ...9 00037 Mounting hardware with Sunroof LXZ524 99 00036 USB cover and screws SC4200c LXZ524 99 00032 Module holder SC4200c LXZ524 99 00017 Main board cover and wiring labels SC4200c LXZ524 99 00019 Set...

Page 34: ...32 English...

Page 35: ......

Page 36: ...669 2932 orders hach com www hach com HACH LANGE GMBH Willst tterstra e 11 D 40549 D sseldorf Germany Tel 49 0 2 11 52 88 320 Fax 49 0 2 11 52 88 210 info de hach com www de hach com HACH LANGE S rl 6...

Reviews: