background image

Page 26


Measurements Triggered by Liquid Levels or Flow

8544operations.fm

Section 4

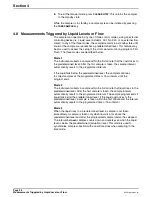
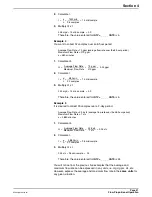
5.

To exit the manual mode, press 

CLEAR ENTRY

. This returns the sampler 

to the standby state.

While the sampler is in standby, a sample cycle can be initiated by pressing 
the 

TAKE SAMPLE

 key.

4.8 Measurements Triggered by Liquid Levels or Flow

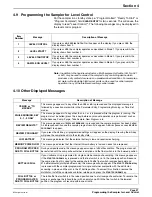
The sampler can operate in any one of three control modes, using an external 
controlling device (i.e. Liquid Level Actuator, Cat. No. 943, or an external flow 
meter). In any of the three modes, the sampler remains in a standby state until 
liquid at the sample source reaches a predetermined level. This feature may 
be also used to access the setup of the storm water monitoring program, First 
Flush. The three modes are described below:

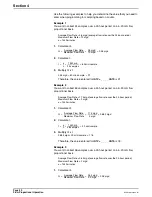
Mode 1

The instrument collects a sample within the first minute that the liquid rises to 
the predetermined level. After the first sample is taken, the sample interval 
automatically resets to the programmed interval. 

If the liquid falls below the predetermined level, the sampler continues 
to collect samples at the programmed time or flow interval, until the 
program ends.

Mode 2

The instrument collects a sample within the first minute that liquid rises to the 
predetermined level. After the first sample is taken, the sample interval 
automatically resets to the programmed interval. The sample program ends if 
liquid falls below the predetermined level. If the liquid again rises to the 
predetermined level, a sample is taken within the first minute and the interval 
automatically resets to the programmed time or flow interval.

Mode 3

When the liquid rises to a predetermined level, a sample is not taken 
immediately. A sample is taken only when liquid is at or above the 
predetermined level and after the programmed sample interval has elapsed. 
The interval between samples counts down and resets even when the liquid 
level is below the predetermined (actuation) level. This mode is used to 
synchronize sample collection with a real-time clock when sampling in the 
time mode.

Summary of Contents for SIGMA 900

Page 1: ...Catalog Number 8544 Sigma 900 Composite Sampler INSTRUMENT MANUAL Hach Company 2003 All rights reserved Printed in the U S A eac 07 03 2ed...

Page 2: ...Visit http www hach com...

Page 3: ...ng the Intake Line 14 3 4 1 Vinyl Intake Tubing 14 3 4 2 Teflon Lined Polyethylene Intake Line 14 3 5 Setting Up the Intake Line and Strainer 15 3 6 Choosing Bottles 15 3 7 Installing the Full Bottle...

Page 4: ...34 5 8 Internal Desiccant Module 35 5 9 Circuit Board Identification 35 5 10 Motor Gear Box 36 5 11 Internal Case Humidity Indicator 36 5 12 Internal Case Humidity Indicator 36 5 13 Memory Battery 36...

Page 5: ...on membrane switch keypad with 18 character alphanumeric liquid crystal display Self prompting menu driven program Internal Clock Indicated real time and date 0 007 time base accuracy Programmable Del...

Page 6: ...Visit http www hach com...

Page 7: ...es a high speed peristaltic pump for collection of the sample liquid The pump body is constructed of impact and corrosion resistant plastic Tubing is held firmly in place by the pump body haves no cla...

Page 8: ...gram settings 2 3 2 Humidity Indicator The internal case humidity indicator Cat No 2660 turns pink when the internal case humidity exceeds 60 percent The sampler is equipped with an internal desiccant...

Page 9: ...ts Failure to do so could result in serious injury to the operator or damage to the equipment To ensure the protection provided by this equipment is not impaired do not use or install this equipment i...

Page 10: ...cations must be per the manufacturer s control drawing specifications Any modification to the instrumentation or the installation is not recommended and may result in life threatening injury and or da...

Page 11: ...Electrical Code speziell gepr ft und zugelassen Dies gilt jedoch keineswegs f r das gesamte Hach Produktangebot Die Entscheidung ob ein Produkt f r den Einsatz in explosionsgef hrden Bereichen geeigne...

Page 12: ...or fibers Toxic materials which upon contact or inhalation could result in injury impairment of health or death Confined spaces are not designed for human occupancy They have restricted entry and con...

Page 13: ...50 C 32 to 120 F Follow the guidelines below and Figure 3 to allow complete drainage of the intake line and prevent cross contamination between samples Install the sampler as close to the source as si...

Page 14: ...n to the stainless steel fitting connector end that points away from the pump control housing 3 4 2 Teflon Lined Polyethylene Intake Line The Connection Kit for Teflon lined Tubing Cat No 2186 contain...

Page 15: ...could freeze and plug the line Place the sample intake and strainer in the mainstream of the sampling source in an area of turbulent and well mixed flow Also take in account the vertical location of t...

Page 16: ...y and nickel cadmium Ni Cad battery Cat No 1416 The 120 V ac to 12 V dc power converter Cat No 1440 includes a built in lead acid battery charger The Power Converter Cat No 1443 contains a charger for...

Page 17: ...y interface connector is a general purpose input output port Each signal is described in Table 2 Table 1 12 V dc Connector Pin Assignments Pin Signal Description A ground B 12 to 17 V dc unregulated T...

Page 18: ...ace unit is available Cat No 2021 which converts a 4 20 mA flow meter output into a 12 V dc pulses At 20 mA 100 flow rate the interface sends ten pulses per minute at 4 mA 0 flow rate the interface se...

Page 19: ...Interface This splitter interface Cat No 939 can be used if access to more than one of the Auxiliary Receptacle functions is required simultaneously Connecting the interface to the 6 pin connector on...

Page 20: ...Visit http www hach com...

Page 21: ...iew of the program CHANGE HALT Stops sampler program and places in standby state When started press this key prior to making any program change and before pressing keys 4 5 6 7 8 9 and NEW PROGRAM RES...

Page 22: ...ete or Ready to Start The program status changes to Program Complete when sampling is complete and there are no samples to be taken or the optional full bottle shut off is actuated When the program is...

Page 23: ...7 After the correct year has been entered the display will read Synchronize Time enter at Time Pressing YES will start the clock The display will read Clock is Now Set 4 4 Bottle Setup Mode When prog...

Page 24: ...s To determine the appropriate number refer to the programming instructions for flow proportional operation in section 4 11 9 OTHER CHANGES Press NO to retain the previously entered program entries fo...

Page 25: ...art Program Halted or Program Complete 2 To operate the pump press either the PUMP or PURGE key This will cause Manual Mode Pump Purge Clear to appear on the display Pressing the PUMP key causes the p...

Page 26: ...terval automatically resets to the programmed interval If the liquid falls below the predetermined level the sampler continues to collect samples at the programmed time or flow interval until the prog...

Page 27: ...ted press the 2 key before any manual operations are performed such as Bottle Advance Pump Purge Take Sample New Program etc REVIEW RESULTS This message appears if DISPLAY FEEDBACK is pressed and the...

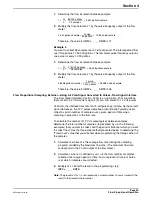
Page 28: ..._ _ CNTS during setup 1 Determine f where f represents the flow increment between samples and n represents the total number of samples to be collected 2 Multiply the flow increment between samples f b...

Page 29: ...les over a given period of time when sampling in proportion to the flow rate To calculate the number of 12 V dc output pulses between samples determine the total number of samples represented by n in...

Page 30: ...low proportional basis Average Flow Rate 1 75 mgd average flow rate over the 24 hour period Maximum Flow Rate 3 mgd a 1440 minutes 1 Calculate Q 2 Calculate t 3 Multiply Q x t Therefore the value ente...

Page 31: ...rate over the 48 hour period Maximum Flow Rate 1 cfs a 2 880 minutes 1 Calculate Q 2 Calculate t 3 Multiply Q x t Therefore the value entered for INTV _ _ _ _ CNTS is 24 You will notice from the prev...

Page 32: ...Visit http www hach com...

Page 33: ...L MODE soft key 5 1 4 No Lubrication Required The 900 Composite Sampler does not require routine lubrication Do not lubricate the pump tube with petroleum jelly silicone grease oil or any other lubric...

Page 34: ...g into the wrong connector can cause extensive damage Note The front panel gasket has a light coating of grease to help assure a watertight seal Do not contaminate the grease or gasket area with dirt...

Page 35: ...desiccant module is located under the CPU board Note The desiccant module cannot be recharged by heating Do not attempt to bake the desiccant module in an oven to remove the moisture as this could be...

Page 36: ...s power at all times If power is removed the data stored in the RAM chip is lost Therefore you cannot power the RAM chips from the 900 Composite Sampler power supply because you would lose data and pr...

Page 37: ...In the U S A call 1 800 635 1230 Outside the U S A and Europe send E mail to intl hach com Repair Service Authorization must be obtained from Hach Company before sending any items for repair Please c...

Page 38: ...Hvidovre Tel 45 0 36 77 29 11 Fax 45 0 36 77 49 11 info hach lange dk The Netherlands Dr Lange Nederland B V Laan an Westroijen 2a NL 4003 AZ Tiel Tel 31 0 3 44 63 11 30 Fax 31 0 3 44 63 11 50 info h...

Page 39: ...r improper application or installation Damage caused by any repair or attempted repair not authorized by Hach Company Any product not used in accordance with the instructions furnished by Hach Company...

Page 40: ...Visit us at www hach com...

Page 41: ...el 6 0 in long x 0 406 in OD 2071 Strainer All 316 Stainless Steel 7 94 in long x 1 0 in OD 2070 Strainer Stainless Steel 3 9 in long x 0 406 in OD 4652 Strainer Teflon Stainless Steel 5 5 in long x 0...

Page 42: ...Visit http www hach com...

Page 43: ...Set Hour Minute AM PM Month Day Year Timed Mode NO Flow Mode NO YES Set Time Interval Between Samples YES Other Changes YES Composite Mode YES NO Set up Complete Ready To Start Continuous Mode NO YES...

Page 44: ...Visit http www hach com...

Page 45: ...the electrical capacity that can be taken out of a battery decreases However excessive heat destroys batteries Avoid placing batteries near heat sources of any kind To maximize battery life operated...

Page 46: ...erature the self discharge rate of nickel cadmium batteries can be as high as 2 per day When charged cells have been stored for a long period of time or at an elevated temperature a change starts to t...

Page 47: ...rawings Appendix C Exploded View Drawings Exploded View 1 of 6 Item Number Description QTY Part Number 1 Pump Assembly 1 1075 2 Overlay 1 906 3 Pump Tube Insert 1 2441 4 Hex Nut 4 SE 403 5 Threadlock...

Page 48: ...engdraw fm Appendix C Exploded View 2 of 6 Item Number Description QTY Part Number 1 Latch 1 2279 2 Keypad Cable Assembly 1 8586 3 Screw 6 SE 340 4 CPU PCB Assembly 1 8921 5 900 Controller Cover 1 861...

Page 49: ...229 6 Threadlock 2 SE 957 21 Slow Blow Fuse 5A 250 V 1 8753 7 Ultrasonic Sensor Gasket 1 8609 22 O ring 1 3321 8 Retainer Plate 1 2548 23 Fuse Holder 5 x 20 mm 1 3320 9 Retainer Plate Gasket 1 2550 2...

Page 50: ...r Item Number Description QTY Part Number 1 5 Amp Fuse Label 1 8537 6 Hex Nut tighten to 16 in lb 17 SE 301 2 Overlay 1 8807 7 Distributor Cable Assembly 1 8539 3 Screw 1 SE 343 8 900 Controller Cover...

Page 51: ...nt Card Bracket 1 2594 4 Internal Power Cable Assy 1 8917 15 Humidity Indicator Card 1 2660 5 Connector Mounting Plate 1 2555 16 Retainer Plate Gasket 1 2557 6 Mounting Plate Gasket 1 2556 17 Retainer...

Page 52: ...1 2 Distributor J5 3 Auxiliary J6 4 Pin 2 J3 5 Power J2 6 Cable Assembly Fuse Holder 3146 7 Fuse Holder 5 x 20 mm 3320 8 Gearbox Assembly 8910 9 Motor Cable Assembly 8859 10 Keypad J9 1 2 3 4 5 6 7 8...

Reviews: