12
5.52.653.01.01.04
6
Installation
DANGER!
Assembly, disassembly and maintenance operations must only be carried out in an atmosphere not
prone to explosion!
The assembly and installation depends on the local environment. The hoist must be suspended in a way that
it can position itself freely.
6.1
Trolley
For assembly on a beam a travel limit must be placed at either end of the track.
This must be attached so that any elastic limitation buffer or the trolley wheels are driven against them in
their end position when moving.
Generally, additional lifting gear (e.g. fork lift, lifting platforms) will be required for the assembly. These must
take the weight of the devices securely.
6.2
Adjusting the gauge
The trolley can be adjusted to various beam flange widths. Adjustment to the rel
evant beam flange width “B”
depends on the type and size and is to be made as follows:
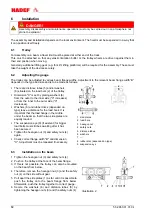
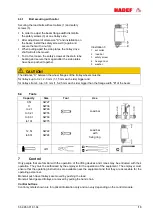
There are distance tubes (5) and/or washers
(6) situated on the load bars (2) of the trolley.
Dimension "X" is set by placing washers (6)
from the outer to the inner side ("X" increases)
or from the inner to the outer side ("X"
decreases).
Washers (6) and rubber discs (depended on
type) leave a distance for the load hook. It is
important that the load hangs in the middle
under the beam so that the two side plates are
equally loaded.
The suspension eye (9) (if existent) for bigger
load bolts must still be swivelling after it has
been secured.
Tighten the hexagon nut (3) and safety nuts (4)
again.
Check correct flange width "B" and dimension
"X". Adjustment must be repeated if necessary.
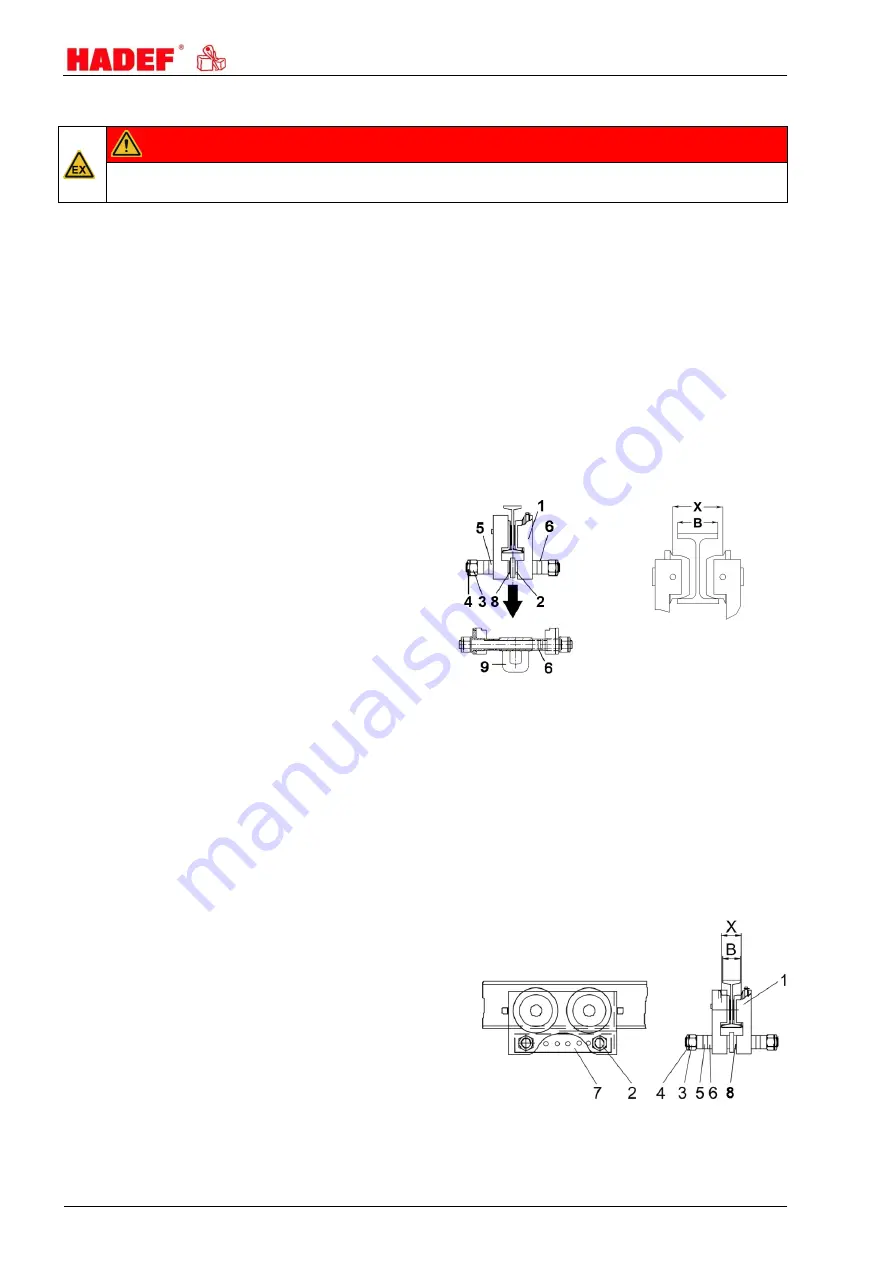
1 side plates
2 load bars
3 hexagon nut
4 safety nuts
5 distance tubes
6 washers
7 ---
8 rubber disc (depended on type)
9 suspension eye
6.3
Installation on the beam
1 Tighten the hexagon nut (3) and safety nuts (4).
2 Push on the trolley at the face of the beam flange.
3 If this is not possible, the trolley can also be mounted
on the beam from below.
4 Therefore, remove the hexagon nut (3) and the safety
nut (4) on the side without gear.
5 Pull apart the side plates (1) as far until it is possible to
push the trolley onto the beam flange from below.
Afterwards, push the trolley together to correct gauge.
6 Secure the washers (6) and distance tubes (5) by
tightening the hexagon nuts (3) and the safety nuts (4).
Illustration 2


