background image

DELAY FUNCTION

1.  First follow steps 1 through 5 above (Using your coffee machine).

2.    Press PROGRAM one time, the ON/OFF indicator light will 

illuminate to 

GREEN and will flash until you have set delay time.

3.   Set the delayed start time by pressing HOUR and MINUTE 

buttons until you reach delayed time desired. The 

AM/PM 

indicator light will appear for 

PM and disappear for AM.

4.   Next, press the DELAY BREW button, the ON/OFF indicator light 

will still be 

GREEN but will stop flashing.

5.   After a few seconds, the LED will display the current time.

6.   When the delayed brew time begins, the ON/OFF indicator light 

will illuminate to 

RED.

7.  You may see the delay brew time by pressing DELAY BREW.

8.  Cancel DELAY BREW by pressing ON/OFF.

9.   If you want to change the delay brew time, follow steps 2 through 

4 above.

10. The brewing process may be interrupted 2 ways;

a.   Pressing the ON/OFF button (must press again to continue brew)

b.    Pulling out the coffee pot (must return to warming plate within 

30 seconds)

11.  All other functions (PROGRAM, DELAY BREW, HOUR/MINUTES

are not available during the brewing process.

12.  Remove coffee pot to serve when finished brewing (about 1 

minutes after coffee stops dripping).

13.  If all coffee will not be served immediately, the coffee can be kept 

warm on the warming plate. The coffee maker will automatically 

shut off after 2 hours from when the 

ON/OFF button was 

pressed, if it hasn’t been manually turned off.

14.  Use caution while pouring coffee out of pot, as contents will be 

very hot!

15.  Always turn off the coffee maker and disconnect the power 

supply when not in use 

CLEANING & MAINTENANCE

CAUTION: Be sure to unplug this appliance before cleaning.  

To protect against electrical shock, do not immerse cord, plug or 

unit in water or liquid. After each use, always make sure plug is first 

removed from wall outlet. 

1.  Clean all detachable parts after each use in hot soapy water.

2.   Wipe the exterior surface of unit with a soft, damp cloth to 

remove stains.

3.   Water droplets may build up in the above area of the funnel 

and drip onto the product base during brewing. To control the 

dripping, wipe off the area with a clean, dry cloth after each use.

4.   Use a damp cloth to gently wipe the warming plate. Never use 

abrasive cleaner to clean it. 

5.  Replace all parts and keep for next use.

REMOVING MINERAL DEPOSITS

To keep your coffee maker operating efficiently, periodically you 

should clean away the mineral deposits left by the water according 

to the water quality in your area and the frequency of use.

1.   Fill the tank with water and descaler to the max level as 

indicated on water gauge (the mix of water and descaler is 

4:1, the detail refers to the instruction of descaler. Please use 

“household descaler”, you may also use the citric acid instead of 

the descaler (One hundred parts of water to three parts of citric acid). 

2.  Place the serving cup under the brew basket.

3.  Ensure the funnel is assembled in place.

4.    Switch on the appliance and “brew” the de-scaling solution.  

5.  After “brew” one-cup solution, switch off the appliance.    

6.  Leave the solution for 15 minutes and repeat step 3-5. 

7.   Switch on the appliance and run off the solution until the water 

tank is completely empty.

www.hadenusa.com

www.hadenusa.com

8

9

Summary of Contents for HC03001-US

Page 1: ...DRIP COFFEE MACHINE MODEL NUMBER HC03001 US INSTRUCTION MANUAL www hadenusa com ...

Page 2: ...Available Monday Friday 8am 4 30pm P T Email us service shadenusa com Write to us Team Haden Studio Designs 6027 Bandini Blvd Commerce CA 90040 Visit us www hadenusa com How Can We Help The Haden team is always interested in what you have to say so why not get in touch ...

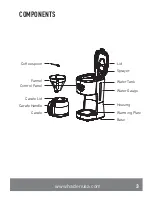
Page 3: ...Funnel Coffee spoon Lid Sprayer Water Tank Water Gauge Housing Warming Plate Base Control Panel Carafe Lid Carafe Handle Carafe COMPONENTS www hadenusa com 3 ...

Page 4: ...cord or plug or after the appliance malfunctions or has been damaged in any manner Return appliance to an authorized service facility for examination repair or adjustment 7 The use of accessory not recommended by the appliance manufacturer may result in fire electric shock or injury to persons 8 Do not use outdoors 9 Do not let cord hang over edge of table or counter or touch hot surface 10 Do not...

Page 5: ...done by authorized service personnel only 20 The container is designed for use with this appliance It must never be used on a range top 21 This appliance can be used by children aged from 8 years and above and persons with reduced physical sensory or mental capabilities or lack of experience and knowledge if they have been given supervision or instruction concerning use of the appliance in a safe ...

Page 6: ... filter Usually a cup of coffee needs a level spoon of coffee powder but you may adjust according to personal taste Close the top lid completely 4 Insert the carafe with handle closed onto warming plate horizontally 5 Plug the power cord into the outlet If you want to adjust the coffee strength you can press STRENGTH button once and then its corresponding indicator will illuminate in orange and th...

Page 7: ... be kept warm in the warming plate The appliance will shut off automatically after 2 hours from the ON OFF button being activated if it has not been manually disconnected at the completion of brewing For an optimum coffee taste serve it just after brewing 10 Always turn the coffee maker off and disconnect the power supply when not use Note Take care when pouring as the temperature of coffee when j...

Page 8: ...F 9 If you want to change the delay brew time follow steps 2 through 4 above 10 The brewing process may be interrupted 2 ways a Pressing the ON OFF button must press again to continue brew b Pulling out the coffee pot must return to warming plate within 30 seconds 11 All other functions PROGRAM DELAY BREW HOUR MINUTES are not available during the brewing process 12 Remove coffee pot to serve when ...

Page 9: ...use REMOVING MINERAL DEPOSITS To keep your coffee maker operating efficiently periodically you should clean away the mineral deposits left by the water according to the water quality in your area and the frequency of use 1 Fill the tank with water and descaler to the max level as indicated on water gauge the mix of water and descaler is 4 1 the detail refers to the instruction of descaler Please u...

Page 10: ... finely grind them just before brewing The Haden coffee grinder is available for this operation 4 Do not reuse coffee powder since this will greatly reduce the coffee flavor Reheating coffee is not recommended as coffee is at its peak flavor immediately after brewing 5 Clean the coffee maker when over extraction causes oiliness Small oil droplets on the surface of brewed black coffee are due to th...

Page 11: ...ing from accident alteration abuse or misuse This warranty extends only to the original consumer purchaser or gift recipient Keep the original sales receipt as proof of purchase is required to make a warranty claim This warranty is void if the product is used for other than single family household use or subjected to any voltage and waveform other than as specified on the rating label e g 120V 60 ...

Page 12: ......

Reviews: