English
Instructions for use
3
General description
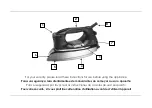
1-
Temperature dial - allows you to select the desired temperature for each garment.
2-
Handle
3-
Fabric guide
4-
Soleplate - glides easily across all types of fabric and prevents sticking.
5-
Button groove - for ironing around buttons.
6-
Cover shell
7-
Thermostat light - illuminates to indicate that the iron is heating and goes out when it has reached the temperature selected
on the temperature dial. The thermostat light cycles on and off during ironing as the iron maintains the selected temperature.
8-
Cord with swivel cord outlet - The swivel cord outlet is ideal for left or right hand use, and provides greater versatility and ease
of movement when ironing. The flexible grommet protects the cord from fraying.
Stable heel rest
- large heel rest keeps the iron stable on the ironing board.
Before using the iron for the first time
1-
Remove any sticker or protective foil from the soleplate.
2-
Let the iron heat up to maximum temperature and pass the iron over a piece of damp cloth for several minutes to remove
any residues from the soleplate.
How to use the iron
1-
Insert the plug into a 230/240 volt power outlet and turn the power on.
2-
Turn the temperature dial to the desired setting by aligning the setting on the dial with the temperature indicator. The
thermostat light will illuminate to indicate that the iron is heating to the selected temperature. When the thermostat light goes
out the iron is at the selected temperature and is ready to iron.
Summary of Contents for New Tailor 1.2
Page 27: ......


