background image

Português 


23 

7.2  

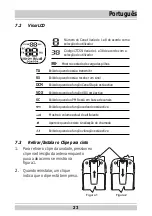
Visor LCD 


Número do Canal: Varia de 1 a 8 de acordo com a 
selecção do utilizador 


Código CTCSS: Varia de 1 a 38 de acordo com a 
selecção do utilizador 


Mostra o estado de carga das pilhas 


TX 

Exibido quando está a transmitir 


RX


Exibido quando está a receber um sinal


DCM


Exibido quando a função Canal Duplo está activa


VOX


Exibido quando a função VOX está activa 


SC


Exibido quando o PMR está em busca de canais 


Exibido quando a função cadeado está activa 


Mostra o volume actual do altifalante 


Aparece quando existe sinalização de chamada 


Exibido quando a função vibração está activa 


7.3 

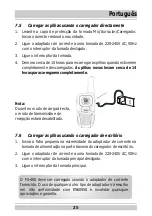
Retirar/Instalar o Clipe para cinto 

1.


Para retirar o clipe da unidade, pressione o 
clipe na direcção da antena enquanto 
puxa a aba como se mostra na 
figura1. 

2.


Quando reinstalar, um clique 
indica que o clipe está bem preso.


Figura 1 

Figura 2 

Summary of Contents for Xplorer FX-400

Page 1: ...EN User Manual P Manual de Utilização Model Xplorer FX 400 PMR 2 Way Rádio Emissor Receptor PMR ...

Page 2: ...publicadas sob reserva de modificações The CE Symbol indicates that the unit complies with the essential requirements of the R TTE directive O símbolo CE indica que esta unidade cumpre com os requisitos essenciais da Directiva R TTE For use Para uso em AT BE CH CY CZ DE DK EE GR E FI FR GB HU IRL I LT LU LV MT NL PL PT SE SK SI ...

Page 3: ...lation 6 7 5 Charging the batteries using direct charger 7 7 6 Charging the batteries using Desktop charger 7 7 7 Battery meter 8 7 8 Battery life 9 8 OPERATION 9 8 1 Transmitting range 9 8 2 Turning the Unit ON OFF 9 8 3 Adjusting the Speaker volume 10 8 4 Changing Channels 10 8 4 1 Setting the CTCSS sub channel 10 8 4 2 Setting the DCS advanced digital code 11 8 4 3 Transmitting sending a speech...

Page 4: ...N or OFF 14 8 13 Setting the Dual Watch Mode 15 9 AUXILIARY FEATURES 15 9 1 Key Lock 15 9 2 LCD Screen Back Light 16 9 3 Microphone Earphone Charge Jack 16 10 SPECIFICATIONS 16 11 CHANNEL FREQUENCY TABLE 16 12 WARRANTY 17 12 1 Warranty Period 17 12 2 Warranty Handling 17 12 3 Warranty Exclusions 17 13 CE CONFORMITY DECLARATION 18 ...

Page 5: ... pilhas usando o carregador directamente 25 7 6 Carregar as pilhas usando o carregador de escritório 25 7 7 Indicador de carga das pilhas 26 7 8 Vida útil das pilhas 27 8 OPERAÇÃO 27 8 1 Alcance de Transmissão 27 8 2 Ligar e Desligar o aparelho 27 8 3 Regular o volume do altifalante 28 8 4 Mudar de Canal 28 8 4 1 Configurar o sub canal CTCSS 28 8 4 2 Configurar o Código Digital avançado DCS 29 8 4...

Page 6: ...efinir o modo Canal Duplo 33 9 FUNÇÕES AUXILIARES 33 9 1 Bloqueio de Tecla 33 9 2 Iluminação do visor LCD 34 9 3 Microfone Auricular Tomada de Carga 34 10 ESPECIFICAÇÕES 34 11 TABELA DE FREQUÊNCIAS 34 12 GARANTIA 35 12 1 Período de Garantia 35 12 2 Modo de Funcionamento da Garantia 35 12 3 Excluído da Garantia 35 13 DECLARAÇÃO DE CONFORMIDADE 36 ...

Page 7: ...iing It can be used to keep in contact with your children when they are playing outside etc Restriction Check the local regulations before using it outside the country where it was purchased The standard may be prohibited in this country 3 SAFETY INSTRUCTIONS 3 1 General Please read carefully through the following information concerning safety and proper use Make yourself familiar with all functio...

Page 8: ...the communicator may be propelled with great force and cause serious injury to the occupants of the vehicle Keep the radio at least 15 centimetres away from a pacemaker Turn your radio OFF as soon as interference is taking place with medical equipment Do not replace batteries in a potentially explosive atmosphere Contact sparking may occur while installing or removing batteries and cause an explos...

Page 9: ...tes Does not touch the antenna while transmitting it could affect the range Remove the battery if the device is not going to be used for a long period 4 INCLUDED IN PACKAGE 2 x Xplorer FX 400 Units 2 x Desktop chargers pods 2 x Power adaptors 8 x AAA Rechargeable batteries 2 x Belt Clips User manual with service card 5 CLEANING AND MAINTENANCE To clean the unit wipe with a soft cloth dampened with...

Page 10: ...ormal household garbage 7 GETTING STARTED 7 1 Diagram and functions Antenna LCD Screen Displays the current channel selection and other radio symbols PTT PUSH toTALK button Press and hold to transmit CALL button Press to send ringing tone to other PMR units MENU Button Press to change to switch between modes Speaker PWR POWER Button Press and hold to turn the unit ON or OFF MIC Microphone Ear Mic ...

Page 11: ... when the VOX feature is enabled SC Displays when the PMR is scanning all channels Displayed when the Key Lock feature is activated Displays the current Speaker volume level Displays when the call signal is ON Displays when the vibrator function is activated 7 3 Removing Installing the Belt Clip 1 To remove the clip from the unit push the belt clip towards the antenna while pulling the clip tab as...

Page 12: ... Cover See Figure 4 Important Read these Safety Warnings before you charge the batteries When placing the FX 400 in the charger use only the rechargeable batteries supplied with the FX 400 Don t try to recharge non rechargeable batteries Make sure the battery compartment cover is securely locked in place when you are charging the batteries Dispose of used batteries safely and in a way that will no...

Page 13: ...e up to 14 hours to fully charge Note During PMR direct charging mode the unit transmit and receive mode is disabled 7 6 Charging the batteries using Desktop charger 1 Insert the small plug on the end of the mains adaptor into the Power in Connection Jack at the back of the desktop charger 2 Plug the mains adaptor into a 240V AC 50Hz main socket with the switch on the socket set to OFF 3 Switch ON...

Page 14: ...available When the battery level reaches it minimum level in PMR on mode unit will emit two beep tones and automatically the power will turn off The FX 400 can detect the battery charge in 4 levels Battery charge at high level Battery charge at medium level Battery charge at low level At this level Important Charge the unit for 10 14 hours Battery charge at very low level When the battery level re...

Page 15: ...o reduce radio frequency exposure when you are using your FX 400 hold the unit at least 5cm 2 inches away from your face Never use your FX 400 outdoors during a thunderstorm Don t use the FX 400 in the rain If your FX 400 ever gets wet turn it off and remove the battery Dry the battery compartment and leave the cover off for a few hours Don t use the unit until it is completely dry Keep the FX 400...

Page 16: ...ss the UP or DOWN button to select the desired channel The channel changes from 1 to 8 or vice versa c Press the PTT button to confirm the channel setting Note Refer to the Channel Table section of this Owner s Manual for detailed frequency listing 8 4 1 Setting the CTCSS sub channel Each channel also has 38 sub channels to let you set up group of users within the same channel for more private com...

Page 17: ...ou set the DCS code CTCSS will automatically set to off mode or vice versa Transmitting and Receiving The FX 400 transmission is one way at a time While you are speaking you can not receive a transmission The FX 400 is an open license band Always identity yourself when are transmitting on the same channel 8 4 3 Transmitting sending a speech The unit is continuously in the Receive mode when the uni...

Page 18: ... voice or other sounds around you The unit will transmit further for 2 seconds even if you stop talking The level of VOX sensitivity is shown by a number on the LCD Screen At the highest level the units will pick up softer noise including background noise at the lowest level it will pick up only quite loud noise a Press the MENU button 4 times VOX will be displayed and OF flashes on the LCD Screen...

Page 19: ...hes on the LCD screen Press the UP or DOWN button to begin scanning DCS code 1 83 e Press the PTT button to confirm your setting 8 7 Vibrator and Call alert Your FX 400 can alert you to incoming signal by emitting an audible call tone and vibration signal 8 8 Call Ring tone You can send a Call ring tone to other PMR users to give an alert that you want to communicate with them Press the CALL butto...

Page 20: ...vate the vibrator function 8 11 Setting the Roger Beep The Roger Beep is a tone which is automatically transmitted whenever the PTT button is released This alerts the receiving party to inform that you have intentionally ended the transmission and you are now in receive mode a Press the MENU button 10 times ON flashes on the LCD Screen b Press the UP or DOWN button ON will be displayed on the LCD ...

Page 21: ...nel it will stop and receive the signal a Press the MENU button 12 times DCM will be displayed while OF flashes on the LCD Screen b Press the UP or DOWN button to select the Dual Watch channel 1 8 except the current channel c Press the MENU button to change the CTCSS code d Press the UP or DOWN button to select the desired CTCSS code 1 38 e Press the MENU button to change the DCS code f Press the ...

Page 22: ...pt PTT and CALL button the LCD Screen back light will illuminate for 5 seconds 9 3 Microphone Earphone Charge Jack The FX 400 is equipped with an auxiliary microphone earphone and charge jack located at the opposite side of the PTT button 10 SPECIFICATIONS Channels Available 8 Channels CTCSS Sub channel 38 for each Channel DCS Sub channel 83 for each channel Output Power TX 0 5W Range Up to 8 Km 1...

Page 23: ...ults free of charge The service centre will at its discretion fulfil its warranty obligations by either repairing or exchanging the faulty units or parts of the faulty units In case of replacement colour and model can be different from the original purchased unit The initial purchase date shall determine the start of the warranty period The warranty period is not extended if the unit is exchanged ...

Page 24: ...ng standard EN301489 5 v1 3 1 2002 08 EN 301 489 1 v1 8 1 2008 04 EN300296 2 v1 2 1 2009 EN60950 1 2006 A11 2009 The product complies with the essentials requirements of the European Parliament and Council s directive R TTE 1995 5 EC on user s safety and electromagnetic interference transposed into national legislation by Decree Law No 192 2000 of 18 August and also meets the RoHS Directive 2002 9...

Page 25: ...ra manter contacto durante viagens entre 2 ou mais automóveis ciclismo actividades de ski Este pode ser utilizado para manter contacto com as crianças quando estão fora de casa a brincar etc Restrições Consulte as leis locais antes de utilizar este dispositivo fora do país aonde foi adquirido A norma pode estar proibida nesse país 3 INSTRUÇÕES DE SEGURANÇA 3 1 Geral Leia por favor atentamente toda...

Page 26: ...mofada é insuflada poderá ser projectado com extrema força e ocasionar lesões aos ocupantes do veículo Mantenha o PMR afastado pelo menos 15 centímetros de estimuladores cardíacos DESLIGUE o PMR se verificar que existe interferências com equipamentos médicos Não substitua pilhas em ambientes onde possam ocorrer explosões A formação de faíscas por contacto pode ocorrer quando colocar ou remover as ...

Page 27: ...ena durante transmissões isto poderá afectar o alcance da mesma Retire as pilhas se o dispositivo não for utilizado durante um longo período de tempo 4 CONTEÚDO DO PACOTE 2 x unidades PMR Xplorer FX 400 2 x Carregadores de secretária 2 x Carregadores directos 8 x Pilhas recarregáveis tipo AAA Manual de Instruções 5 MANUTENÇÃO E LIMPEZA Para limpar o aparelho utilize um pano macio humedecido em águ...

Page 28: ...doméstico 7 PRIMEIROS PASSOS 7 1 Diagrama e funções Botão PTT premir para falar premir e manter para falar Botão Power premir e manter para LIGAR DESLIGAR PMR Botões CIMA BAIXO premir para mudar canais volume e seleccionar configurações durante a programação Botão MENU premir para programar as configurações PMR Visor LCD Mostra o Canal actual e outros símbolos Botão CALL CHAMAR premir para enviar ...

Page 29: ...o está activa VOX Exibido quando a função VOX está activa SC Exibido quando o PMR está em busca de canais Exibido quando a função cadeado está activa Mostra o volume actual do altifalante Aparece quando existe sinalização de chamada Exibido quando a função vibração está activa 7 3 Retirar Instalar o Clipe para cinto 1 Para retirar o clipe da unidade pressione o clipe na direcção da antena enquanto...

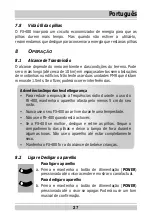
Page 30: ... Importante Leia estes Avisos de Segurança antes de recarregar as pilhas Ao colocar o FX 400 no carregador use apenas as pilhas recarregáveis fornecidas com o FX 400 Não tente recarregar pilhas não recarregáveis Certifique se que a tampa está bem presa quando está a recarregar as pilhas Elimine as pilhas usadas de forma segura e de uma forma que não prejudique o meio ambiente nunca tente queimá la...

Page 31: ...rem completamente Nota Durante o modo de carga directa o modo de transmissão e de recepção estará desabilitado 7 6 Carregar as pilhas usando o carregador de escritório 1 Insira a ficha pequena na extremidade do adaptador de corrente na tomada de alimentação na parte traseira do carregador de escritório 2 Ligue o adaptador de corrente a uma tomada de 220 240V AC 50Hz com o interruptor da tomada pri...

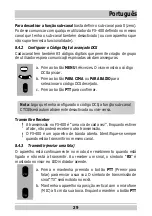
Page 32: ...cam a quantidade de carga disponível Quando o nível atinge o valor mínimo com o PMR ligado o aparelho emite um sinal sonoro de dois tons e desliga se automaticamente O FX 400 pode detectar a carga das pilhas até 4 níveis Pilhas totalmente carregadas Nível alto Pilhas com meia carga Nível médio Pilha com carga baixa Neste nível Importante Carregue a unidade cerca de 10 14 horas Pilhas totalmente de...

Page 33: ...egurança Para reduzir a exposição a frequências rádio durante o uso do FX 400 mantenha o aparelho afasta pelo menos 5 cm do seu rosto Nunca use o seu FX 400 ao ar livre durante uma tempestade Não use o FX 400 quando está a chover Se o FX 400 se molhar desligue e retire as pilhas Seque o compartimento das pilhas e deixe a tampa de fora durante algumas horas Não use o aparelho até estar completament...

Page 34: ...ar no visor b Prima o botão PARA CIMA ou PARA BAIXO para seleccionar o canal desejado O canal muda de 1 a 8 ou vice versa c Prima o botão PTT para confirmar Nota Consulte a secção Tabela de Canais deste manual para a lista de frequências detalhadas 8 4 1 Configurar o sub canal CTCSS Cada canal está subdividido em 38 sub canais permitindo configurar um grupo de utilizadores dentro do mesmo canal pa...

Page 35: ... confirmar Nota Logo que tenha configurado o código DCS a função sub canal CTCSS será automaticamente desactivada ou vice versa Transmitir e Receber A transmissão no FX 400 é uma via de cada vez Enquanto estiver a falar não poderá receber outra transmissão O FX 400 é um aparelho de banda aberta Identifique se sempre quando está a transmitir no mesmo canal 8 4 3 Transmitir enviar uma fala O aparelh...

Page 36: ...voz ou por outros sons ao seu redor O aparelho irá transmitir por mais 2 segundos mesmo que tenha deixado de falar O nível de sensibilidade VOX é representado no visor por um número No nível mais alto o aparelho irá captar ruídos mais suaves incluindo ruídos de fundo e no nível mais baixo somente os ruídos mais altos a Prima o botão MENU 4 vezes o símbolo VOX será exibido no visor com OF a piscar ...

Page 37: ...Prima o botão PARA CIMA ou PARA BAIXO para iniciar a pesquisa do código DCS 1 83 e Prima o botão PTT para confirmar 8 7 Função Vibração e Alerta de Chamada O seu FX 400 pode alertá lo para o sinal de entrada emitindo um sinal de chamada audível e sinal de vibração 8 8 Tom de Chamada Pode enviar um tom de chamada para outros utilizadores de PMR para que sejam avisados de que pretende falar comunica...

Page 38: ...MA ou PARA BAIXO para activar a função vibração 8 11 Definir Roger Bip O Roger Bip é um som que é transmitido automaticamente quando o botão PTT é libertado Isto alerta a parte que recebe a transmissão que terminou a sua transmissão e que agora se encontra em modo de recepção a Prima o botão MENU 10 vezes o símbolo ON começa a piscar b Prima o botão PARA CIMA ou PARA BAIXO ON indica que está activ...

Page 39: ...ão MENU 12 vezes o símbolo DCM irá acender e OF aparecerá a piscar b Prima o botão PARA CIMA ou PARA BAIXO para escolher o Segundo canal 1 8 diferente do canal actual c Prima o botão MENU para alterar o código CTCSS d Prima o botão PARA CIMA ou PARA BAIXO para escolher o código CTCSS pretendido 1 38 e Prima o botão MENU para alterar o código DCS f Prima o botão PTT para confirmar g Prima o botão P...

Page 40: ...ir um botão excepto os botões PTT e CALL a luz do visor acenderá durante 5 segundos 9 3 Microfone Auricular Tomada de Carga O FX 400 está equipado com uma tomada auxiliar para microfone auricular e carga localizada no lado oposto do botão PTT 10 ESPECIFICAÇÕES Canais disponíveis 8 Canais Sub Canais CTCSS 38 para cada canal Sub Canais DCS 83 para cada canal Potência de saída TX 0 5W Alcance Até 8 k...

Page 41: ...o seu próprio critério cumprirá com as obrigações de garantia reparando ou trocando as unidades defeituosas No caso de substituição a cor e modelo poderão ser diferentes da cor da unidade inicialmente adquirida A data inicial de compra determinará o início do período de garantia O período de garantia não será estendido no caso da unidade ser trocada ou reparada por HÆGER ou qualquer dos seus centr...

Page 42: ...m as seguintes normas EN301489 5 v1 3 1 2002 08 EN 301 489 1 v1 8 1 2008 04 EN300296 2 v1 2 1 2009 EN60950 1 2006 A11 2009 e satisfaz as exigências essenciais aplicáveis da Directiva R TTE 1995 5 CE do Parlamento Europeu e do Conselho de 9 de Março de 1999 transposta para a legislação nacional pelo Decreto Lei nº 192 2000 de 18 de Agosto e cumpre igualmente a Directiva RoHS 2002 95 CE O original d...

Page 43: ...__ ___ Otheres Outros ___________________________________________________________________ Vendor data Dados do estabelecimento vendedor Vendor Estabelecimento ___________________________________________________________________ Address Endereço ___________________________________________________________________ ___________________________________________________________________ Stamp Carimbo Este c...

Page 44: ......

Page 45: ......

Page 46: ...l do Arneiro Fax 351 21 949 8325 2660 456 São Julião do Tojal e mail suporte tec haeger pt Portugal http www haeger pt Any reprint of this documentation is prohibited without the prior express consent of HÆGERTEC Proibida a reprodução total ou parcial deste manual sem autorização expressa de HÆGERTEC ...

Reviews: