9
Fit sliding rear fence
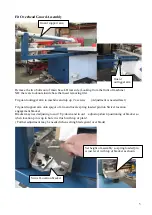
Swivel blade guard out of the way.
Remove the first nut of each of the 3 studs coming off the rear fence sliding rod
Leaving 2 thin locknuts locked together on 2 of the studs and 1 x thicker nut on the other with one
washer. Wind this nut all the way towards rod.
Insert the 3 studs into the 3 holes.
Carefully with assistance and concentrating on
the front 2 studs going into the cast mounting
brackets.
Fit a washer and nut on to each and screw nut on
until stud can be seen just coming out of each nut
Pushing the studs down onto the adjustment bolts
in the slots, tighten up these 2 nuts
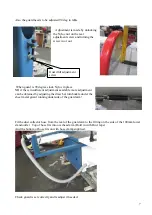
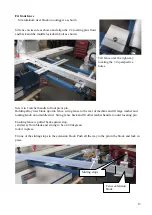
Carefully slide on the fence sliding casting
Note the position of lock lever. The pin may
have to be pushed in to slide lock clamp over
shaft
Slide the casting up to the main table
Fit the fence extrusion onto the sliding casting,
lock in place and then slide the fence assembly
up approximately 100mm off the aluminum
insert in the blade gap.
Measuring as shown by the 2 arrows
When fitting
sliding fence
casting to rod
Ensure lever is
in this position
as shown
This pin may
have to be
pushed down!
Rear fence sliding rod
Rear Fence
measurement tape
extrusion

