background image

13

OPERATION MANUAL

4. OPERATION & TEST RUN

Once the assembly is complete, test run your machine to make sure it runs properly and is ready 

for regular operation. The test run consists of checking the following: 


1) The motor powers up and runs in the correct direction 


2) the stop button safety feature works correctly.

If, during the test run, you cannot easily locate the source of an unusual noise or vibration, stop

using the machine immediately, then review Troubleshooting on Page 41.

4.1 TEST RUN THE MACHINE

1. Make sure you understand the safety instructions at the beginning of the manual and that the ma-

chine is set up properly.

2. Make sure all tools and objects used during setup are cleared away from the machine.

3. Connect the machine to the power source.

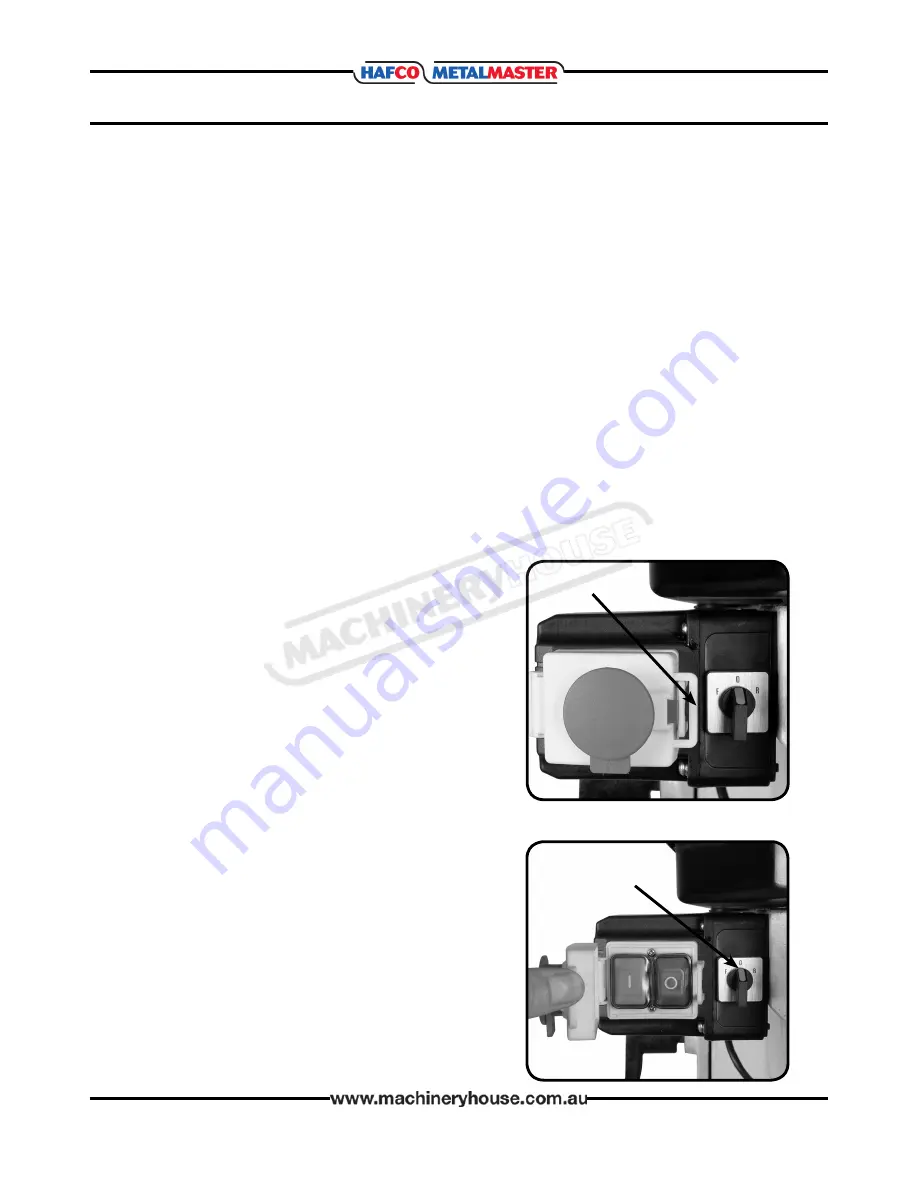
4. Push the EMERGENCY STOP button in, then press the release tab (see Fig.  7 ) so that the yellow 

door pops open. When the EMERGENCY STOP button yellow door pops open, the On/OFF switches 

are exposed. The machine is now ready for operation.

5. Verify that the machine is operating correctly

by switching the Forward/Reverse switch (Fig. 8) to the 

right to the forward position and press the green ON 

button. —When operating correctly, the machine will run 

smoothly with little or no vibration or rubbing noises. In-

vestigate any strange or unusual noises or vibrations before 

operating the machine further. Always turn the machine 

off, by pressing the red button that will close the yellow 

door and conceal the ON/OFF buttons. Then disconnect 

the machine from power and investigate or correct any 

potential problems.

 6. Press the large  red STOP button to stop the machine.

Allow the spindle to stop rotating before proceeding.

7. Repeat Step 5 with the Forward/Revers switch to the 

left to select reverse then press the green On button.  The 

spindle should now rotate in the opposite direction.

8. Press the large red EMERGENCY STOP button to stop 

the machine. Allow the spindle to stop rotating before 

proceeding.

9. With the yellow door closed and the ON/OFF button 

concealed, switch the forward reverse switch to the left 

and to the right.

 If the machine does not start, the EMERGENCY STOP 

button safety feature is working  correctly. The Test Run is 

complete

Release Tab 

Forward Reverse

Switch

Fig. 7

Fig. 8

Page 13

Instructions Manual for HM-32 (K012)

07/02/2018

Summary of Contents for HM-32

Page 1: ...MILL DRILL OPERATION MANUAL Edition No MD001 Date of Issue 01 17 Model HM 32 Page 1 Instructions Manual for HM 32 K012 07 02 2018 ...

Page 2: ... SERIAL NO DATE OF MANF Note This manual is only for your reference Owing to the continuous improvement of the machine changes may be made at any time without obligation or notice Please ensure the local voltage is the same as listed on the specification plate before operating this electric machine Distributed by www machineryhouse co nz MACHINE DETAILS Page 2 Instructions Manual for HM 32 K012 07...

Page 3: ...0 2 3 Lifting Instructions 11 3 SETUP 3 1 Mounting The Mill Drill On Optional Stand 11 3 2 Mounting To A Workbench 12 3 2 Leveling 12 4 OPERATION TEST RUN 4 1 Test Run The Machine 13 4 2 Changing Spindle Speeds 14 4 3 Basic Controls 15 5 MAINTAINANCE 5 1 Troubleshooting 16 5 2 Lubrication 17 5 3 Optional Accessories 18 APPENDIX A Electrical Circuit Diagram 19 Spare Parts 20 Risk Assessment Sheets ...

Page 4: ...d Tilting Head Front Back Fixed Drilling Capacity 31 5mm End Mill Capacity 22mm Face Mill Capacity 80mml Power Feed Longitudinal X Axis Optional Table T Slot 14mm Work Table Load Capacity 50kg Spindle Speeds Steps RPM 12 100 2150 Motor Power 1 5kW 2hp Motor Voltage 240Volts Overall Height 1100mm Weight 295kgs 1 1 SPECIFICATIONS 1 2 STANDARD EQUIPMENT Drill Chuck Arbour 3MT 2MT Drill Sleeve Face Cu...

Page 5: ...wnfeed Handwheel H Column I Quill Lock Lever J Longitudinal Handwheel K Cross Travel Lock L Longitudinal Travel Lock M Table Stop N Cross Travel Handwheel O Face Mill P Spindle Q Depth Stop R Table S Depth Scale T Headstock Elevation Crank Fig 2 A B C D E F G H I J K L M N O P R Q S T Fig 1 Fig 2 Page 5 Instructions Manual for HM 32 K012 07 02 2018 ...

Page 6: ...ll Drift 6 Hex Keys 7 3mt 2mt Drill Sleeve 8 Socket Spanner 9 Drill Chuck Arbour 5 6 7 8 9 1 1 5 ACCESSORIES 1 4 ELECTRICAL CONTROLS A1 A2 A3 A4 A5 A1 Emergency Stop A2 Emergency Stop Release A3 Forward Reverse Switch A4 Start Button A5 Stop Button Page 6 Instructions Manual for HM 32 K012 07 02 2018 ...

Page 7: ...he risk of eye injury or blindness from flying particles Everyday eyeglasses are not approved safety glasses WEARING PROPER APPAREL Do not wear clothing or jewelry that can become entangled in moving parts Always tie back or cover long hair Wear non slip footwear to avoid accidental slips HEARING PROTECTION Always wear hearing protection when operating or observ ing loud machinery Extended exposur...

Page 8: ...rs at a safe distance from the work area Stop using the machine if they become a distraction MAINTAIN POWER CORDS When disconnecting machines from power grab and pull the plug and not the cord Pulling the cord may damage the wires inside Do not handle cord plug with wet hands Avoid cord damage by keeping it away from heated surfaces high traffic areas harsh chemicals and wet damp locations MAINTAI...

Page 9: ...e new cutting tools with care Leading edges are very sharp and can cause lacerations SPINDLE SPEEDS Select the spindle speed that is appropriate for the type of work and material Allow the mill drill to gain full speed before beginning a cut POWER DISRUPTION In the event of a lo cal power outage during use of the mill turn OFF all switches to avoid possible sudden start up once power is restored S...

Page 10: ...aller Any extension cord used with this machine must be approved It is recommended that the machine be plugged directly into a power point It is recommended that the machine is anchored to the floor to prevent tipping or shifting It also reduces vibration that may occur during operation Use the holes in the bottom of the cabinets as guides for drilling holes in the floor and mount the stand The ma...

Page 11: ...cabinet it is recommend you consider the following options When mounting on the optional cabinet consider using Hafco M0015 machine mounts to make it easy for leveling and eliminates vibration Bolting the machine also to the floor prevents tipping or shifting and reduces vibration that may occur during operation resulting in a machine that runs slightly quieter and feels more solid If the machine ...

Page 12: ...stand or to an existing workbench it must be leveled If you mounted your machine to an existing workbench use a precision level and metal shims as needed under the machine base to make sure the machine table is level from side to side and from front to back If you mounted your machine to the cabinet use a precision level on the table and adjust the cabinet s leveling bolts to make sure the machine...

Page 13: ...itching the Forward Reverse switch Fig 8 to the right to the forward position and press the green ON button When operating correctly the machine will run smoothly with little or no vibration or rubbing noises In vestigate any strange or unusual noises or vibrations before operating the machine further Always turn the machine off by pressing the red button that will close the yellow door and concea...

Page 14: ...motor inward to move the rear pulley toward the spindle then re tighten the locking lever Fig 9 Fig 9 Motor Locking Lever 3 Open the belt cover then loosen the two idler cap screws Fig 10 that hold the idler pulley in place so it can move freely Fig 10 Idler Screws 4 With the center and rear pulleys loose move the V belts to the corresponding position for the desired speed see chart below Fig 11 5...

Page 15: ... in position and increases ridgidity Locking Knob Engages disengages the fine feed handwheel Quill Downfeed Levers Provide coarse control over vertical spindle travel Locking Knob Quill Downfeed Levers Knurled Knob Fine Downfeed Handwheel Quill Lock Longitudinal Travel Handwheels Control longi tudinal X Axis travel of the table Cross Travel Handwheel Controls cross Y Axis travel of the table Table...

Page 16: ...s closed Machine stalls or is over loaded 1 Feed rate too fast or cutting speed to slow 2 Wrong cutter type 3 Motor is overheated 4 Motor bearings are faulty 1 Adjust feed rate or cutting speed 2 Use the correct cutter for the job 3 Clean motor let cool and reduce workload 4 Test by rotating the shaft Replace bearings if faulty Machine has vibrations or noisy operation 1 Motor or machine component...

Page 17: ...ith a general purpose industrial and NLGI 2 grease E Table Leadscrews Lubricate once each week with several drops of Mobil Vactra 2 or equiva lent way oil F Ball Oilers Wipe the outer surface of the ball fitting with a clean cloth to remove contami nants Press the ball of the fitting with the tip of the oiler Press a few drops of Mobil Vactra 2 or equivalent way oil into the ball fitting then clea...

Page 18: ...g Kit This clamping kit includes 24 studs six step block pairs six T nuts six flange nuts four coupling nuts and six end hold downs The rack is slotted so it can be mounted ALIGN M230 Power Feed for Mill Drills If you want to get the most out of your mill drill you really need a power feed This power feed unit comes with everything required to start milling with exact control Comes sup plied with ...

Page 19: ...19 OPERATION MANUAL A ELECTRICAL DIAGRAM Page 19 Instructions Manual for HM 32 K012 07 02 2018 ...

Page 20: ...OW TO ORDER SPARE PARTS 1 Have your machines model number serial number date of manufacture on hand these can be found on the specification plate mounted on the machine 2 A scanned copy of your parts list diagram with required spare part s identified 3 Go to www machineryhouse com au contactus and fill out the enquiry form attaching a copy of scanned parts list CONTENTS B HeadBodyPartsList 21 C Ta...

Page 21: ...21 OPERATION MANUAL B HEAD BODY PARTS LIST Page 21 Instructions Manual for HM 32 K012 07 02 2018 ...

Page 22: ...ing ring 18 oil cup 56 handle body 94 retainging ring 19 bracket 57 turbine 95 feed worm 20 gear 58 key 96 feed inst support 21 shaft 59 gear shaft 97 bolt 22 worm 60 screw 98 screw 23 bolt 61 fixed collar thread 99 nameplate 24 washer 62 nut 100 scale 25 separating ring 63 washer 101 front cover board 26 screw 64 ball bearing 102 washer 27 wire californium 65 retaining 103 screw 28 warning board ...

Page 23: ...23 OPERATION MANUAL C TABLE COLUMN PARTS LIST Page 23 Instructions Manual for HM 32 K012 07 02 2018 ...

Page 24: ...Protect Board Slice 36 Slip Saddle 12 Protect Board 37 Steel Ball 13 Pin 38 Lock Handle 14 Left Diai Clutch 39 Stop Lump 15 Screw 40 Bolt 16 Pin 41 Screw 17 Oil Cup 42 Gib Srrip 18 Left Support 43 Gib Srrip Screw 19 Table 44 Gib Srrip 20 Ladder Shaped Nud 45 Screw 21 Stop Lump 46 Guide Screw Nut 22 Screw 47 Guide Screw 23 Rivew 48 Guide Screw Support 24 Zero Site Board 49 Guide Screw 25 Right Supp...

Page 25: ...e connecting 14 Use correct amperage extension cords Undersized extension cords overheat and lose power Replace extension cords if they become damaged 15 Keep machine well maintained Keep blades sharp and clean for best and safest performance Follow instructions when lubricating and changing accessories 16 Keep machine well guarded Make sure guards on machine are in place and are all working corre...

Page 26: ...ore use Replace any cutting tools immediately if dull chipped or cracked Handle new cutting tools with care Cutting edges are very sharp and can cause lacerations 10 Reversing the spindle Make sure the spindle has come to a complete stop before changing the direction of the spindle Do not slow or stop the spindle by using you hand 11 Stopping the spindle Do not slow or stop the spindle by using yo...

Page 27: ...ely stopped A HIGH Risk Control Strategies Recommended for Purchase Buyer User Isolate power to machine prior to any checks or maintenance Eliminate avoid loose clothing Long hair etc Isolate power to machine prior to any checks or maintenance Do not leave chuck key in chuck Make sure all guards are secured shut when machine is on MEDIUM LOW Wear hearing protection as required F STRIKING MEDIUM En...

Reviews: