background image

EN11

4.9. 

Filling the detergent

4.11. 

Rinse-aid usage

4.12. 

Filling the rinse-aid and

setting

4.10. 

Using combined detergents

Do not fill detergent into the detergent 

compartment more than required; 

otherwise you can see whitish streaks 

or bluish layers on glass and dishes and 

may cause glass corrosion. Continued 

use of too much detergent may cause 

machine damage.

Using little detergent can result in poor 

cleaning and you can see whitish

streaksin hard water. See the detergent 

manufacturer’s instructions for a further 

information

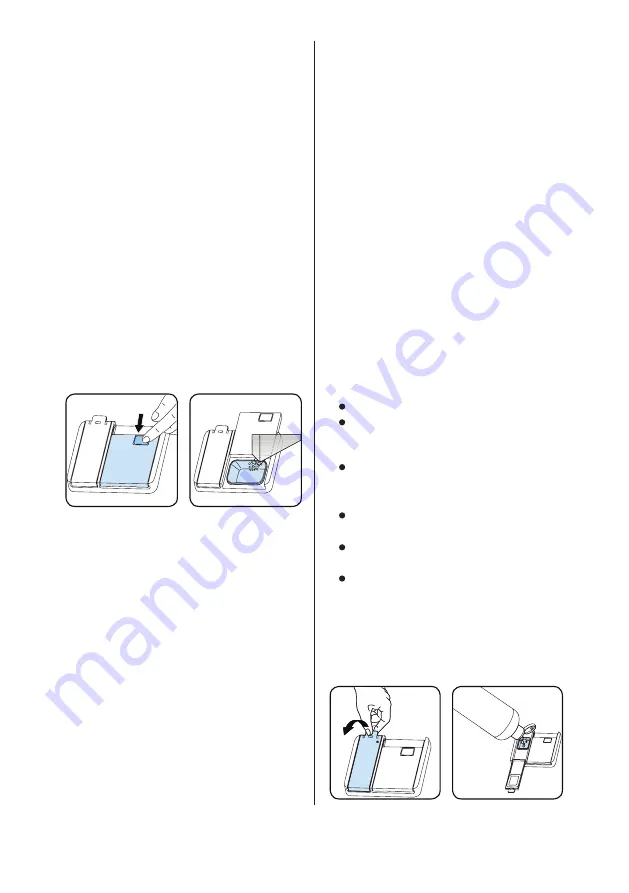
Push the latch to open the dispenser 

and pour in the detergent.

Close the lid and press it until it locks in 

place. The dispenser should be refilled 

just before the start of each programme. 

If the dishes are heavily soiled, place 

additional detergent in the pre-wash 

detergent chamber.

The rinse aid helps to dry the dishes 

without streaks and stains. Rinse-aid is 

required for stain-free utensils and clear 

glasses. The rinse aid is automatically re-

leased during the hot rinse phase. If rinse 

aid dosage setting set too low, whitish 

stains remains on dishes and dishes do 

not dry and washed clean. If rinse aid 

dosage setting set too height, you can 

see bluish layers on glass and dishes.

These products should be usedaccording 

to the manufacturer’s instructions.

Never put combined detergents into the 

interior section or the cutlery basket.

Combined detergents contain not only 

the detergent but also rinse-aid, salt 

replacement substances and additional

components depending on the

combination. We recommend you do 

not use combined detergents in short

programmes.

Please use powder detergents in such 

programmes.

If you encounter problems when using 

combined detergents, please contact 

the detergent manufacturer.

When you stop using combined detergents, 

make sure that water hardness and rinse 

aid settings are set to the correct level

Detergent

To fill the rinse aid compartment, open 

the rinse-aid compartment cap. Fill 

the

compartment with rinse aid to the 

MAX level and then close the cap. 

Be careful not to overfill the rinse aid 

compartment and wipe up any spills.

In order to change the rinse aid 

level, follow the below steps:


Open the door of the machine.


Turn on the machine, and touch 

the Programme button as soon as the 

machine is turned on.


Hold down the Programme 

button until “rA” disappears. Rinse aid 

setting follows water hardness setting.


The machine will display the last 

setting.


Change the level by touching 

the programme button.


Turn off the machine to save 

the setting. The factory rinse aid level 

setting is “4”.

If the dishes are not drying properly or 

are spotted, increase the level. If blue 

stains form on your dishes, decrease 

the level.

Summary of Contents for HDW-FI60D

Page 1: ...1 1 English User manual Product applied 533 23 320 Product name DISHWASHER FULLY BUILT IN HDW FI60D...

Page 2: ...of your appliance Please take the time to read this User Manual before using your appliance and keep this book for future reference Icon Type Meaning WARNING Serious injury or death risk RISK OF ELEC...

Page 3: ...4 3 Fill the salt 9 4 4 Test Strip 10 4 5 Water Hardness Table 10 4 6 Water Softener System 10 4 7 Setting 10 4 8 Detergent Usege 10 4 9 Filling the Detergent 11 4 10 Using Combined Detergents 11 4 11...

Page 4: ...nmentally friendly as they are recyclable Use of recycled material reduces raw material consumption and decreases waste production This appliance can be used by children aged from 8 years and above an...

Page 5: ...plate Ensure the machine does not stand on the electrical supply cable Never use an extension cord or a multiple socket connection The plug should be accessible after the machine is installed After i...

Page 6: ...left open It may cause accidents Place knives and other sharp objects in the cutlery basket in a blade down position For models with the automatic door opening system when th EnergySave option is act...

Page 7: ...iners for recycling Material unsuitable for domestic waste must be disposed of at recycling centres Contact a relevant recycling centre to obtain information about disposal of different materials Pack...

Page 8: ...Instead it shall be handed over to the applicable collection point for the recycling of electrical and electronic equipment By ensuring this product is disposed of correctly you will help prevent pote...

Page 9: ...tamination sand rust etc from indoor plumbing This will also help prevent yellowing and deposit formation after washing Note printing on the water inlet hose If models are marked with 25 C the water t...

Page 10: ...h the values in the Technical Specifications table The earthed plug of the machine must be connected to an earthed outlet supplied by suitable voltage and current In the absence of earthing installati...

Page 11: ...Upper basket track latch 11 Cutlery basket 12 Turbo Drying Unit This system en hances the drying performance of your dishes 13 Indoor lighting you can better place your dishes 3 2 Technical specificat...

Page 12: ...tem has to be refreshed so that it operates with the same performance also during the next wash For this purpose dishwasher salt is used Machine can only be used by special dishwasher salt to soften t...

Page 13: ...cool dry places out of reach of children Add the proper detergent for the selected program to ensure the best performance The amount of detergent needed depends on the cycle load size and soil level o...

Page 14: ...be usedaccording to the manufacturer s instructions Never put combined detergents into the interior section or the cutlery basket Combined detergents contain not only the detergent but also rinse aid...

Page 15: ...id not dispensed r1 is shown on the display 2 1 dose is dispensed r2 is shown on the display 3 2 doses are dispensed r3 is shown on the display 4 3 doses are dispensed r4 is shown on the display 5 4 d...

Page 16: ...ts into the dishwasher with the opening facing downwards otherwise water can collect on items If there is cutlery basket in machine you are recommended to use the cutlery grid in order to obtain the b...

Page 17: ...the racks horizontally Upper Basket Height adjustment Turn the Rail Stop Clips at the ends of the rails to the sides to open them as shown in the image below then pull out and remove the basket Change...

Page 18: ...Upper Cutlery Basket The upper cutlery basket is designed for the placement of large and small cutlery and utensils WARNING Knives and other sharp ob jects must be placed horizontally in the cutlery b...

Page 19: ...tive Basket Loads Lower Basket Top basket Incorrect loads Incorrect Loads Incorrect loading can cause poor washing and drying performance Please follow the manufacturer s recommendations for a good pe...

Page 20: ...e for normally soiled daily dishes with faster program P7 Dual Pro Wash 113 Suitable for both lightly soiled delicate glassware on upper rack and heavily soiled crockery on lower rack P8 Quick 30 30 S...

Page 21: ...o the how long the button is pressed and held for When the Delay Start touch button is pressed for a long period of time the counter will stop at h 00 Additional functions can also be selected 5 Energ...

Page 22: ...closing the door the newly selected programme will resume the course of the old programme NOTE Open the door slightly at first to stop a wash programme before it is complete in order to avoid water sp...

Page 23: ...machine thanks to Ion Technology Natural Ion Tech function is activated by pressing Half Load 6 touch button for 3 seconds Meanwhile display counts from 1 to 3 At the end of 3 seconds Ion will be disp...

Page 24: ...r foreign objects on the coarse and fine filters remove them and clean them thoroughly with water a Micro Filter b Coarse Filter c Metal Filter 8 CLEANING AND MAINTENANCE 1 2 a c b To remove and clean...

Page 25: ...ng Risk of cuts When cleaning the waste water pump ensure that you do not injure yourself on pieces of broken glass or pointed implements In this case 1 First always disconnect the appliance from the...

Page 26: ...the programme is finished Machine stops during washing Power failure Check mains power Water inlet failure Check water tap Shaking and hitting noises are heard during a wash operation The spray arm is...

Page 27: ...tion Rinse aid dosage set too low Increase rinse aid dosage setting Rust stains form on the dishes Stainless steel quality of the dishes is insufficient Use only dishwasher proof sets High level of sa...

Page 28: ...r input Close the tap and contact for service F2 Inability to discharge water Water discharge hose and filters may be clogged Cancel the program If the error continues contact for service F8 Heater er...

Page 29: ...omer Service for a period of at least 10 years from the date on which your appliance was placed on the market within the European Economic Area 1 When the machine isn t in operation Disconnect the plu...

Page 30: ...stical noise emissions dB A re 1 pW 44 Freestanding Built in Built in Energy consumption 241 kwh per year based on 280 standard cleaning cycles using cold water fill and the consumption of low power m...

Page 31: ...52253525 R35...

Page 32: ......

Page 33: ...1 1 Vi e tnamese M s n ph m p d ng 533 23 320 T n s n ph m M Y R A CH N M TO N PH N HDW FI60D...

Page 34: ...thi t b Vui l ng c k H ng d n S d ng tr c khi d ng thi t b v gi s ch h ng d n n y tham kh o trong t ng lai Bi u t ng Lo i c nh b o ngh a C NH B O Nguy c th ng t ch nghi m tr ng ho c t vong NGUY C I N...

Page 35: ...r a b t 9 4 3 mu i r a b t 9 4 4 Que Th N c 10 4 5 B ng o C ng C a N c 10 4 6 H Th ng L m M m N c 10 4 7 C i t 10 4 8 S d ng Ch t t y r a 10 4 9 Cho n c r a b t v o ng n ng 11 4 10 S d ng ch t t y r a...

Page 36: ...t li u ng g i u th n thi n v i m i tr ng nh l v t li u t i ch S d ng v t li u t i ch gi p gi m m c ti u th nguy n li u th v gi m thi u l ng r c th i Tr em t 8 tu i tr l n nh ng ng i b suy gi m ch c n...

Page 37: ...t n i i n ph i kh p v i c c gi tr tr n t m bi n m b o m y kh ng l n d y c p i n Kh ng s d ng c p i n n i d i ho c chia i n Ph ch c m n n t v tr d ti p c n sau khi l p t Sau khi l p t cho m y v n h nh...

Page 38: ...m Kh ng c a m y m C th g y tai n n X p dao v s c nh n v o gi ng d ng c v i ph n l i h ng xu ng ph a d i i v i c c m u c h th ng m c a t ng khi t y ch n Ti t ki m N ng l ng c k ch ho t c a s m khi k t...

Page 39: ...li u t i ch V t li u kh ng ph h p v i r c th i sinh ho t ph i c x l t i c c trung t m t i ch Li n h v i trung t m t i ch nh n th ng tin v vi c th i b c c lo i v t li u kh c nhau C c v t li u ng g i b...

Page 40: ...b cho bi t r ng kh ng th x l s n ph m nh r c th i sinh ho t th ng th ng S n ph m ph i c a n m t i m thu gom t i ch thi t b i n v i n t B ng c ch m b o s n ph m n y c ti u h y ng c ch b n s gi p ng n...

Page 41: ...h v y s tr nh hi n t ng v ng v ng c n trong m y sau khi r a Ch th ng s in tr n v i c p n c V i lo i c nh d u 25 C nhi t c a n c t i a c th l 25 C n c l nh i v i c c lo i ng kh c u ti n s d ng n c l nh...

Page 42: ...c u ch tu n th c c gi tr trong b ng Th ng s K thu t Ph ch c m ti p a c a m y ph i c k t n i v i c m ti p a c i n p v d ng i n ph h p N u kh ng c l p t h th ng ti p a th i n c y quy n ph i ti n h nh l...

Page 43: ...Ch t tr t gi tr n 11 Gi ng d ng c 12 H th ng l m kh t ng c ng H th ng n y gi p n ng cao hi u su t l m kh b t a 13 n gi p b n x p b t a v o m y d d ng h n 3 2 Th ng s k thu t Dung t ch 15 b b t a K ch...

Page 44: ...ong h th ng l m m m Do h th ng l m m m ph i c l m m i gi hi u su t ho t ng c ng nh cho nh ng l n r a ti p theo Mu i r a b t c ng c s d ng v i c ng m t m c ch Ch s d ng mu i r a b t chuy n d ng cho m y...

Page 45: ...cho m y r a b t gia d ng ch t t y r a n i kh r o m t m v ngo i t m v i c a tr em ch t t y r a th ch h p cho ch ng tr nh c ch n m b o hi u su t r a t t nh t L ng ch t t y r a c n thi t t y thu c v o ch...

Page 46: ...nh tr n th y tinh v b t a n c tr x m n p ng n ch a n c tr x v o ng n ch a t i v ch MAX v ng n p l i C n th n kh ng tr n n c tr x v lau s ch ph n b tr n thay i N c tr x h y l m theo c c b c sau M c a m...

Page 47: ...t y tr ng Ch s 1 Kh ng c n c tr x r1 hi n th tr n m n h nh 2 1 ph n l ng x r2 hi n th tr n m n h nh 3 2 ph n l ng x r3 hi n th tr n m n h nh 4 3 ph n l ng x r4 hi n th tr n m n h nh 5 4 ph n l ng x r...

Page 48: ...c v t d ng kh c t t t c c c nh c c ly v n i v o m y r a b t v i ph n mi ng h ng xu ng d i n u kh ng n c s ng v o trong c c v t d ng n y N u c gi ng d ng c trong m y b n n n s d ng l i d ng c c c k t...

Page 49: ...Dao k o v d ng c ng c th c t tr n gi theo chi u ngang i u ch nh chi u cao gi tr n Xoay ch t ray tr t hai u thanh ray sang hai b n m h nh minh h a b n d i sau k o l y gi ra Thay i v tr c a c c b nh xe...

Page 50: ...VI15 Gi ng d ng c ph a tr n Gi d ng c ph a tr n c thi t k t c c lo i dao k o v v t d ng nh C NH B O Dao v c c v t s c nh n kh c ph i c t n m ngang tr n gi ng...

Page 51: ...6 5 2 Gi ng Thay th V tr th p Gi tr n c ng X p kh ng ng c ch X p kh ng ng c ch X p kh ng ng c ch l m gi m hi u su t r a v l m kh b t a Vui l ng tu n theo khuy n ngh c a nh s n xu t c hi u su t s d ng...

Page 52: ...50 Th ch h p cho b t a h ng ng y b b n th ng th ng r a v i t c nhanh P7 Dual Pro Wash 113 Th ch h p cho th y tinh d v b n nh gi tr n v s nh s b b n nhi u gi d i P8 Quick 30 30 Ph h p cho b t a b b n n...

Page 53: ...n gi thay i th i gian h n gi nhanh h n T c thay i ph thu c v o kho ng th i gian n gi n t Khi n t H n gi c gi l u m n h nh s d ng h 00 C c ch c n ng b sung c ng c th c ch n 5 N t Ti t ki m n ng l ng n...

Page 54: ...c a c m trong khi v n h nh th i gian c n l i c a ch ng tr nh ch n s hi n th tr n m n h nh 3 2 Sau khi ng c a ch ng tr nh m i c ch n s ti p t c ti n tr nh c a ch ng tr nh c L U H y m h c a d ng ch ng t...

Page 55: ...a 6 trong 3 gi y k ch ho t t nh n ng Natural Ion Tech Trong khi m n h nh hi n th s m t 1 n 3 Sau 3 gi y Ion s c hi n th t c t nh n ng kh Ion c k ch ho t Nh tay kh i n t sau khi Ion hi n th tr n m n h...

Page 56: ...t l n N u c th c ph m c n s t l i ho c c c v t th l tr n m ng l c th v tinh h y lo i b v r a s ch th t k b ng n c a M ng l c tinh b M ng l c Th c M ng l c kim lo i 8 V SINH V B O D NG 1 2 a c b Xoay n...

Page 57: ...C nh b o nguy c t tay Khi v sinh b m n c th i h y c n th n kh ng b th ng do m nh v th y tinh ho c d ng c s c nh n Trong tr ng h p n y 1 Lu n ng t k t n i thi t b kh i ngu n i n tr c ti n 2 Th o c c g...

Page 58: ...g khi ang r a S c i n Ki m tra ngu n i n S c ng c p n c Ki m tra v i c p n c Ti ng rung l c v va p trong qu tr nh v n h nh Tay phun va ch m v i b t a gi b n d i Di chuy n ho c lo i b d ng tr n gi ang...

Page 59: ...n l m kh Ch n ch ng tr nh c l a ch n l m kh L ng n c tr x qu th p T ng c i t l ng n c tr x R s t h nh th nh tr n b t a Ch t l ng th p kh ng r c a b t a kh ng t t Ch r a c c b b t a r a c v i m y L ng...

Page 60: ...a F2 Kh ng x c n c ng n c x v b l c c th b t c H y ch ng tr nh r a Li n h d ch v s a ch a n u ti p t c x y ra l i F8 L i h th ng l m kh Li n h d ch v s a ch a F1 Tr n n c R t ph ch c m c a m y v kh a...

Page 61: ...c n ng li n quan theo Thi t k sinh th i t ng ng c th c t t D ch v kh ch h ng trong kho ng th i gian t nh t 10 n m k t ng y thi t b c a v o th tr ng trong Khu v c Kinh t Ch u u 1 Khi m y kh ng ho t ng...

Page 62: ...h cho chu tr nh r a ti u chu n ph t 254 Th i l ng ch b t Ti ph t n dB A re 1 pW 44 L p t m t M c ti u th n ng l ng 241 kwh n m d a tr n 280 chu tr nh r a ti u chu n b ng n c l nh v m c ti u th c a ch...

Page 63: ...52253525 R35...

Page 64: ...www hafele vn com...

Reviews: