background image

16

1

strato

verso

1

2

3

verso

13

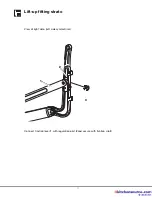
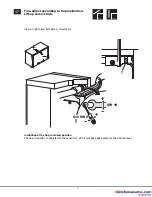
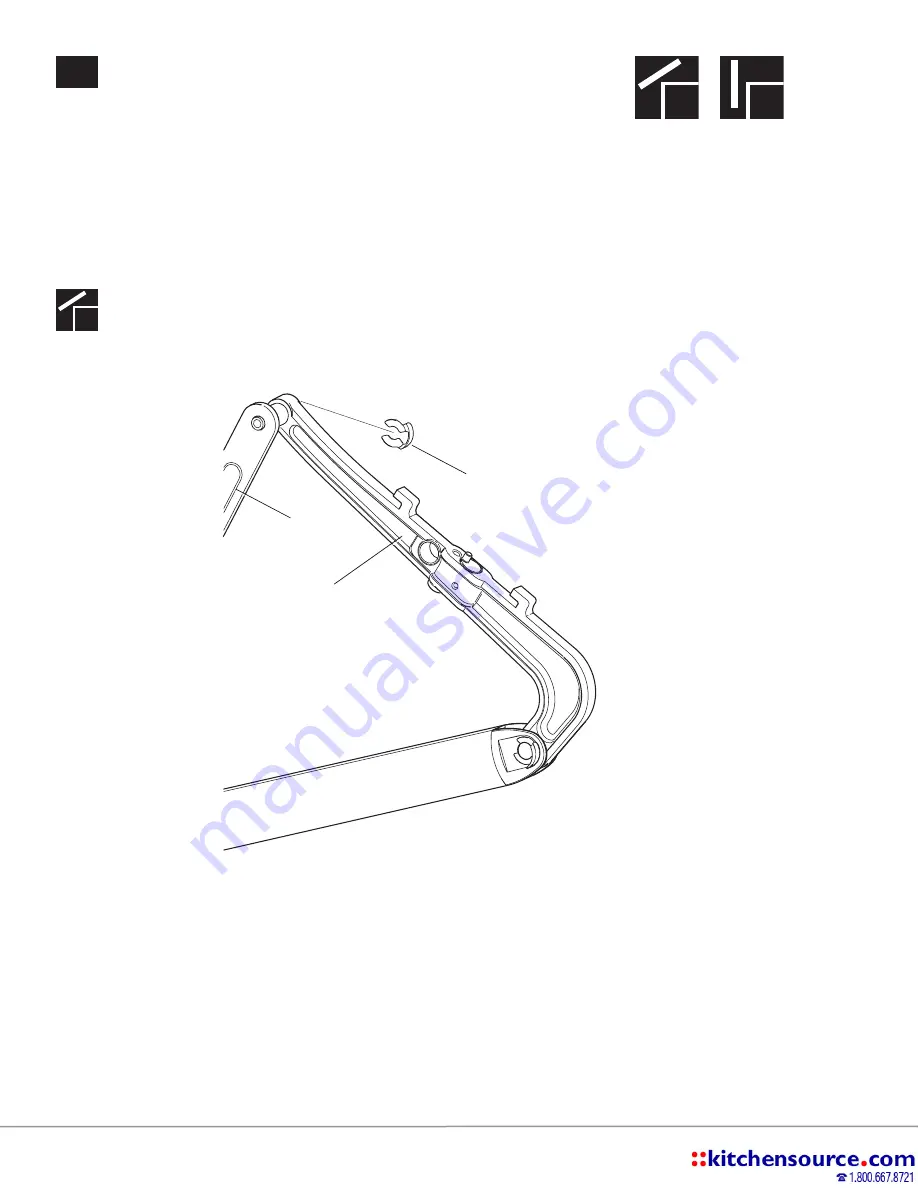
Connect traction lever.

Connect traction lever 

1

with regulation part 

2

and secure with fixation clip 

3

.

View of right side. (left side symmetrical)

Summary of Contents for Verso 372.68 Series

Page 1: ...Lift up Fittings Verso and Strato Item No 372 68 Series and 372 67 Series MountingInstructions Verso Strato ...

Page 2: ...ly instructions as prescribed by the manufacturer also form part of the agreed use 4 Also take into account the general legal and miscellaneous regulations and legal provisions that are applicable even those that apply in the operator s country as well as the applicable environmental protection regulations The regula tions of the trade associations or other supervisory authorities that are in forc...

Page 3: ... 40 ca 65 ca 95 ca 120 ca 145 a c 5 5 2 a c 0 8 2 a c 5 2 3 a c 5 6 3 a c 0 1 4 a c 0 5 4 a c 5 9 4 a c 3 3 5 a c 5 7 5 4 9 7 4 4 7 4 9 6 4 4 6 4 9 5 4 4 5 4 9 4 4 4 4 4 1 4 0 0 8 0 2 4 min 138 ca 110 View of right side left side symmetrical 1 Overview on construction sizes for lift up fitting verso Cabinet height 420 800 mm ...

Page 4: ...2 420 350 342 420 186 186 186 308 308 308 295 295 295 36 28 98 346 338 408 200 200 200 295 295 315 600 313 5 440 480 100 594 315 650 313 5 440 480 150 644 315 37 37 37 50 50 50 37 37 37 37 37 138 138 138 151 151 151 138 138 138 138 138 X Y D H ca R ca T U ca V W min 500 500 550 600 550 650 mm m m 40 72 168 32 2 3 6 9 V View of right side left side symmetrical 2 Overview on construction sizes lift ...

Page 5: ...0 800 37 mm 138 mm 50 mm 151 mm 37 mm 138 mm 342 420 420 650 huwilift verso huwilift strato Drilled holes A Ø 5 mm x min X deep 5 Ø 16 12 5 Ø 19 15 Design for all cabinet heights View of right inner side left side symmetrical Drilling depth 3 Drill holes for fitting in accordance with the drilling diagram Lift up fitting verso strato ...

Page 6: ... of flap B C B 5 5 2 0 0 8 0 2 4 5 5 2 2 3 2 3 2 3 2 3 2 3 2 3 13 5 13 5 A and B observe overlay C Drilling depth 5 Ø 16 12 5 Ø 19 15 A B Design for particle board and MDF board Cabinet height 420 800 mm 4 Drill holes for flap according to the drilling diagram ...

Page 7: ... verso A 5 5 2 5 5 2 0 0 8 0 2 4 2 3 2 3 2 3 2 3 2 3 2 3 8 Ø3 2 M4 Drilling diagram for reverse side of flap A A observe overlay 5 Drill holes for flap according to the drilling diagram Design for 20 mm aluminum profile ...

Page 8: ...erse side of flap X Y 420 500 mm 500 550 mm 550 650 mm 255 mm 342 420 mm 186 mm 293 5 mm 313 5 mm 5 Ø 16 12 5 Ø 19 15 Design for particle board and MDF board A B A and B observe overlay C Drilling depth 6 Drill holes for flap according to the drilling diagram Lift up fitting strato ...

Page 9: ... 342 420 mm 186 mm 293 5 mm 313 5 mm A 2 3 2 3 2 3 2 3 2 3 2 3 8 Y Y X Ø3 2 M4 Drilling diagram for reverse side of flap Design for 20 mm aluminum frame profile Cabinet height 420 650 mm A Drill holes for flap in according to the drilling diagram Lift up fitting strato 7 ...

Page 10: ...erso Fixing set for fixation brackets Not included in Set to be ordered separately Left and right side on flap Design for particle board and MDF board Design for aluminum frame profile 8 Screw on fixation brackets ...

Page 11: ...16 mm Euro ø 6x16 19 mm Euro ø 6x12 16 mm Euro ø 6x16 19 mm 9 Screw on the base fixing plate and right left adapter plate View of right side wall Left side wall symmetrical The base plate can be used for both sides right and left ...

Page 12: ...s compression spring 1 fitted in traction lever 2 If not please do so Slightly loosen clamp screws 3 Connect traction lever 2 and stabilization bar 5 3 1 2 5 1 3 3 1 2 10 Install transversal stabilization bar Lift up fitting verso strato ...

Page 13: ... 6 6 0 mm Press traction lever 2 stabilization bar 5 together Spring tension and engage successively with axis pieces 6 traction lever bearing 7 Fit into the cabinet without free play Tighten both clamp screws 3 2 4 Nm ...

Page 14: ...on The lifting arm of the fitting must be in the open position supply condition as otherwise there is a risk of injury Fitting is under spring tension The fitting can be used for both sides right and left 11 Screw on fitting ...

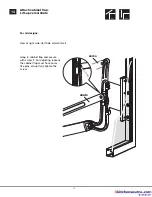
Page 15: ...tall regulation part on the lifting arms View of right side left side symmetrical The regulation part can be used for both sides right and left Connect regulation part 1 and lifting arm 2 with bolt 3 and secure with fixation clip 4 ...

Page 16: ...16 1 strato verso 1 2 3 verso 13 Connect traction lever Connect traction lever 1 with regulation part 2 and secure with fixation clip 3 View of right side left side symmetrical ...

Page 17: ...17 1 2 3 Lift up fitting strato strato Connect traction lever 1 with regulation part 2 and secure with fixation clip 3 View of right side left side symmetrical ...

Page 18: ...g in cabinet flap and secure with screw 1 For adjusting reasons the cabinet flap must have some free play do not fully tighten the screw For all designs 14 Attach cabinet flap Lift up verso strato View of right side left side symmetrical ...

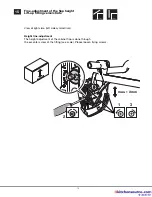
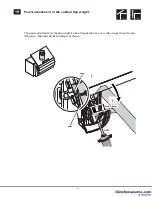
Page 19: ...eight adjustment of the cabinet flap is done through the excenter screw at the fitting see scale Please loosen fixing screws max 3 mm 2 1 3 15 Fine adjustment of the flap height Lift up fitting verso strato View of right side left side symmetrical ...

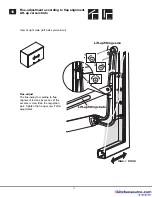
Page 20: ...2 3 Fine adjust The fine adjust according to flap alignment is done by means of the excenter screw 2 on the regulation part Tighten the fixing screw 1 after adjustment 16 Fine adjustment according to flap alignment Lift up verso strato View of right side left side symmetrical ...

Page 21: ...in closed position The flap inclination is adjusted at the excenter 7 of the receptive base plate for the traction lever Ø4 SW 4 SW 19 7 17 Fine adjust according to flap inclination Lift up verso strato View of right side left side symmetrical ...

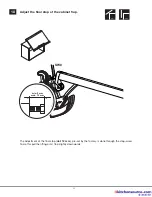
Page 22: ...W 8 min 9 mm max 15 mm 18 Adjust the final stop of the cabinet flap The adjustment of the final stop abt 12 mm pre set by the factory is done through the stop screw To do this pull the lifting arm flap slightly downwards ...

Page 23: ...o SW 4 max min max 20 mm kg 19 Power adjustment of the cabinet flap weight The power adjustment for the flap weight is done through the hex screw See scale To do this pull lifting arm flap downwards and adjust as shown ...

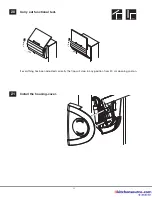
Page 24: ...24 1 strato verso If everything has been adjusted correctly the flap will stop in any position from 20 cm opening and on 20 Carry out functional test 21 Install the housing cover ...

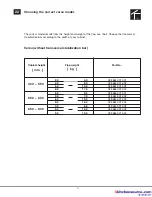
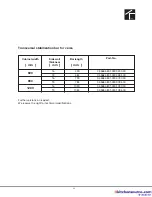
Page 25: ...84 001 003 9 0 16 0 03 3684 001 004 3 0 6 5 03 3684 001 002 650 800 5 0 10 0 03 3684 001 003 9 0 15 0 03 3684 001 004 verso The correct model results from the height and weight of the flap see chart Choose the transversal stabilization bar according to the width of your cabinet Verso without transversal stabilization bar Cabinet height mm Flap weight kg Part No 22 Choosing the correct verso model ...

Page 26: ... 04 3684 801 000 0790 00 19 784 04 3684 801 000 0784 00 1200 16 1090 04 3684 801 000 1090 00 19 1084 04 3684 801 000 1084 00 Cabinet width mm Part No Side wall thickness mm Bar length mm Transversal stabilization bar for verso Further versions on request We reserve the right for technical modifications ...

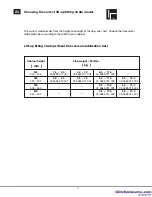
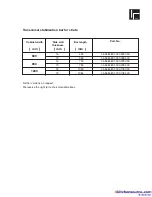
Page 27: ... 500 550 03 3685 013 003 03 3685 013 004 600 3 5 10 0 6 0 14 5 550 650 03 3685 014 003 03 3685 014 004 1 strato The correct model results from the height and weight of the flap see chart Choose the transversal stabilization bar according to the width of your cabinet LIft up fitting strato without transversal stabilization bar Cabinet height mm Flap weight Part No kg 23 Choosing the correct lift up...

Page 28: ...01 000 0790 00 19 784 04 3684 801 000 0784 00 1200 16 1090 04 3684 801 000 1090 00 19 1084 04 3684 801 000 1084 00 Cabinet width mm Part No Side wall thickness mm Bar length mm Transversal stabilization bar for strato Further versions on request We reserve the right for technical modifications ...

Reviews: