background image

Summary of Contents for HC-IF77A

Page 1: ...HC IF77A 536 61 555 VN TIẾNG VIỆT Hướng dẫn vận hành và bảo trì bếp ...

Page 2: ...he possibility of electric shock Neveruseasteamcleanertocleanthehob Theapplianceandaccessiblepartsmaybe hot during operation Take care to avoid touching the heating elements Children less than 8 years of age should be keptatasafedistanceunlesscontinuously supervised This appliance may be used by children aged8oroverandbypersonswithreduced physical sensory or mental capabilities or lack of experien...

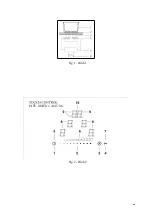
Page 3: ...duced current 3 Magnetic field 4 Inductor 5 Electronic circuit 6 Power supply User s Instructions Fig 2 1 Power ON Power OFF 2 Slider sensor 3 Booster key 4 Lock key 5 ON OFF LED 6 Slider LED 7 Lock LED 8 Heating zone and setting display 9 Timer indicator zone 10 Timer Installation All operations relative to installation electric connection should be carried out by skilled personnel in conformity ...

Page 4: ...n display 8 of the rear area Display 8 located on the front area will indicate the power level selected for the combined zone This function makes it possible to obtain a rectangular cooking zone particularly suited to rectangular or oval shaped pans If you are using a round pan the minimum diameter of the base should be 20 cm in order to ensure optimal detection Automatic Parboiling selectable Whe...

Page 5: ... and thereafter the adjustment of the second digit Within 10sec after the adjustment of the second digit the value might be reset Illuminated display dot in the timer display and in case of a cooking zone specific timer a blinking assigned LED In case of an active timer display the timer value may be set to 0 directly by pressing 0 on the slider area left side Switching of an active timer A timer ...

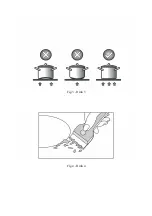
Page 6: ...ppropriate product rinsewithwateranddrybymeansofacleancloth Undernocircumstance should sponges or abrasive cloths be used also avoid using aggressive chemical detergents such as oven sprays and spot removers Installer s Instructions Installation These Instructions are for the qualified technician as a guide to installation adjustment and maintenance according to the laws and standards in force The...

Page 7: ...ussdasGerätbeimPlatzendesKochfelds sofort vom Netz getrennt werden DasKochfelddarfnichtmitDampfgereinigt werden Das Gerät und seine zugänglichen Teile könnenwährenddesBetriebesheißwerden Es ist darauf zu achten dass die Heizelemente nicht berührt werden Kinder unter acht Jahren müssen fern gehalten werden sofern sie nicht ständig unter Aufsicht stehen Dieses Gerät kann von Kindern über acht Jahren...

Page 8: ...nügt das Anheben führt zur Unterbrechung des Systems das elektronische System erlaubt größte Flexibilität und Genauigkeit in der Regulierung Abb 1 1 Gefäße 2 Induktionsstrom 3 Magnetfeld 4 Induktor 5 Stromkreis 6 Stromzufuhr Anweisungen für den Benutzer Abb 2 1 Ein Aus Taste ON OFF 2 Slider 3 Booster 4 Sperre 5 LED on off 6 LED Slider 7 LED Sperre 8 Kochzone 9 LED timer 10 Timer Installation Alle ...

Page 9: ...ochfeld dassichbesondersfür rechteckigeundovaleKochtöpfeeignet Falls Sie einen runden Topf verwenden sollte der Bodendurchmesser für eine einwandfreieDetektionmindestens20cmbetragen Automatisches Hochkochen mit Auswahl WirddasAutomatischeHochkochenaktiviert wirddie Leistung der entsprechenden Kochzone für einen bestimmten Zeitraum auf 100 gestellt der von der ausgewählten Kochstufe abhängt Nach Ab...

Page 10: ...imer mussdieSteuerungzuerst aus Leistungssensor unddannwiedereingeschaltetwerden Kochzonen Timer 1 99 Min Diese Funktion steht nur zur Verfügung wenn eineKochzoneinBetriebist Stufehöherals0 Leuchtpunktan Signaltonmit Timer vierauszuschaltendeKochzonenkönnenfreiprogrammiertwerden EinstellungdesTimers EinstellungimFingerdruck Einstellbereich ZuerstwirddieersteStelleeingestellt danachdiezweite Sie kö...

Page 11: ...ostfreiem Stahl Instandhaltung Abb 4 Spuren von Aluminiumfolie Essensresten Fettspritzern Zucker oder stark zuckerhaltigen Speisen müssen sofort mit einem Schaber von der Kochfläche entfernt werden um mögliche Schäden an der Fläche zu vermeiden Mit einem entsprechenden Reinigungsmittel und Küchenpapier säubern dann mit klarem Wasser nachspülen und abschließend mit einem Lappen trocken wischen Kein...

Page 12: ... sinh bếp Thiết bị và các bộ phận có thể tiếp cận có thể nóng trong khi vận hành Hãy cẩn thận để tránh chạm phải các phần tử gia nhiệt Trẻ em dưới 8 tuổi cần được cách ly ở một khoảng cách an toàn nếu không được giám sát liên tục Trẻ em trên 8 tuổi hoặc người bị khuyết tật về khả năng thể chất giác quan hoặc tinh thần hoặc chưa có kinh nghiệm và sự hiểu biết có thể sử dụng thiết bị này nếu họ được...

Page 13: ... với nguồn điện bộ TC mất 1 giây để chuẩn bị vận hành Sau khi khởi động toàn bộ màn hình và LED nhấp nháy tới khoảng 1 giây Sau 1 giây toàn bộ màn hình và đèn LED được tắt trở lại Bộ TC bây giờ có thể được BẬT trở lại bằng cách ấn phím ON OFF 1 Các màn hình hiển thị ổn định 0 Các cảnh báo trực quan đối với các vùng nóng H được hiển thị xen kẽ với 0 và chấm nhỏ hiển thị đồng bộ Các chấm hiển thị tr...

Page 14: ... định được kích hoạt để nhận thêm điện năng danh định Nếu vùng nấu mong muốn có khả năng kích hoạt bộ tăng thế màn hình hiển thị biểu tượng P Thời gian tăng được giới hạn trong 5 phút để bảo vệ dụng cụ nấu nướng Sau khi bộ tăng thế được tự động tắt vùng nấu tiếp tục vận hành ở mức công suất 9 Bộ tăng thế có thể được kích hoạt trở lại sau một vài phút Trong trường hợp chảo được nhấc ra khỏi vùng nấ...

Page 15: ...chỉ bộ hẹn giờ hoạt động sang vùng nấu tại bất kỳ thời điểm nào có hoặc không kích hoạt một bộ hẹn giờ Độc lập Bật trở lại chế độ kích hoạt TC với một bộ hẹn giờ độc lập được kích hoạt bộ hẹn giờ được chọn trước tiên dấu thập phân trên màn hình bộ hẹn giờ nhấpnháy Saukhimộtvùngnấuđượcchọn dấuthậpphânbiếnmấtkhỏi màn hình bộ hẹn giờ và một dấu thập phân ổn định trên màn hình vùng nấu nhấp nháy Khi t...

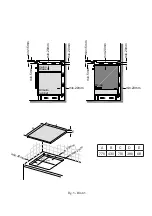
Page 16: ... trang bị hệ thống làm mát thích hợp không có rò rỉ khí nóng từ lò nướng vào bếp các lỗ nạp khí được bố trí như minh họa trong hình Đấu nối điện Hình 6 Trước khi thực hiện đấu nối điện đảm bảo rằng các đặc điểm thiết bị như trên để theo dõi những gì được chỉ thị trên tấm ma trận được đặt tại đáy của bề mặt làm việc thiết bị được gắn nối đất hiệu quả theo các tiêu chuẩn và luật pháp hiện hành Thực ...

Page 17: ...Fig 1 Hình 1 Fig 2 Hình 2 ĐIỀU KHIỂN CẢM ỨNG ...

Page 18: ...Fig 4 Hình 4 Fig 3 Hình 3 ...

Page 19: ...abinet min 5mm min 20mm min 20mm min 20mm min 15mm min 50mm Rmax 2mm D 1 3 C 1 3 B A min 40mm E A 298 590 590 700 770 770 770 1000 B 520 350 520 350 390 450 520 360 C 275 560 560 680 750 710 750 980 D 500 330 490 330 370 410 490 340 E 68 68 68 68 68 68 68 68 A B C D E 770 430 710 390 68 ...

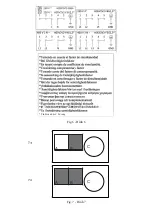
Page 20: ...Fig 6 Hình 6 Fig 7 Hình 7 A B C A B C Tính toán hệ số bổ sung ...

Page 21: ......

Page 22: ......

Page 23: ......

Page 24: ... www hafele com vn 100 Nguyen Van Linh Nam Duong Ward Hai Chau District Da Nang Vietnam Phone 84 511 358 4966 Fax 84 511 358 4977 Email danang hafele com vn Website www hafele com vn Ree Tower 3rd Floor 9 Doan Van Bo District 4 Ho Chi Minh City Vietnam Tel 84 8 39113113 Fax 84 8 39113114 Email info hafele com vn Website www hafele com vn 60817650 10 05 2018 ...

Reviews: