3700 Series ANSI Grade 2 Interconnected Lock
Installation Instructions
Meets ANSI 156.12
I-LS00770
REV 2
Page 2 of 3
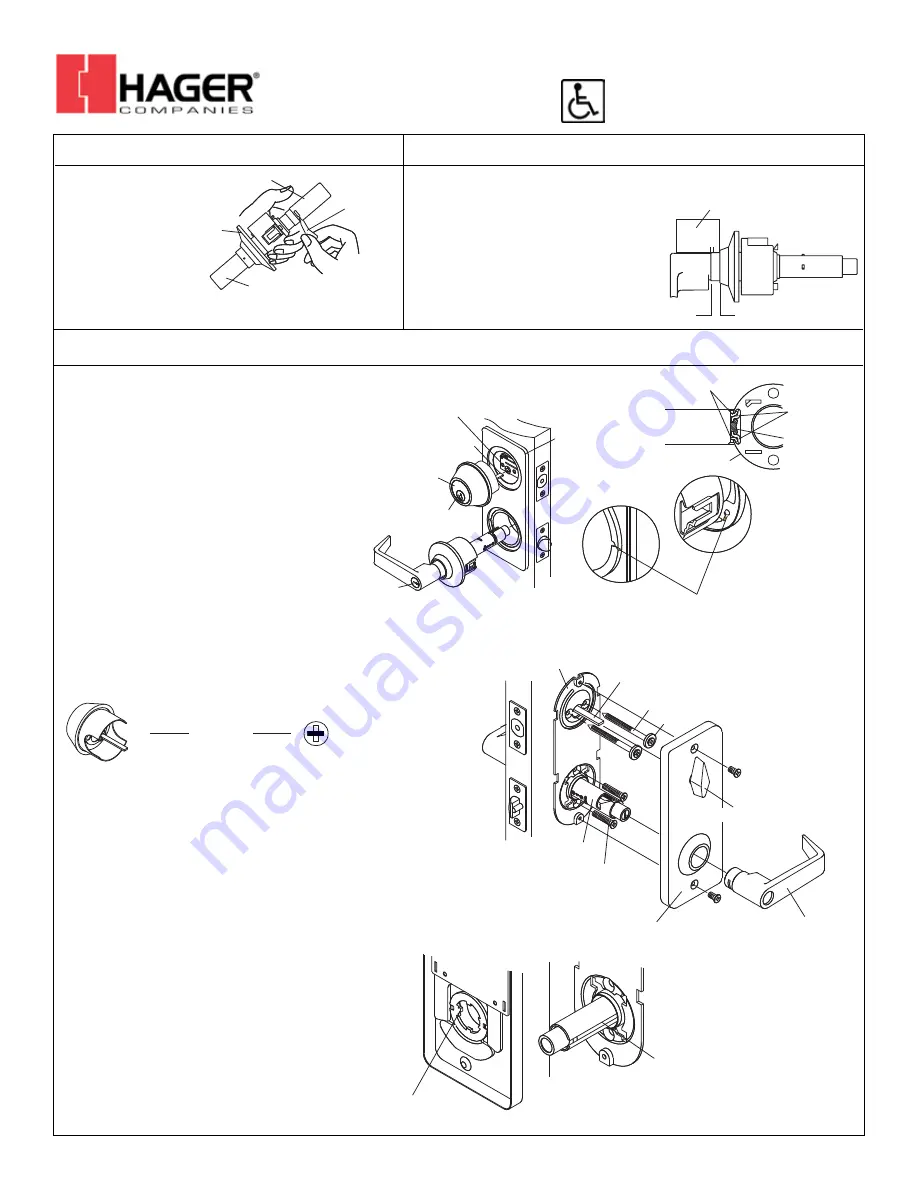
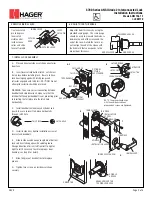
5. REMOVE INSIDE LEVER
Use lever catch
pin to depress
lever catch
visible under
inside sleeve
collar and slide
lever off spindle.
6. ADJUST DOOR THICKNESS
Adjust for door thickness by using the
provided scale gauge. The scale gauge
should be used to measure the distance
between the end of the sleeve and the
end of the rose. Rotate the rose in or
out to align the end of the sleeve with
the tick mark that corresponds to the
proper door thickness.
7. INSTALL LOCK ASSEMBLY
A. Place optional outside escutcheon on exterior
door face.
B. Insert leverset into bottom latch. Latch must
be in place before installing lock. Be sure to have
lock housing engaged with latch prongs and
retractor engaged with latch tail. CAUTION: Do not
attempt to install lock with door closed.
WARNING: To ensure correct connection between
deadbolt and cylindrical lock, make sure that the
latchbolt of the upper deadbolt is not projecting prior
to inserting the tail piece into the latch hole
horizontally.
C. Install deadbolt exterior keyed cylinder and
guard. Be sure to insert tail piece horizontally
through latch hole.
D. Install inside liner, tighten installation screw of
leverset and deadbolt.
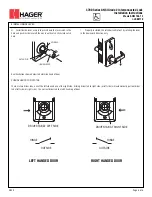
E. Slide inside escutcheon onto spindle of bottom
lock so driver tab engages with spindle groove.
Change direction of driver tab from left to right or
right to left if necessary to achieve proper door
handing (see step 8 for detail).
F. Slide tail piece of deadbolt onto turnpiece
groove.
G. Tighten two screws on inside escutcheon
securely.
INSIDE LEVER
LEVER
CATCH PIN
OUTSIDE
ROSE
OUTSIDE LEVER
END OF SLEEVE
END OF ROSE
THICKNESS GAUGE
LATCH PRONGS
LATCH UNIT
RETRACTOR
LATCH TAIL
LOCK HOUSING
B
OUTSIDE
ESCUTCHEON
LATCH HOLE
TAIL PIECE
TOP DEADBOLT
KEY HOLE
BOTTOM
LEVERSET
KEY HOLE
A - C
OPTIONAL
NOTE: The prong should align
with the outside escutcheon
groove when screws are tightened.
E
DRIVER TAB
SPINDLE
GROOVE
ENGAGE DRIVER TAB
TO SPINDLE GROOVE
INSIDE LEVER
D
G
F
INSIDE LINER
INSTALLATION
SCREW
INSIDE ESCUTCHEON
TAIL PIECE
TURNPIECE
INSTALLATION SCREW
SPINDLE
WASHER
TAIL PIECE
LATCH HOLE


