background image

05

22

!

!

5

6

!

4

1

3

2

3.  

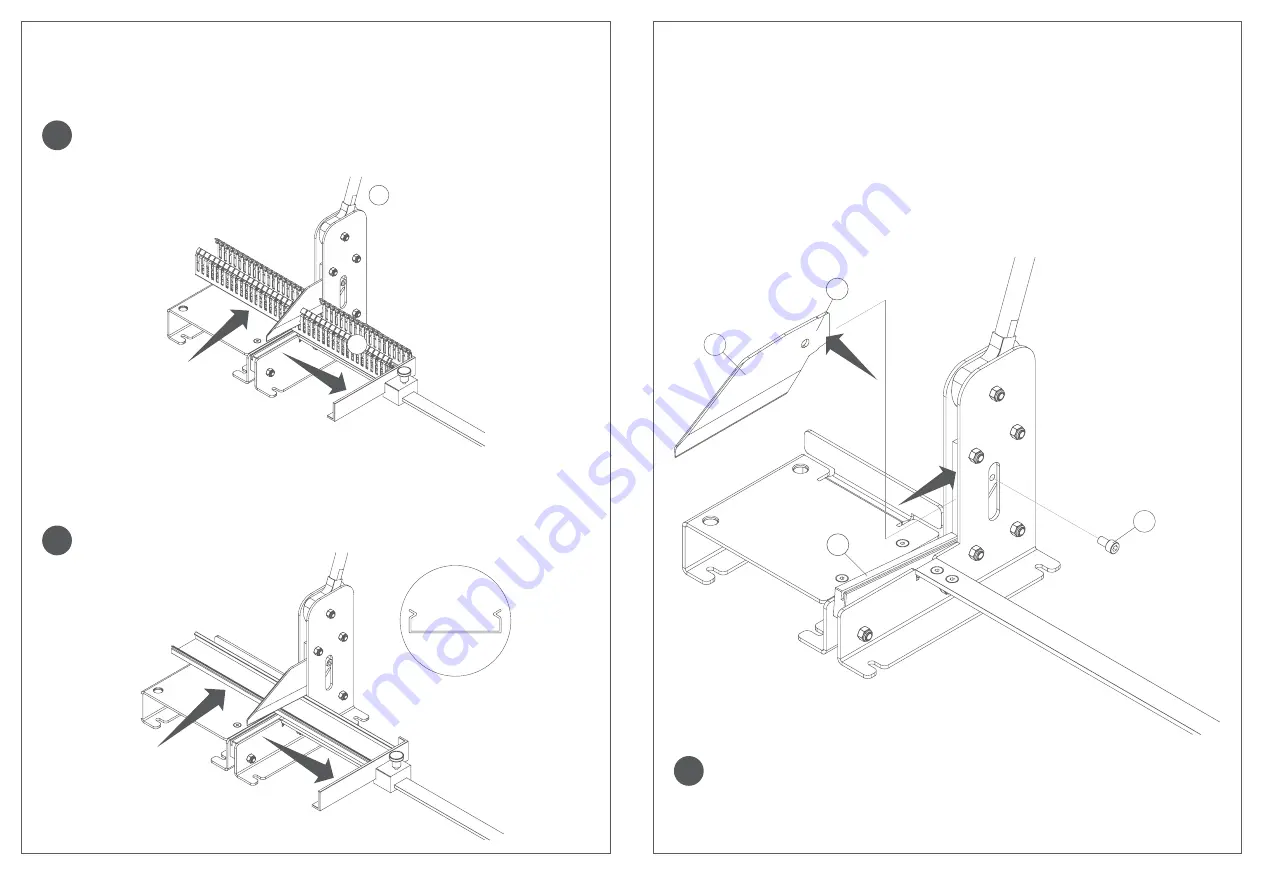
Zum Schneiden den Handhebel   nach unten ziehen und nach dem Schneidvorgang 

wieder nach oben bringen. Die geschnittenen Kanalteile vorsichtig entnehmen. Eventuell 
hierzu den Anschlag lösen um Teile freizulegen.


Der Messerschutz muß nach dem Schneidvorgang automatisch an das Messer  


hochklappen. Ist der Schneidvorgang nur mit großem Kraftaufwand möglich,   


ist das Messer stumpf oder defekt und muß ersetzt werden.

4.  

Zum Schneiden des Deckels die Schritte 1 - 3 wiederholen.


Die Abkantungen des Deckels müssen beim Schneiden nach oben zeigen.

JA

Manutenzione

1.  

Sostituzione lama

1.1.  

Per smontare la lama togliere la vite (2) ed estrarre la lama (1).

1.2.  

Lubrificare le superfici di appoggio della lama (3) indicate dalla freccia con l’olio multiu-

so fornito in dotazione.

1.3.  

Per montare la lama, spingere verso il basso la protezione lama (4) ed inserire la lama 

(1) nell’alloggiamento fino all’arresto. Fissare con la vite (2).


  Non immagazzinare la lama al di fuori dell’apparecchio nè trasportarla senza  


una idonea protezione di sicurezza.

Summary of Contents for BA7CUTTER

Page 1: ...and save these instructions GB 09 Norme di sicurezza uso previsto messa in funzione funzionamento manutenzione e distinta dei pezzi di ricambio Prima della messa in funzione leggere e conservare queste istruzioni I 17 Cesoia da banco per canali da cablaggio I GB Bench mount wiring duct cutting tool RoHS COMPLIANT 2 Hager Vertriebsgesellschaft mbH Co KG Zum Gunterstal 66440 Blieskastel Telefon 0684...

Page 2: ...timales Schnittergebnis und Funktion des Gerätes muß das Messer stets scharf sein Wenn stumpf ist das Messer zu erneuern Der federnde Messerschutz muß nach dem Schneidvorgang umgehend wieder an das Messer hochklappen Sollte diese Funktion defekt sein ist das Messer sofort gegen Verletzung zu sichern oder zu entfernen Der Messerschutz muß vor erneuter Inbe triebnahme repariert oder ausgetauscht wer...

Page 3: ...ung auf einem stabilen und kippsicheren Untergrund z B Werkbank Position und Lage des Gerätes festlegen und Befestigungspunkte vom Gerät übernehmen Dem Untergrund geeignetes Befestigungsmaterial verwenden Nicht im Lieferumfang enthalten parts not included ...

Page 4: ... einschrauben Anschlag auf das Lineal aufschieben Montage Gegenhal ter seitliche Auflage und Längenanschlag mittels mitgeliefertem Befestigungsmaterial Das Lineal muß beim Montieren mit Hilfe eines Zollstocks oder Maßbandes auf das ge naue Maß Abstand zwischen Messer und Außenkante des Anschlags eingestellt wer den Disegno esploso ...

Page 5: ... 01 Manopola ITALIA 02 Vite a testa cilindrica M6x12 mm ITALIA 03 Camma ITALIA 04 Boccola camma ITALIA 05 Spina camma ITALIA 06 Molla di compressione ITALIA 07 Fiancata destra ITALIA 08 Colonna di riferimento ITALIA 09 Colonna di riferimento protezione lama ITALIA 10 Portalama ITALIA 11 Vite testa cilindrica con esagono M8x35 ITALIA 12 Boccola di centraggio molla ITALIA 13 Lama ITALIA 14 Vite test...

Page 6: ...tzt werden 4 Zum Schneiden des Deckels die Schritte 1 3 wiederholen Die Abkantungen des Deckels müssen beim Schneiden nach oben zeigen JA Manutenzione 1 Sostituzione lama 1 1 Per smontare la lama togliere la vite 2 ed estrarre la lama 1 1 2 Lubrificare le superfici di appoggio della lama 3 indicate dalla freccia con l olio multiu so fornito in dotazione 1 3 Per montare la lama spingere verso il ba...

Page 7: ...osa e deve essere sostituita 4 Per tagliare il coperchio ripetere i passi 1 e 3 Durante il taglio i fianchi del coperchio devono essere rivolti verso l alto SI Wartung 1 Auswechseln des Messers 1 1 Zum Ausbauen des Messers 2 die Schraube 1 entfernen und das Messer gerade heraus ziehen 1 2 Die Aufnahmeflächen 3 des Messers mit dem mitgelieferten Mehrzweckfett einfet ten 1 3 Zum Einbauen des Messers...

Page 8: ...ttore e tagliare in corrispondenza di questo punto BA7CUTTER Ersatzteilliste Pos Beschreibung Ursprungsland 01 Griff ITALIEN 02 Zylinderschraube M6x12 mm ITALIEN 03 Exenter ITALIEN 04 Achse ITALIEN 05 Spannstift ITALIEN 06 Druckfeder ITALIEN 07 Seitenplatte rechts ITALIEN 08 Führung ITALIEN 09 Führung ITALIEN 10 Haltplatte für Messer ITALIEN 11 Zylinderschraube M6x35 mm ITALIEN 12 Druckstück ITALI...

Page 9: ... Spostare l arresto sulla guida Utilizzando il materiale di fissaggio in dotazione montare la controtesta appoggio laterale e l arresto longitudina le Durante il montaggio la guida dovrà essere settata con l ausilio di un metro pieghevole o un metro a nastro per la misura esatta distanza tra lama e bordo esterno dell arresto Detailliertes zeichnen ...

Page 10: ... has always to be sharp If dull it has to be exchanged The spring loaded blade guard has to fold up promptly after the cutting procedure If this feature does not work the knife has to be secured or removed immediately to avoid inju ries Before operating the device again the blade guard has to be repaired or exchanged Specified condition use The bench mount wiring duct cutting tool VTC125 is only t...

Page 11: ...re messo in funzione solo una volta garantito il suo corretto montaggio su un supporto stabile dove non possa essere ribaltato Il materiale di fissaggio dell apparecchio non è in dotazione Usare materiale di fissaggio stabile ed idoneo al relativo supposto Al fine di ottenere prestazioni e risultati di taglio ottimali la lama deve essere sempre affilata Sostituire la lama priva di affilatura Dopo ...

Page 12: ...ng the included mounting parts The ruler has to be adjusted to the exact gauge distance between knife and the outer edge of the length stopper by using a tape measure or a folding ruler Detailed drawing 21 11 19 02 30 01 15 20 13 07 03 04 05 19 28 29 23 10 11 12 06 14 08 16 09 25 24 26 27 19 19 18 11 24 22 22 17 ...

Page 13: ...can be cut on its place BA7CUTTER spare part list Pos Description Country of origin 01 Handle ITALY 02 Cylindric screw M6X12 mm ITALY 03 Cam ITALY 04 Cam bush ITALY 05 Cam tap ITALY 06 Compression spring ITALY 07 Right side ITALY 08 Reference post ITALY 09 Blade protection reference post ITALY 10 Blade holder ITALY 11 Cylindric screw M8X35 mm ITALY 12 Spring bush ITALY 13 Blade ITALY 14 Cylindric ...

Page 14: ...r damaged It has to be exchanged 4 To cut covers please repeat steps 1 and 3 The rims of the cover must be on top when cutting YES 5 6 Maintenance 1 Replacement of the blade 1 1 To remove the blade remove the screw 2 and pull the blade straight out 1 1 2 Grease the slide faces of the blade 3 with the included multi purpose grease 1 3 To install the knife depress the blade guard 4 and slide the bla...

Reviews: