Programs
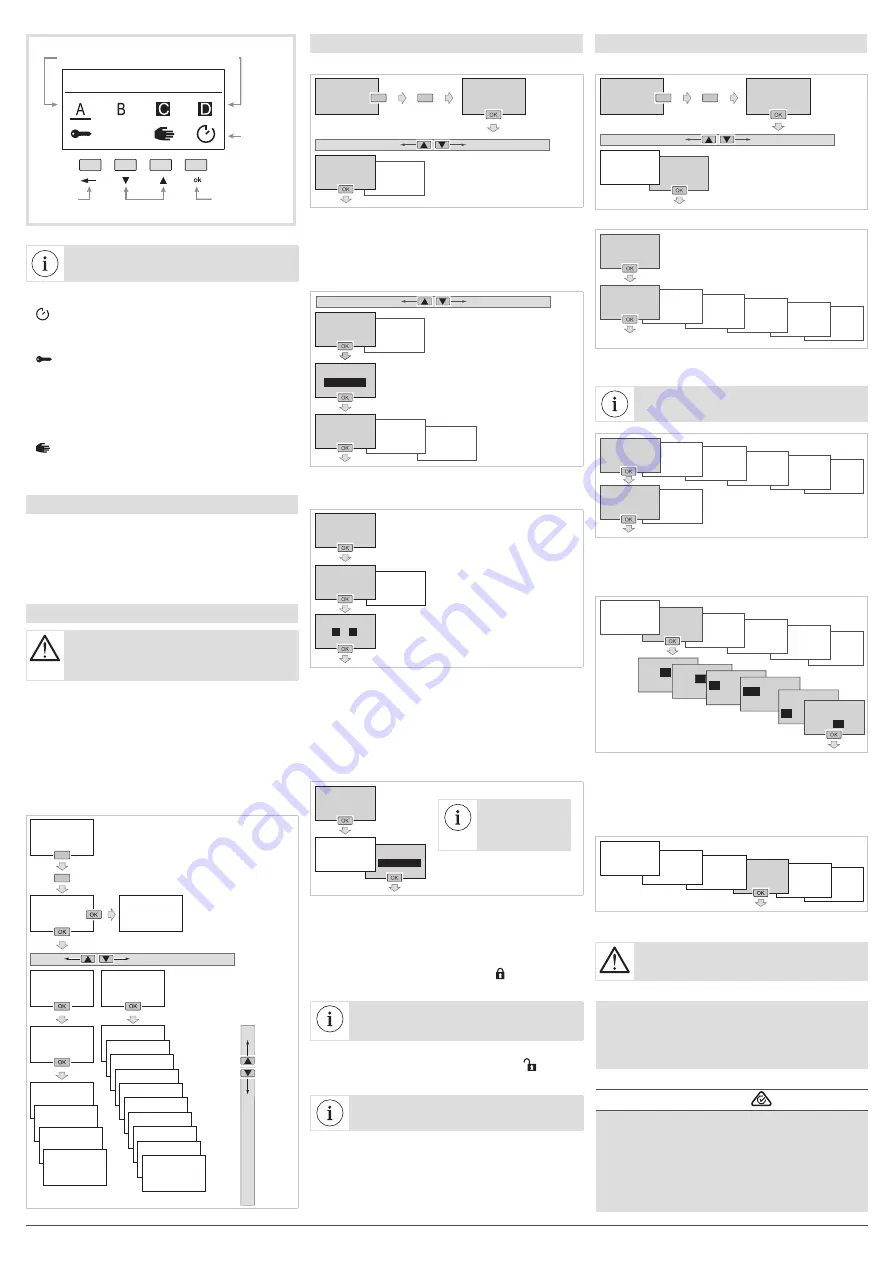
To access the programs:
sett
SETTINGS
PROGRAMS
HOME
SCREEN
HOME
SCREEN
Press and hold
Press a key twice
WRITE / CHANGE PROGRAM
It is possible to create up to 10 or 20 programs
(depending on version).
In order to create a program:
• Select the
+ Add
function;
• Change the program.
SETTINGS
PROGRAMS
PROGRAM 1
DELATE
PROGRAM 1
DISABLE
PROGRAMS
+ ADD
PROGRAM 1
CHANGE
Then define a weekly program. In order to do this:
• Program the selection of the output (or outputs) in
question.
EVENTS
LIST
A
B
C
D
OK
OUTPUTS
PROGRAM 1
CHANGE
Use keys
3
/
4
and
ok
to select the output(s)
to be enabled.
The enabled output is on a black background
Press the
ok
key after selecting OK to go back to the
Change
menu.
• In the list of events, create the first programming
step by selecting
+ Add
, then:
- define the type of action linked to the program
step,
- define the trigger linked to the program step,
- select the day (or days) of the week linked to the
program step.
EVENTS LIST
+ ADD
OUTPUTS
PROGRAM 1
CHANGE
Up to 40
program steps
can be added
per program.
KEY LOCK
This function is used to lock the clock keypad. It can
be accessed via the configuration application or
locally using keys
ok
and
←
.
• To enable this function locally, simultaneously press
the keys
ok
and
←
(> 3 s) until the symbol is
displayed (2 s).
The user only accesses the home screen
and views the current program and the
status of the outputs.
• To disable this function locally, simultaneously
press the keys
ok
and
←
(> 3 s) until the symbol
is displayed (2 s).
The user can access all screens.
Go back
to the home
screen
Option
display
Set the manual
control option
Change the channel
A, B, C or D
Display the output:
• output status on ON (black background);
• output status on OFF (white background).
MANUAL CONTROLS.
Figure 4:
presentation of the manual controls screen.
The
←
key can be used to return
to the home screen at any time.
The manual control options available for each output
(A, B, C and D) are:
•
: exception on ON or OFF of the output with
respect to the current command. The return to
automatic mode will occur at the next program
step.
•
: override on ON or OFF of the output
(permanent command). The override function forces
an output when in ON or OFF status. No other
command (ON, OFF, timer, pulse or exception) is
taken into account if the override is active. Only
cancelling the override or a manual command via
the front panel will authorize other commands
again.
•
: manual on ON or OFF of the output (highest
priority command and only available if the product
has these buttons).
Priority:
Manual mode > Override > Exception.
Reset
It is possible to reset the Bluetooth
®
or
switch back
to the product factory
settings.
Reset is accessible via:
• configuration application;
• locally on the clock, for more information, refer
to
Settings / Reset
(available in the complete
installation instructions).
Menu
If programming was performed via the
configuration application, the period (annual
cycle) cannot be changed from the pop-up
menu.
From the screen saver, press one of the 4 keys twice
to activate the backlight and then switch to the
home screen. Press and hold the
ok
key to view the
Programs / Settings
menu.
All programming and settings are based on the
following principle:
• keys
3
/
4
are used to navigate the menus and enter
settings;
• the
ok
key is used to confirm.
The
←
key can be used to return to the previous
selection level at any time.
Press a key twice
Press and hold
PROGRAMS
SETTINGS
BLUETOOTH
DATE/TIME
WIRED INPUT
DAYLIGHT SAVINGS
TIME CHANGE
ASTRO
PROGRAM 1
PROGRAM 2
––––––––
PROGRAM XX*
HOME
SCREEN
MANUAL
CONTROLS
CONTRAST
BACKLIGHT
LANGUAGE
RESET
FOR
LIST OF
PROGRAMS
HOME
SCREEN
(*) 10 or 20 programs
depending on the version
Settings
To access settings:
sett
SETTINGS
PROGRAMS
HOME
SCREEN
HOME
SCREEN
Press and hold
Press a key twice
The
Settings
menu provides access to the following settings:
SETTINGS
–––––
ASTRO
DAYLIGHT
SAVINGS TIME
CHANGE
WIRED
INPUT
DATE
& TIME
BLUETOOTH
CONTRAST
BACKLIGHT
LANGUAGE
RESET
FOR
BLUETOOTH
Bluetooth
®
activation
Enable the Bluetooth
®
function if the setup
application is used to program your clock.
DISABLE
ENABLE
–––––
ASTRO
DAYLIGHT
SAVINGS TIME
CHANGE
WIRED
INPUT
DATE
& TIME
BLUETOOTH
Press
ok
to confirm and the
←
key to go back to the
Settings
menu.
DATE- TIME
Set time and day
Use keys
3
/
4
and
ok
to set and confirm the date,
hour and minutes format.
YEAR
01.01.
19
MONTH
01/04/
01/04/
04
/19
DAY
30
.04.19 TIME FORMAT
24H
12H 30/04/19
TIME
15
:00
30/04/19
TIME
15:
31
–––––
ASTRO
DAYLIGHT
SAVINGS TIME
CHANGE
WIRED
INPUT
DATE
& TIME
BLUETOOTH
Press
ok
to confirm and go back to the
Settings
menu.
LANGUAGE
Select the desired language from among the following
languages: FRANÇAIS, DEUTSCH, ENGLISH,
NEDERLANDS, PORTUGUES, ESPAÑOL, ITALIANA,
ΕΛΛΗΝΙΚΗ, SVENSKA.
FOR
RESET
LANGUAGE
BACKLIGHT
CONTRAST
–––––
Press
ok
to confirm the language and go back to the
Settings
menu.
• When a load greater than 10A is used, a 2.5
mm
2
cable must be used.
• Not suitable for controlling SELV loads.
Hager 06.2020 - 6LE005569B
2
Hager Controls S.A.S., 33 rue Saint-Nicolas, B.P. 10140, 67703 SAVERNE CEDEX, France - www.hager.com
Hager Controls hereby declares that this
EGN200AU and EGN400AU Time Switch radio
equipment complies with the essential
requirements and other relevant
provisions of Directive 2014/53/EU.
The CE declaration
can be viewed at:
www.hager.com
å
and
The Bluetooth
®
word mark and logos are
registered trademarks owned by Bluetooth SIG,
Inc. and any use of such marks by Hager is
under license. Other trademarks and trade
names are those of their respective owners.


