background image

123

0.95”

0.80”

6


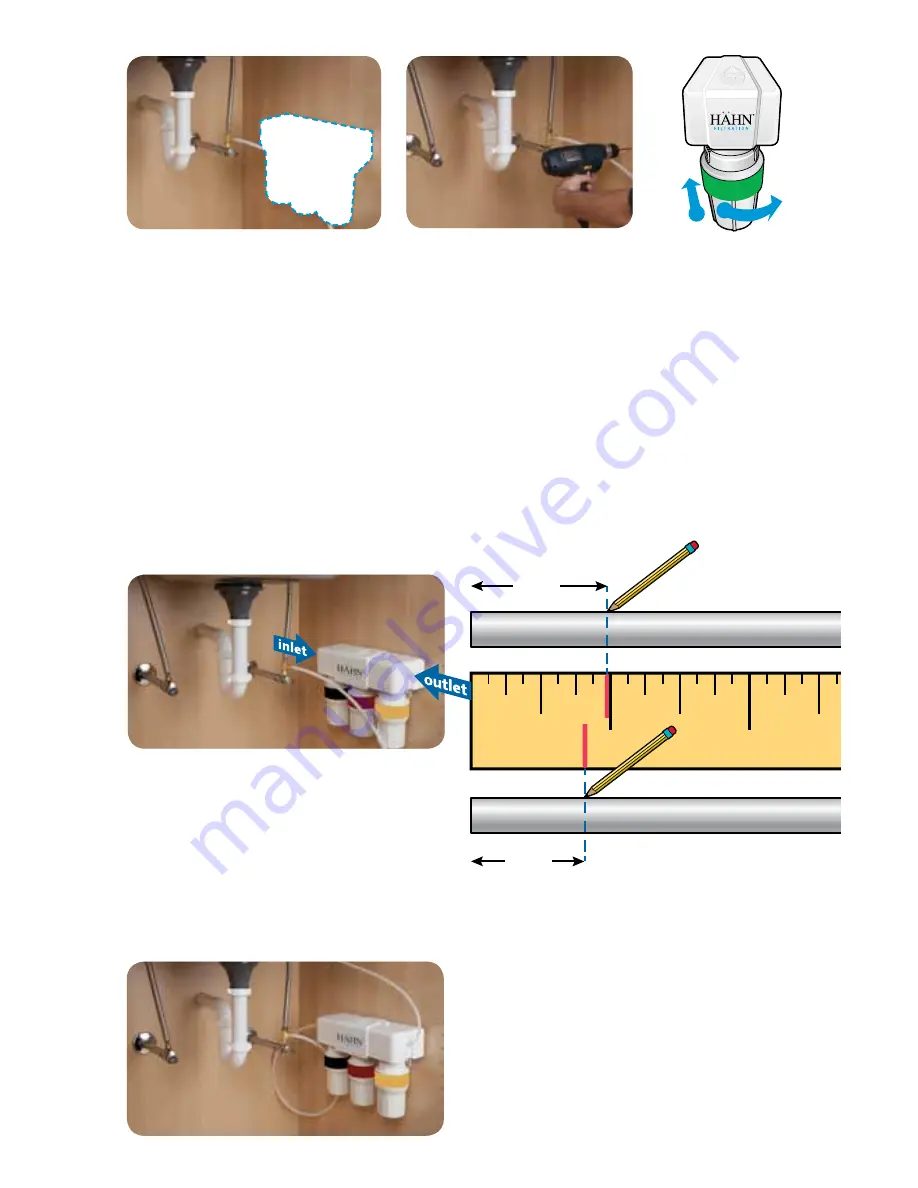
Unit Installation:

 Select a space 

under your sink for the filter 
unit that is at least 12 inches 
from the bottom of your cabinet 
and allows for easy access to 
your cold water supply and for 
filter replacements. Use the 
mounting holes located at the 
back of the unit to mark the wall 
screw placements with a pencil.

6


Center to hole differences:

  HF-1STAGE:

 41mm 

HF-2STAGE:

 65mm 

HF-3STAGE:

 98mm

10


Turn the cold water on. Check 
for leaks and proper installation: 
place a towel under the filter unit 
and check for leaks. Allow water to 
run for 10 minutes to flush carbon 
fines. Note: Never use oils to 
lubricate the O-rings; O-rings come 
pre-lubricated.

9


 Connect supply lines:

 insert tubing 

from the tee fitting into the inlet side 
and insert tubing from the faucet into 
the outlet side. Use diagram on the 
right to mark tubing depth to ensure 
they get inserted completely.

9


 It is VERY IMPORTANT to insert tubing 

completely so leaking does not occur.

7


 Use a 7/32” drill bit to 
drill holes for the plastic 
anchors provided. Carefully 
tap the anchors into the 
drilled hole with a hammer. 
Mount unit to the wall 
with the screws. For the 
HF-3STAGE — Pull the 
protective plastic strip from 
the battery compartment. 
The red LED should flash 
and beep five (5) times to 
indicate that the battery is 
installed correctly.

Depth to insert 2 
and 3-stage tubing

Depth to insert single stage tubing

(Diagram is actual size)

2

1

8


 Attach  each 
sump to 
the bottom 
of the unit 
housing. Align 
connection 
points, push 
the sump 
up and turn 
to the right. 
Ensure that 
the sump is 
locked in. 

Summary of Contents for HF-2STAGE

Page 1: ...Under Counter Water Filter Installation Instructions MODELS HF 2STAGE and HF 3STAGE...

Page 2: ...past the edge of the sink Note we recommend enlisting the services of an approved or certified professional if drilling is required Preparing for Installation Please read entire installation guide bef...

Page 3: ...ube insert 1 P 1 4 Brass Tee 1 A HF 1STAGE filter unit B Faucet 1 C Filter Cartridge 1 D Screws with anchors 2 E Faucet Rubber Washer 1 F Faucet Spacer 1 G Faucet Washer 1 H Faucet Nut 1 I 3 x1 4 Poly...

Page 4: ...to ensure complete seal Avoid over tightening 4 Faucet Installation Install as shown Tighten nut to secure faucet to sink 5 Faucet Connection Connect the outlet hose to the base of the faucet by slidi...

Page 5: ...insert tubing from the tee fitting into the inlet side and insert tubing from the faucet into the outlet side Use diagram on the right to mark tubing depth to ensure they get inserted completely 9 It...

Page 6: ...Enjoy clean healthy water and the peace of mind that comes from award winning filter technology...

Page 7: ...included which covers defects in materials and workmanship If for any reason you are not satisfied with your purchase simply call us or the dealer you purchased from A Return Authorization Code and a...

Page 8: ...cm2 Min operating temperature 40 F 4 44 C Max operating temperature 90 F 32 22 C The HF 2STAGE and HF 3STAGE systems are Tested and Certified by NSF International against NSF ANSI Standards 42 53 and...

Reviews: