background image

GETTING FAMILIARIZED WITH YOUR 2.4GHz RADIO SYSTEM

3

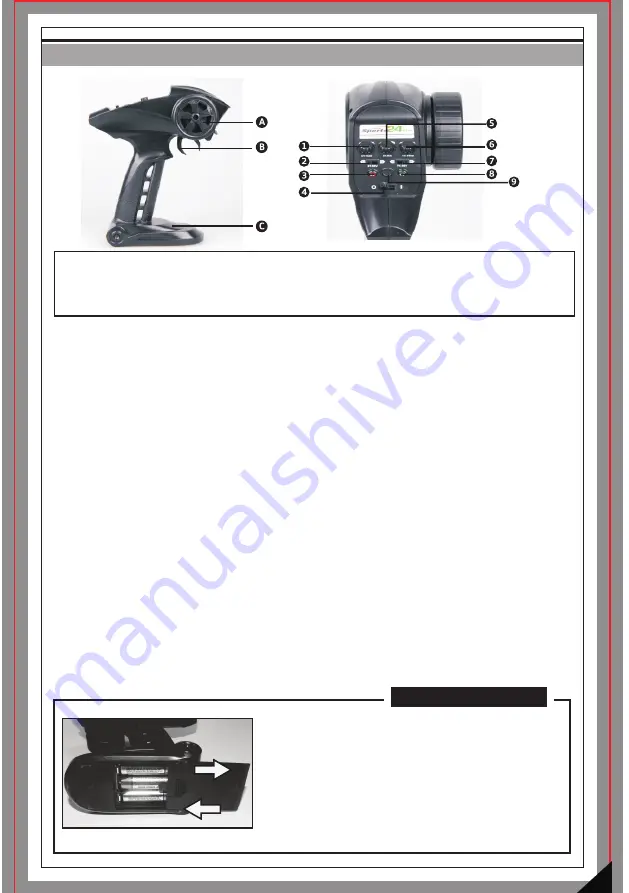
Steering Wheel: 

It proportionally operates the model s right and left steering control.

Battery Case: 

It requires 3pcs of AA size batteries.

Power Switch: 

It is used to turns the radio controller ON/OFF

Steering Dual Rate Dial: 

 It allows you to change the amount of steering servo travel compared to the amount 

of physical movement of the steering wheel.

Throttle /Steering Trims: 

They are used to adjust the center trim of the throttle/steering channel.

Steering Reverse: 

 It allows you to electronically switch the direction of steering servo travel. For example, 

if you move the steering wheel to the right and the steering servo moves to the left,flip the Steering Reverse 

Switch to make the steering servo move to the left.

Throttle Reverse :

 It allows you to electronically switch the direction that the motor operates in relation to the 

throttle trigger. For example, if you pull the throttle trigger to accelerate forward, but the model goes in reverse, 

flip the Throttle Reverse Switch to make the model accelerate forward.

Trigger:

 It controls the speed and braking ability of your car. Pull it to accelerate, release it to decelerate,and 

push it to brake. Pushing it a second time activates the reverse feature.

Indicators:

 It shows battery power level.Green indicator flashing means battery power is not enough. 

As long as bothred and green indicator goes flashing indicating that the radio controller runs out of battery 

power, you must replace with fresh batteries immediately. 

Bind/Mode button: 

It used to bind your 2.4GHz radio system.(This button is no longer used because your car

is automatically bound with your 2.4Ghz radio in system when both are switched on.)

A: Steering Wheel

B: Trigger

C: Battery Case


1: Steering Trim

2: Steering Reverse

3: Red Indicator

4: Power Switch

5: Steering Dual Rate

6: Throttle Trim

7: Throttle Reverse

8: Green Indicator

9: Bind/Mode button

Bind/Mode

BATTERY INSTALLATION

1) Slide the battery cover as shown , and according to the

     illustrations of polarities, install 3pcs of  AA size batteries. 

2) Replace the battery cover after batteries are installed.

 -Use batteries of same type.

 -Remove batteries from the case if not in use.

 -Always check the battery power. 

 -Dispose of exhausted batteries properly.

 NOTES:

Summary of Contents for 2118

Page 1: ...GEAR RATIO 1 9 06 22mm ITEM NO 2118 Technical Data Off Road Buggy OFF ROAD BUGGY READY TO RUN ITEM NO 2128 OFF ROAD TRUGGY ITEM NO 2138 OFF ROAD TRUCK Technical Data Off Road Truggy Technical Data Off...

Page 2: ...electronic components These have been carefully calibrated at the factory Only use manufactured parts to upgrade your car If you perform a drive train upgrade replace the entire system Such as motor...

Page 3: ...le with obstructed line of sight at night or near water Your vehicle is radio controlled Radio waves are subject to interference Radio interference can cause loss of control of your vehicle Take care...

Page 4: ...make the model accelerate forward Trigger It controls the speed and braking ability of your car Pull it to accelerate release it to decelerate and push it to brake Pushing it a second time activates...

Page 5: ...at centre 2 Turn it left to allow your vehicle turn to left 3 Turn it right to allow your vehicle turn to right A Pull the trigger back t push it to brake B To stop running your car release the trigge...

Page 6: ...crease STEERING D R 6 TO TUNE THE THROTTLE TRIM Throttle trim is used to set your idle speed THROTTLE TRIM 8 STEERING THROTTLE REVERSE Steering Reverse It allows you to electronically switch the direc...

Page 7: ...be able to drive at higher speeds in a more controlled way RUNNING PRACTICE TO CHARGE THE BATTERY PACK Remove the batteries from the car Use only the provided charger and charger box to charge the ba...

Page 8: ...stripped and or dirty gears 3 Clean and oil bushings or ball bearings 3 Check if there are damaged parts 1 Check if there are damaged parts MAINTAINING YOUR CAR After running your car the following p...

Page 9: ...Gears Metal Drive Pinion Gears Shock Springs ESC RECEIVER UNIT 5 Wire Steering Servo 9g Ball Stud 4 7 8P Aluminum Bottom Plate Main Drive Shaft 2 99 3mm Suspension Pins 1 5 12mm 8P NOTE THE PART IMAGE...

Page 10: ...s 4P Buggy Whees Complete 4P Truggy Wheels 4P 24023 24028R 24027R 24029 NOTE THE PART IMAGES MAY VARY FROM THE ACTUAL PARTS Ball Bearings 5 8 2 5mm 8P Li ion Battery 3 7v 800mAH 2P Charge Box Charger...

Page 11: ...25050 25051 25052 25053 25054 25055 25056 25057 25058 25059 Washer Head Self Tapping Screws 2 6mm 20P Washer Head Self Tapping Screws 2 10mm 20P Washer Head Screws 2 18mm 20P Countersunk Screws 1 5 5m...

Page 12: ...actory We do not take any responsibility for damage and or accidents that occur as the result of custom modifications and or incorrect operation Thank for purchasing our product This product is an aut...

Reviews: