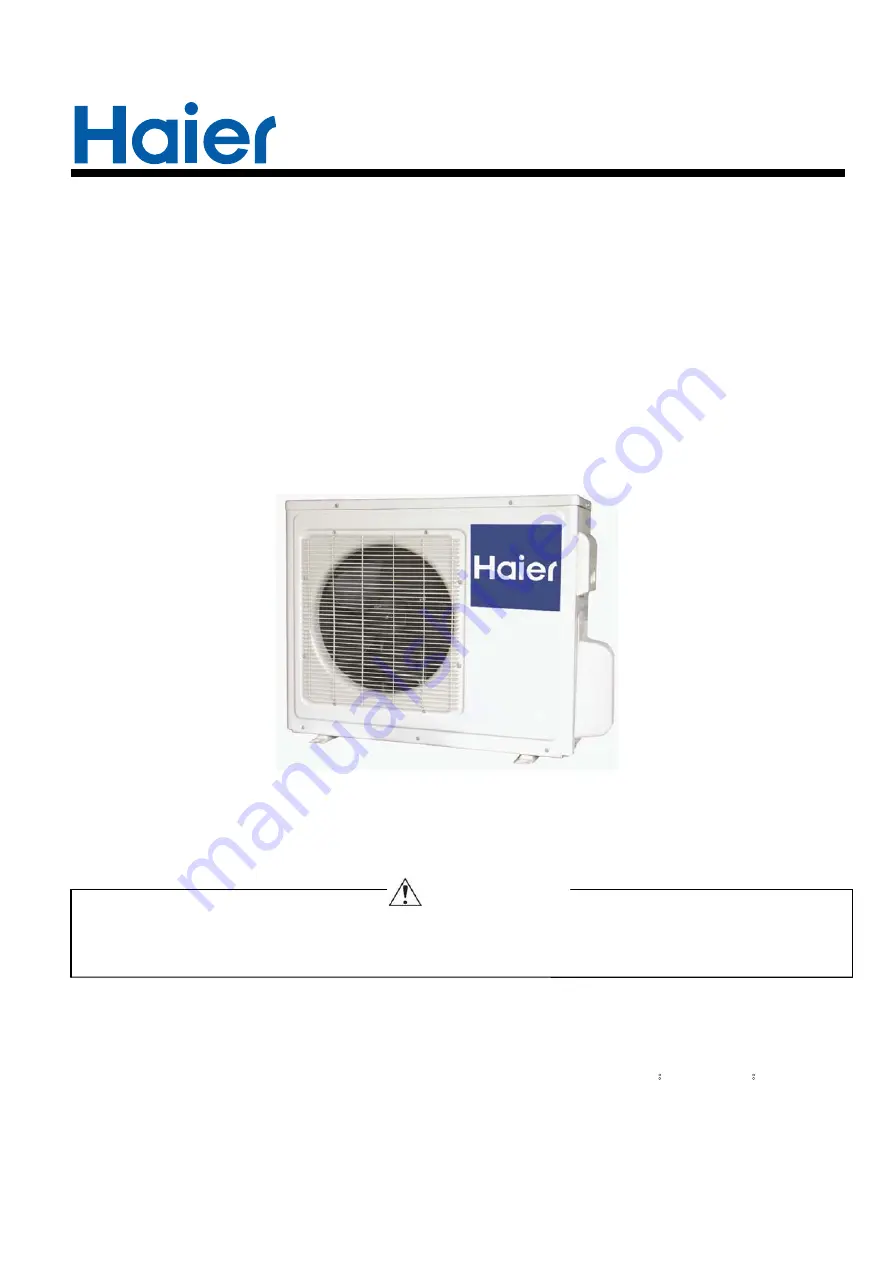
background image

SERVICE MANUAL

Wall Mounted Type

DC Inverter 

1U24RE8ERA

Model No.

This service information is designed for experienced repair technicians only and is not designed for use by the general public.
It does not contain warnings or cautions to advise non-technical individuals of potential dangers in attempting to service a product.
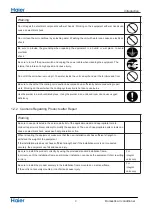
Products powered by electricity should be serviced or repaired only by experienced professional technicians. Any attempt to service or
Repair the product or products dealt with in this service information by anyone else could result in serious injury or death

WARNING

2015 (Qingdao Haier Air Conditioner General corp. , Ltd)

All rights reserved. Unauthorized copying and distribution is a violation of law

Haier Group

Version

˖

V1

Date

˖

2015-12-05

Summary of Contents for 1U24RE8ERA

Page 1: ...l dangers in attempting to service a product Products powered by electricity should be serviced or repaired only by experienced professional technicians Any attempt to service or Repair the product or products dealt with in this service information by anyone else could result in serious injury or death WARNING 2015 Qingdao Haier Air Conditioner General corp Ltd All rights reserved Unauthorized cop...

Page 2: ...ns 7 3 Sensors list 8 4 Piping diagrams 9 5 Operation range 10 6 Printed circuit board connector wiring diagram 11 7 Functions and control 8 Dimensional drawings 9 Center of gravity 10 Service diagnosis 11 Performance and curves diagrams 12 Circuit diagrams 15 48 30 29 29 56 ...

Page 3: ...e explanation 1 U 2 4 R E 8 E A R The maximum combination number Type of outdoor unit U normal type Nominal cooling capacity 24000BTU h Platform of outdoor units 2p 2p platform Europe Version number Heat pump R410A refrigerant DC inverter Apply toT1 220 240V50HZ 1ph 1 ...

Page 4: ...cket before disassembling the equipment for a repair Working on the equipment that is connected to a power supply can cause an electrical shook If it is necessary to supply power to the equipment to conduct the repair or inspecting the circuits do not touch any electrically charged sections of the equipment If the refrigerant gas discharges during the repair work do not touch the discharging refri...

Page 5: ...e welder in an enclosed room can cause oxygen deficiency 1 2 2 Cautions Regarding Products after Repair Warning Be sure to use parts listed in the service parts list of the applicable model and appropriate tools to conduct repair work Never attempt to modify the equipment The use of inappropriate parts or tools can cause an electrical shock excessive heat generation or fire When relocating the equ...

Page 6: ...s other than the specified refrigerant R 410A R22 in the refrigerant system If air enters the cooling system an excessively high pressure results causing equipment damage and injury If the refrigerant gas leaks be sure to locate the leak and repair it before charging the refrigerant After charging refrigerant make sure that there is no refrigerant leak If the leak cannot be located and the repair ...

Page 7: ...operly and if the connections at the soldered or crimped terminals are secure Improper installation and connections can cause excessive heat generation fire or an electrical shock If the installation platform or frame has corroded replace it Corroded installation platform or frame can cause the unit to fall resulting in injury Check the grounding and repair it if the equipment is not properly grou...

Page 8: ...cks Caution Caution A caution is used when there is danger that the reader through incorrect manipulation may damage equipment loose data get an unexpected result or has to restart part of a procedure Warning Warning A warning is used when there is danger of personal injury Reference A reference guides the reader to other places in this binder or in this manual where he she will find additional in...

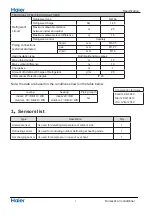
Page 9: ...e r u s s e e p d n u o S 65 B d r e w o p d n u o S ELECTRICAL SPECIFICATIONS g n i t a e h g n i l o o c 9 3 9 4 A t n e r r u c g n i n n u r l a n i m o N Maximum running current A 12 5 13 5 0 1 1 0 A t n e r r u c g n i t r a t S TECHNICAL SPECIFICATIONS PARTS g n i t a e h g n i l o o c Compressor r o s s e r p m o C y r a t o R e p y T TNB220FFEMC l e d o M 900 W t u p t u o r o t o M t PVE...

Page 10: ...s m 7 Amount of Additional Charge of Refrigerant g m 20 Intemational Protection degree IP 24 Note the data are based on the conditions shown in the table below cooling heating Piping length Indoor 27 DB 19 WB ć ć Outdoor 35 DB 24 WB ć ć Indoor 20 DB ć Outdoor 7 DB 6 WB ć ć 5m 3ˊSensors list type Description Qty Ambient sensor Its used for detecti 1 e d i s r o o d t u o f o e r u t a r e p m e t g...

Page 11: ...Pinping diagrams Domestic air conditioner 4ˊPiping diagrams 9 EEV EEV ...

Page 12: ... Operation range Domestic air conditioner 5ˊOperation range 10 ...

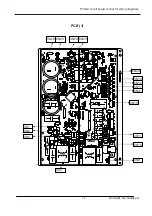
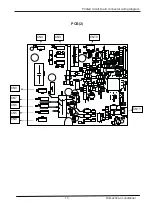
Page 13: ...rol board and the module board 9 CN28 CN25 Connector to P and N of the module board 10 CX2 Connector for communicate and power N between indoor and outdoor unit 11 CN15 Connector for electric expansion valves PCB 2 Module PCB For 1U24RE8ERA CN10 Connector for the DC power 5V and 15V form the control PCB CN11 Connector for communicate between the control board and the module board P CN1 N CN5 Conne...

Page 14: ...Printed circuit board connector wiring diagrams 12 Domestic air conditioner PCB 1 CN2 CX2 CN1 CN23 CN3 CN9 CN47 CN10 CN17 CN18 CN19 CN15 CN24 CN25 CN28 CN22 CN11 ...

Page 15: ...Printed circuit board connector wiring diagram 13 Domestic air conditioner PCB 2 CN4 CN3 CN10 CN11 CN5 CN8 CN9 CN6 CN7 ...

Page 16: ...CAP M VALVE MOTOR MOTOR WARNING CAUTION OUTDOOR UNIT WIRING DIAGRAM CAP CAP COMPRESSOR DON T TOUCH CAPACITOR EVEN AFTER PLUG OFF DANGER OF ELECTRIC SHOCK CN7 CN6 AC N OUT AC L OUT BR OR B A A CG A XG A PIPING CN21 CN17 TC TEMP SENSOR COMP DEFROST TEMP SENSOR CS CN18 AMBIENT TEMP SENSOR HW CN19 SUCTION TEMP SENSOR QX CN47 TEMP SENSOR BL OR W BL OR W BR OR B Note The dotted parts are optional B Blac...

Page 17: ...be prior to the calculated frequency 7 1 1 3 The speeds of increasing or decreasing the frequency of the compressor The speed of increasing or decreasing the frequency rapidly 1 1HZ second The speed of increasing or decreasing the frequency slowly 2 1HZ 10seconds 7 1 1 4 The calculation of the compressor s frequency 1 The minimum maximum frequency limitation AˊWhile refrigerating F MAX r is the ma...

Page 18: ...nd under the condition of maximum ability the maximum designing ability of the system T ě Ti Pi ěPi Ti Tst_i the setting temperature Tnh_i the indoor environment temperature Pi i the ability of the indoor unit Refrigeration dehumidification Heating mode K ě Ki Pi ěPi The calculation of the actual output frequency when there is no healthy airflow F F ED rated frequency hPhK When the healthy airflow...

Page 19: ... 14ć Ta 16ć Keeping the speed Ta 14ć High 7 1 3 The control of the outdoor Electronic expansion valve EEV 09K series have no this function In cooling mode the EEV opening range is 90 480 steps The EEV opening is 5 steps when unit is off In heating mode the EEV opening range is 60 480 steps The EEV opening is 45 steps when unit is off After outdoor unit is off the EEV opening keep the current on fo...

Page 20: ... for each time continuously sampling for 8 times then order them and take the mean value of the middle 2 values take the mean value TTC ć Abnormal stop 110 Decreasing the frequency rapidly 1HZ second 100 Decreasing the frequency slowly 1HZ 10seconds 98 The frequency doesn t change 93 Increasing the frequency 1HZ 10second 90 Increasing the frequency 1HZ 1second TTC 110ć lasts for 20 seconds Overhea...

Page 21: ...he compressor if the AC current is greater than 7A the frequency of the compressor increases at the prohibited speed ƽDuring the starting process of the compressor if the AC current is greater than 6 5A the frequency of the compressor increases at the speed of no faster than 0 1HZ second 7 1 5 4 The protection function of AC current During the starting process of the compressor if the AC current i...

Page 22: ...mp_3 3ć the frequency of the compressor increases at the speed of 1HZ 10seconds For example Tpg_indoorİ0ćˈlast for 2 minutes and then the outdoor unit will stop and report underload malfunction but don t send malfunction report to the indoor The compressor stops for more than 3 minutes Tpg_indoor ice_temp_3 2ć the compressor recovers 7 1 5 6 The frequency limitation of modification rate In the fie...

Page 23: ...6 1 62 19 87 2775 79 6222 72 5729 1 74 1 60 18 82 5577 75 4384 68 8710 1 72 1 59 17 78 1230 71 5010 65 3815 1 70 1 57 16 73 9543 67 7939 62 0907 1 68 1 55 15 70 0342 64 3023 58 9863 1 66 1 54 14 66 3463 61 0123 56 0565 1 64 1 52 13 62 8755 57 9110 53 2905 1 62 1 51 12 59 6076 54 9866 50 6781 1 60 1 49 11 56 5296 52 2278 48 2099 1 58 1 47 10 53 6294 49 6244 45 8771 1 56 1 46 9 50 8956 47 1666 43 67...

Page 24: ...14 0 78 0 78 24 10 7475 10 4216 10 0964 0 75 0 75 25 10 3000 10 0000 9 7000 0 75 0 75 26 9 8975 9 5974 9 2980 0 76 0 76 27 9 5129 9 2132 8 9148 0 80 0 80 28 9 1454 8 8465 8 5496 0 84 0 83 29 8 7942 8 4964 8 2013 0 87 0 86 30 8 4583 8 1621 7 8691 0 91 0 90 31 8 1371 7 8428 7 5522 0 95 0 93 32 7 8299 7 5377 7 2498 0 98 0 97 33 7 5359 7 2461 6 9611 1 02 1 00 34 7 2546 6 9673 6 6854 1 06 1 04 35 6 985...

Page 25: ...2 0695 1 9147 2 49 2 34 69 2 1652 2 0032 1 8516 2 54 2 38 70 2 0983 1 9393 1 7908 2 59 2 42 71 2 0337 1 8778 1 7324 2 63 2 46 72 1 9714 1 8186 1 6761 2 68 2 50 73 1 9113 1 7614 1 6219 2 73 2 54 74 1 8533 1 7064 1 5697 2 78 2 58 75 1 7974 1 6533 1 5194 2 83 2 63 76 1 7434 1 6021 1 4710 2 88 2 67 77 1 6913 1 5528 1 4243 2 92 2 71 78 1 6409 1 5051 1 3794 2 97 2 75 79 1 5923 1 4592 1 3360 3 02 2 80 80...

Page 26: ... 6361 0 5667 0 5043 4 80 4 31 113 0 6200 0 5518 0 4907 4 86 4 36 114 0 6043 0 5374 0 4775 4 92 4 41 115 0 5891 0 5235 0 4648 4 98 4 45 116 0 5743 0 5100 0 4524 5 04 4 50 117 0 5600 0 4968 0 4404 5 10 4 55 118 0 5460 0 4841 0 4288 5 16 4 60 119 0 5325 0 4717 0 4175 5 22 4 65 120 0 5194 0 4597 0 4066 5 28 4 70 Discharging Sensor R80ć 50K f3 B25 80ć 4450Kf3 Temp ć Max Kȍ Normal Kȍ Min Kȍ Tolerance ć ...

Page 27: ...3 6024 2 55 2 23 0 2167 2730 1887 0018 1641 4966 2 53 2 22 1 2045 9191 1784 3336 1554 7931 2 52 2 21 2 1932 0242 1687 8144 1473 1460 2 50 2 20 3 1825 0899 1597 0431 1396 2333 2 48 2 19 4 1724 6540 1511 6468 1323 7551 2 47 2 17 5 1630 2870 1431 2787 1255 4324 2 45 2 16 6 1541 5904 1355 6163 1191 0048 2 43 2 15 7 1458 1938 1284 3593 1130 2298 2 41 2 14 8 1379 7528 1217 2282 1072 8813 2 40 2 13 9 130...

Page 28: ... 9065 1 71 1 61 44 228 4809 212 4060 197 2844 1 69 1 59 45 218 3860 203 2887 189 0648 1 67 1 57 46 208 7855 194 6066 181 2273 1 65 1 55 47 199 6531 186 3369 173 7524 1 63 1 54 48 190 9639 178 4584 166 6217 1 60 1 52 49 182 6945 170 9508 159 8181 1 58 1 50 50 174 8228 163 7951 153 3249 1 56 1 48 51 167 3280 156 9733 147 1268 1 53 1 46 52 160 1904 150 4683 141 2090 1 51 1 44 53 153 3914 144 2641 135...

Page 29: ... 07 1 06 88 38 9643 37 5045 36 0668 1 11 1 09 89 37 6569 36 2078 34 7831 1 14 1 13 90 36 3996 34 9622 33 5513 1 18 1 16 91 35 1903 33 7653 32 3689 1 22 1 19 92 34 0269 32 6151 31 2338 1 26 1 23 93 32 9075 31 5096 30 1438 1 30 1 27 94 31 8302 30 4467 29 0970 1 33 1 30 95 30 7933 29 4246 28 0915 1 37 1 34 96 29 7950 28 4417 27 1254 1 41 1 37 97 28 8337 27 4961 26 1970 1 45 1 41 98 27 9078 26 5864 25...

Page 30: ...31 12 0503 11 2003 2 54 2 39 124 12 5840 11 6965 10 8617 2 58 2 43 125 12 2270 11 3545 10 5348 2 63 2 47 126 11 8817 11 0240 10 2191 2 68 2 51 127 11 5475 10 7046 9 9142 2 72 2 55 128 11 2242 10 3957 9 6197 2 77 2 59 129 10 9112 10 0970 9 3352 2 81 2 63 130 10 6084 9 8082 9 0602 2 86 2 67 131 10 3151 9 5288 8 7945 2 91 2 71 132 10 0312 9 2586 8 5378 2 95 2 75 133 9 7563 8 9971 8 2895 3 00 2 80 134...

Page 31: ...Dimensinal drawings Domestic air conditioner 8 Dimensional drawings 9 Center of gravity 29 890 988 697 353 353 890 12 7 3 4 890 288 677 374 353 132 unit mm unit mm ...

Page 32: ...ion error occurs between the indoor and outdoor units In either case conduct the diagnostic procedure described in the following pages Parameter of primary electronic appliance e r u t c i p r e t e m a r a p e m a n Compressor Rated voltage 220 230V Rated current 4 8A Rated frequency 50 60HZ Fan motor Rated voltage 220 230V Rated current 0 2A Rated frequency 50 60HZ Reactor Rated voltage 220 230V...

Page 33: ...ipment operates but does not cool or does not heat only for heat pump Check for faulty operation of the electronic expansion valve Set the units to cooling operation and compare the temperatures of the liquid side connection pipes of the connection section among rooms to check the opening and closing operation of the electronic expansion valves of the individual units Diagnosis by service port pre...

Page 34: ...o o d t u O 1 2 1 F 8 3 e g a P M P I f o n o i t c e t o r p e h T 2 1 F F22 3 Overcurrent protection of AC electricity for the outdoor model Page 39 F3 4 Communication fault between the IPM and outdoor PCB Page 41 F19 6 Power voltage is too high or low Page 42 F4 8 Overheat protection for Discharge temperature Page 43 F21 10 Defrost temperature sensor failure Page 33 F7 11 Suction temperature se...

Page 35: ...ut is more than 4 92V or less than 0 08V during compressor Decision operation Conditions z Note The values vary slightly in some models Supposed Ŷ Faulty connector connection Causes Ŷ Faulty thermistor Ŷ Faulty PCB Troubleshooting Caution Be sure to turn off power switch before connect or disconnect connector or else parts damage may be occurred Thermistor resistance check method Remove the connec...

Page 36: ...detected by the EEPROM are used to determine MCU Malfunction Detection Malfunction When the data of EEPROM is error or the EEPROM is damaged Decision Conditions Supposed Ŷ Faulty EEPROM data Causes Ŷ Faulty EEPROM Ŷ Faulty PCB Troubleshooting Caution Be sure to turn off power switch before connect or disconnect connector or parts damage may be occurred Replace the indoor or outdoor mainboard ...

Page 37: ...ue to faulty indoor unit PCB Troubleshooting Caution Be sure to turn off power switch before connect or disconnect connector or else parts damage may be occurred Check whether terminals on indoor pcb is well Electrify the machine again and turn it on in the cooling operation Measure voltage between the positions 1and 3 of Terminal CN5 on the indoor PCB the voltage is about 90 220vac check whether ...

Page 38: ... condition and so on Malfunction Detection Malfunction when the data of EEPROM is error or the EEPROM is damaged Decision Conditions Supposed Ƶ DC fan motor protection dues to the DC fan motor faulty Causes Ƶ DC fan motor protection dues to faulty PCB Troubleshooting Caution Be sure to turn off power switch before connect or disconnect connector or parts damage may be occurred ...

Page 39: ...an run Yes Measure the voltage between 3 and 6 of the terminal about 0 5v Is it normal N0 the motor of the outdoor unit is damaged and needs replacing Measure the voltage between 1 and 3 of the terminal of fan motor on the mainboard about DC310V Measure the voltage between 3 and 4 of the terminal about DC15V Measure the voltage between 5 and 3 of the terminal about 1 6v NO Is it normal The mainboa...

Page 40: ...es to faulty PCB of IPM module Ŷ Compressor wiring disconnected Troubleshooting Caution Be sure to turn off power switch before connect or disconnect connector or else parts damage may be occurred Electrify the machine again and turn it on with the remote controller If malfunctions are reported before or upon the compressor being started up IPM Module is damaged and needs replacing 1ǃThe system ma...

Page 41: ...s too high Malfunction Detection Malfunction when the IPM Module is damaged Decision or the compressor is damaged Conditions power supply voltage is too low or too high Supposed Ŷ Faulty IPM Module Causes Ŷ Faulty compressor Ŷ Faulty power supply Troubleshooting Caution Be sure to turn off power switch before connect or disconnect connector or parts damage may be occurred ...

Page 42: ...ressor being started up IPM Module is damaged and needs replacing Repair the power supply The system may have been over or under charged with gas which can be judged through the pressure of the measuring system YES NO Yes NO The compressor is started normally but malfunctions are reported after it has run for some time Check the power supply is too low or too high NO ...

Page 43: ...onnected Troubleshooting Caution Be sure to turn off power switch before connect or disconnect connector or else parts damage may be occurred 1 Check whether Terminal CN23 and CN24 on the outdoor mainboard CN10 and CN11 on IPM module 2 Check whether the connected wire between IPM and outdoor Are they good Electrify the machine again and turn it on Check whether the voltage between 1 and 2 of Termi...

Page 44: ...ply voltage not as specified Causes Ŷ the IPM module is broken Ŷ the outdoor PCB is broken Troubleshooting Caution Be sure to turn off power switch before connect or disconnect connector or else parts damage may be occurred Electrify the machine again and turn it on with the remote controller Check whether the compressor is started normally Is it ok Yes Maybe there is some disturbance NO No 230 is...

Page 45: ...urred Electrify the machine again and turn it on with the remote controller then measure the temperature at the exhaust temperature sensor of the compressor on the outdoor unit The temperature exceeds 110 ć shortly after the machine starts up 1 The cryogen may have been leaked during installation or there may be leakage in the piping system 2 There may be other causes to make the exhaust temperatu...

Page 46: ...sconnected Causes Ŷ The indoor PCB is broken Ŷ The outdoor PCB is broken Ŷ The Module PCB is broken Troubleshooting Caution Be sure to turn off power switch before connect or disconnect connector or else parts damage may be occurred NO A Yes NO Yes No YES Restart the a c and it becomes normally If starting up normally but malfunction occurs again after a while Check whether the linking cable betwe...

Page 47: ...outdoor unit with a multimeter If 230VAC is available but 310DC not the power module is damaged replace it with a new one Test the outdoor power supply 230VAC and 310VDC with a multimeter The outdoor mainboard is damaged replace it with a new one The indoor mainboard is damaged replace it with a new one If the value varies between 0 and 80 VAC the outdoor mainboard is damaged replace it with a new...

Page 48: ...or Ƶ Faulty PCB Troubleshooting Caution Be sure to turn off power switch before connect or disconnect connector or parts damage may be occurred Within 3 minutes after the machine is supplied with power and turned on with the remote controller check whether the compressor can start up 1 The wiring of compressor is incorrect or the connection is poor 2 The compressor is damaged At first the compress...

Page 49: ...ty heat exchanger Ƶ Faulty heat exchange sensor Ƶ Insufficient gas Troubleshooting Caution Be sure to turn off power switch before connect or disconnect connector or else parts damage may be occurred Electrify the machine again and turn it on with the remote controller check whether the wind temperature is below 65ć The malfunction is reported after the machine has run for some time 1 ǃ Check room...

Page 50: ...4782 5917 6375 6384 6101 5734 27 19ć 5920 5734 5582 5275 6685 7135 7016 6858 6281 30 22ć 6204 6072 5940 5610 6930 7590 7392 7128 6666 32 23ć 6529 6364 6236 5950 7350 7928 7892 7555 6960 35 24ć 6856 6788 6484 6268 7501 8360 8139 7720 7357 cooling value temerature table performance curves outdoor temp 4300 4800 5300 5800 6300 6800 7300 7800 8300 cooling capacity W cooling capacity and indoor outdoor...

Page 51: ...1477 1868 2354 2665 2845 27 19ć 1794 1738 1692 1126 1648 2045 2445 2912 3061 30 22ć 1825 1786 1747 1165 1645 2101 2506 2960 3164 32 23ć 1865 1818 1782 1235 1744 2195 2760 3137 3303 35 24ć 1904 1885 1801 1301 1780 2314 2846 3206 3492 power consumption value temp table performance curves outdoor temp 100 600 1100 1600 2100 2600 3100 3600 4100 power consumption w indoor temp DB WB power consumption a...

Page 52: ...999 2093 20ć 1922 2025 2099 25ć 1991 2104 2211 30ć 2190 2341 2481 35ć 2412 2499 2640 38ć 2533 2683 2853 40ć 2872 3025 3196 43ć 3238 3419 3610 performance curves cooling discharge pressure table indoor temp 1000 1500 2000 2500 3000 3500 4000 10ć 15ć 20ć 25ć 30ć 35ć 38ć 40ć 43ć discharge pressure Kpa outdoor temp DB WB cooling discharge pressure and temp curves 21 15ć 27 19ć 35 24ć ...

Page 53: ...1 3 7 8 6 4 7 20ć 4 2 0 1 1 9 8 3 5 7 25ć 5 4 0 1 0 0 9 3 9 7 30ć 6 5 0 1 7 4 9 5 3 8 35ć 1 1 1 1 6 5 9 3 4 8 38ć 4 3 1 1 6 8 9 7 8 8 40ć 976 1085 1247 43ć 1074 1171 1360 indoor temp performance curves cooling suction pressure table 350 550 750 950 1150 1350 1550 10ć 15ć 20ć 25ć 30ć 35ć 38ć 40ć ć suction pressure Kpa outdoor temp DB WB cooling suction pressure and temp curves ć ć ć ...

Page 54: ... 8 0 2 7 0 5 9 7 2 1ć 2 0 8 6 0 0 5 7 9 9 4 8 7 6ć 7 9 7 6 8 3 6 7 2 7 2 8 12 11ć 7 4 9 5 1 2 8 6 4 0 4 7 18 16ć 9 0 0 5 2 1 7 5 8 5 0 6 24 20ć 6 9 8 3 8 6 3 4 0 6 8 4 indoor temp humidity 46 heating capacity and indoor outdoor temp table performance curves 0 1000 2000 3000 4000 5000 6000 7000 8000 9000 heating capacity W heating capacity and indoor outdoor temp curves 10ć 20ć 27ć outdoor temp DB ...

Page 55: ...2 6 9 4 2 6 4 3 2 2 1ć 3 9 6 2 5 6 5 2 7 3 4 2 7 6ć 9 6 4 2 1 5 3 2 7 5 2 2 12 11ć 9 8 8 1 8 1 7 1 7 9 5 1 18 16ć 0 5 4 1 9 1 3 1 7 8 1 1 24 20ć 4 2 0 1 1 3 9 8 3 8 indoor temp humidity 46 power consumption value temp table performance curves 0 500 1000 1500 2000 2500 3000 15ć 10ć 7 8ć 2 1ć 7 6ć 12 11ć 18 16ć 24 20ć cooling capacity w outdoor temp DB WB heating capacity and indoor outdoor temp cur...

Page 56: ...4 3 3 7 6 1 3 2 1ć 1 1 8 3 6 2 6 3 7 2 4 3 7 6ć 9 2 6 3 0 2 5 3 2 8 3 3 12 11ć 5 0 5 3 4 1 4 3 0 4 2 3 18 16ć 9 3 3 3 0 1 2 3 7 0 0 3 24 20ć 8 0 8 2 8 2 7 2 5 0 6 2 performance curves heating discharge pressure table indoor temp 1000 1500 2000 2500 3000 3500 4000 15ć 10ć 7 8ć 2 1ć 7 6ć 12 11ć18 16ć24 20ć discharge pressure Kpa outdoor temp DB WB heating discharge pressure and temp curves 10ć 20ć 2...

Page 57: ... 3 5 4 9 4 2 1ć 2 7 6 2 5 6 3 1 6 7 6ć 5 0 8 5 8 7 6 4 7 12 11ć 6 0 9 6 8 8 7 4 8 18 16ć 1014 1053 1073 24 20ć 1200 1239 1259 performance curves heating suction pressure table indoor temp 0 100 200 300 400 500 600 700 800 900 1000 1100 1200 1300 1400 15ć 10ć 7 8ć 2 1ć 7 6ć 12 11ć18 16ć24 20ć suction pressure Kpa outdoor temp DB WB heating suction pressure and temp curves 10ć 20ć 27ć ...

Page 58: ... 34 P6_0 TREO 35 P4_5 INT0 36 P6_6 INT2 TXD1 37 P6_7 INT3 RXD1 38 P6_5 CLK1 CLK2 39 P6_4 RXD2 40 P6_3 TXD2 41 P3_1 TRBO 42 P3_0 TRAO 43 P3_6 INT1 44 P3_2 INT2 45 P1_3 KI3 AN11 46 P1_2 KI2 AN10 47 P1_1 KI1 AN9 48 P1_0 KI0 AN8 49 P0_0 AN7 50 P0_1 AN6 51 P0_2 AN5 52 P0_3 AN4 53 P0_4 AN3 54 P6_2 55 P6_1 56 P0_5 AN2 CLK1 57 P0_6 AN1 DA0 58 VSS AVSS 59 P0_7 AN0 DA1 60 VREF 61 VCC AVCC 62 P3_7 SSO 63 P3_...

Page 59: ...R018 4 7K R016 1K R012 4 7K R011 4 7K R004 4 7K R019 4 7K R213 100 1 2 3 4 5 6 7 8 IC4 HA1630D06 IC4 HA1630D06 R206 1K R205 1K R203 1K R204 6 2K R201 1K R202 6 2K 1 2 3 4 5 6 7 8 5V 5V 1 2 3 CN11 䙊䇟 TR2 2SA1037AK PC1 PC817A PC2 PC817A TR3 MMBT9013 C018 103 C016 472 C017 223 C014 102 C032 104 C036 104 C023 224 C015 102 C034 104 C001 104 5V C413 100U 25V D203 US1M D202 US1M D201 US1M C412 22U 25V C4...

Page 60: ...ms Domestic air conditioner Sincere Forever Haier Group Haier Industrial Park No 1 Haier Road 266101 Qingdao China_ Http www haier com Edited by Signed by Approved by Jing Yanqin Yang Xiaodong He S hiquan Wu Hongjin ...

Page 61: ...electricity should be serviced or repaired only by experienced professional technicians Any attempt to service or Repair the product or products dealt with in this service information by anyone else could result in serious injury or death WARNING 2015 Qingdao Haier Air Conditioner General corp Ltd All rights reserved Unauthorized copying and distribution is a violation of law Haier Group Version V...

Page 62: ...val of Outdoor panel Procedure Warning Be sure to wait 10 minutes or more after turning off all power supplies before disassembling work s t n i o P e r u d e c o r P p e t S s l e n a p e h t e v o m e R 1 1 Loosen the screws and lift the top panel and remove the handle ...

Page 63: ...e r u d e c o r p f o l a v o m e R 2 Domestic air conditioner s t n i o P e r u d e c o r P p e t S 2 Loosen the screws of the panel pull and remove the front panel ...

Page 64: ...ir conditioner 2 Removal of Electrical Box Procedure Warning Be sure to wait 10 minutes or more after turning off all power supplies before disassembling work Step Procedure Points 1 Remove the fixing screws Than lift the electrical box ...

Page 65: ...Removal Procedure 3 Removal of Fan and Fan Motor Loosen the fixing screws Remove the fan and motor 4 Domestic Air Conditioner ...

Page 66: ...Removal Procedure 4 Removal of Fan Motor Bracket and Partition Loosen the fixing screws and lift the fan motor bracket Remove the partition 5 Domestic Air Conditioner ...

Page 67: ...Removal Procedure 5 Removal of Compressor and Heat Exchanger Remove the valve plate Remove the valves and the compressor Loosen the screws and remove the heat exchanger 3 6 Domestic Air Conditioner ...

Reviews: