background image

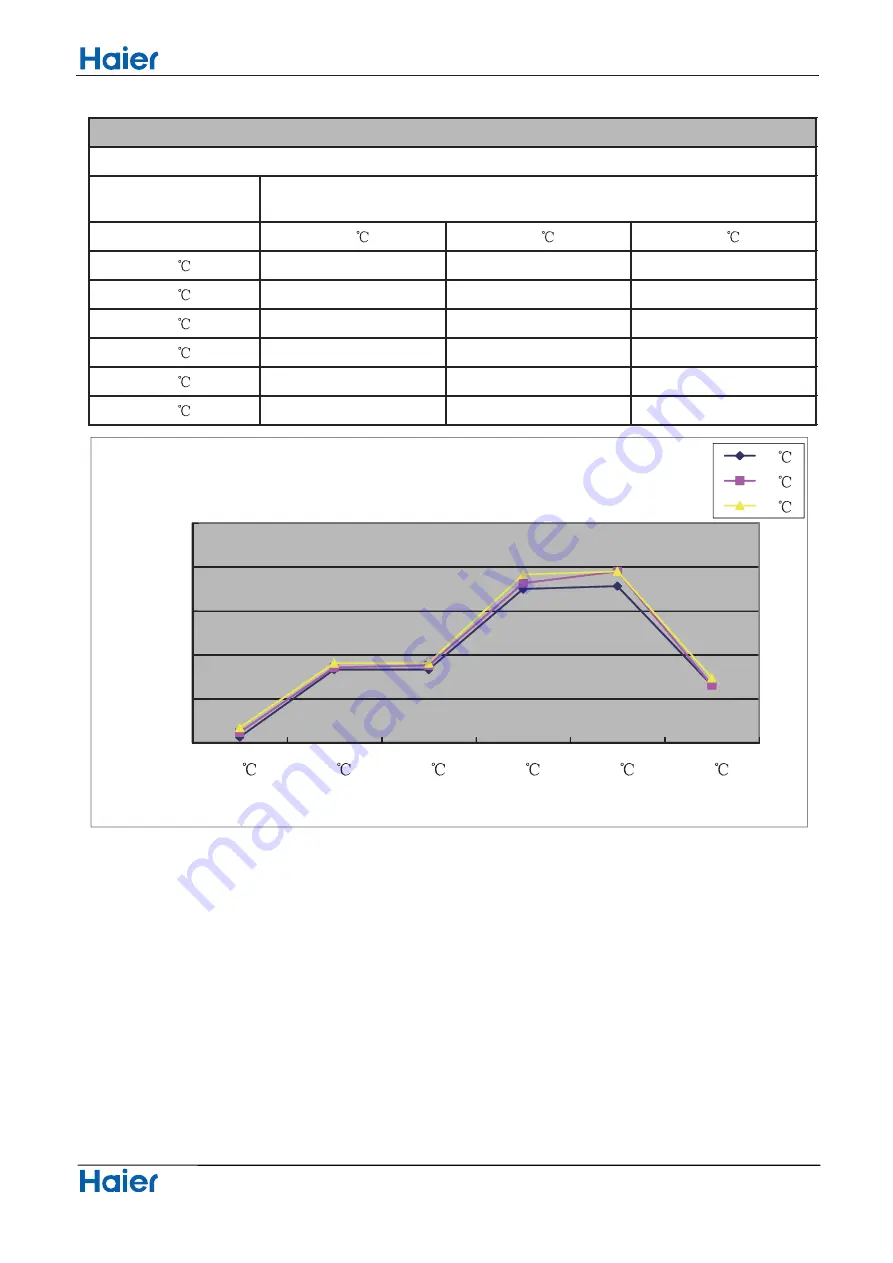
outdoor tem p.

(hum idity 46% )

D B/W B

16

19

22

15

1562

1616

1670

25

2331

2355

2403

30

2331

2379

2403

35

3248

3314

3414

40

3281

3447

3447

45

2154

2154

2237

(12+12)performancecurves

cooling discharge pressure.table

indoor tem p.

1500

2000

2500

3000

3500

4000

15

25

30

35

40

45

DI

S

CHA

RG

E

P

RE

S

S

URE

O utdoor Tem p

C O O LIN G D IS C H A R G E P R E S S U R E

16
19
22

Cooling discharge pressure


     Performance curves diagram


Domestic air conditioner


58

Summary of Contents for 2U50S2SF1FA

Page 1: ...duals of potential dangers in attempting to service a product Products powered by electricity should be serviced or repaired only by experienced professional technicians Any attempt to service or Repair the product or products dealt with in this service information by anyone else could result in serious injury or death WARNING 2016 Qingdao Haier Air Conditioner General corp Ltd All rights reserved...

Page 2: ...nsors list 8 4 Piping diagrams 9 5 Operation range 10 6 Printed Circuit Board Connector Wiring Diagram 11 7 Functions and Control 8 Dimensional drawings 9 Conter of gravity 10 Service Diagnosis 11 Performance and cerves diagrams 12 Sound level 13 Circuit diagrams 16 65 64 48 32 31 31 ...

Page 3: ...ame explanation 2 U 1 8 F E F F A R The maximum combination number Type of outdoor unit U normal type Nominal cooling capacity 18000BTU h Platform of outdoor units F F platform Europe Version number Heat pump R32 refrigerant DC inverter Apply toT1 220 240V50HZ 1ph 1 ...

Page 4: ...cket before disassembling the equipment for a repair Working on the equipment that is connected to a power supply can cause an electrical shook If it is necessary to supply power to the equipment to conduct the repair or inspecting the circuits do not touch any electrically charged sections of the equipment If the refrigerant gas discharges during the repair work do not touch the discharging refri...

Page 5: ...e welder in an enclosed room can cause oxygen deficiency 1 2 2 Cautions Regarding Products after Repair Warning Be sure to use parts listed in the service parts list of the applicable model and appropriate tools to conduct repair work Never attempt to modify the equipment The use of inappropriate parts or tools can cause an electrical shock excessive heat generation or fire When relocating the equ...

Page 6: ...dified power cable can cause an electrical shock or fire Placing heavy items on the power cable and heating or pulling the power cable can damage the cable Do not mix air or gas other than the specified refrigerant R 410A R22 in the refrigerant system If air enters the cooling system an excessively high pressure results causing equipment damage and injury If the refrigerant gas leaks be sure to lo...

Page 7: ... an electrical shock or fire If the power cable and lead wires have scratches or deteriorated be sure to replace them Damaged cable and wires can cause an electrical shock excessive heat generation or fire Warning Do not use a joined power cable or extension cable or share the same power outlet with other electrical appliances since it can cause an electrical shock excessive heat generation or fir...

Page 8: ...e attention of the reader to specific information The meaning of each icon is described in the table below 1 2 5 Using Icons List Icon Type of Information Description Note Note A note provides information that is not indispensable but may nevertheless be valuable to the reader such as tips and tricks Caution Caution A caution is used when there is danger that the reader through incorrect manipulat...

Page 9: ...ATIONS g n i t a e h g n i l o o c A t n e r r u c g n i n n u r l a n i m o N Maximum running current A A t n e r r u c g n i t r a t S TECHNICAL SPECIFICATIONS PARTS g n i t a e h g n i l o o c Compressor r o s s e r p m o C y r a t o R e p y T l e d o M W t u p t u o r o t o M Oil type FW68S L e m u l o v e g r a h c l i O Fan n a f l a i x A e p y T 0 4 W t u p t u o r o t o M 3 8 4 h m h g i ...

Page 10: ...ote the data are based on the conditions shown in the table below h t g n e l g n i p i P g n i t a e h g n i l o o c Indoor 27 DB 19 WB Outdoor 35 DB 24 WB Indoor 20 DB Outdoor 7 DB 6 WB 5m 3 Sensors list type Description Qty i t c e t e d r o f d e s u s t I r o s n e s t n e i b m A 1 e d i s r o o d t u o f o e r u t a r e p m e t g n Suction sensor Its used for detecting suction pipe temperat...

Page 11: ...Pinping diagrams Domestic air conditioner 4 Pinping diagrams 9 ...

Page 12: ...Domestic air conditioner 5 Operation range 10 Introduction ...

Page 13: ... for four way valve coil 7 CN15 8 CN16 Connector for thermistors 9 CN17 10 CN18 11 CN19 12 CN20 13 CN21 14 CN22 15 CN23 Connector for electric expansion valves Connector for fan motor Connector for DC POWER 15Vand 5V to the module board 16 CN24 Connector for communicate between the control board and the module board 17 CN25 18 CN28 Connector to N and P of the module board 19 CN36 Connector for com...

Page 14: ... e n n o c B C P s e i r e s 1 P CN8 2 N CN9 3 LO CN4 Connector for reactor 4 LI CN3 7 CN5 U 8 CN6 V 9 CN7 W 10 CN10 Connector for the DC power 5V and 15V form the control PCB 11 CN11 Connector for communicate between the control board and the module board Connector for CN27 CN25 on the control board 5 AC_L CN1 6 AC_N CN2 Connector for CN10 CN9 on the control board Connector for the compressor Wir...

Page 15: ...wiring diagram Domestic air conditioner PCB 1 CN9 CN10 CN36 CN11 CN15 CN17 CN18 CN20 CN3 CN5 CN2 CN25 CN28 CN23 CN24 CN2 CN1 CN47 CN19 CN21 CN16 CN22 13 ...

Page 16: ...wiring diagram 14 Domestic air conditioner PCB 2 CN4 CN3 CN10 CN6 CN5 CN8 CN11 CN9 CN7 CN1 CN2 ...

Page 17: ...ts are optional for different unit 2 The components of main pcb board is fixed facing to the compressor 0 1 3 2 5 DC FAN PIPE TEMP SENSOR PIPE TEMP SENSOR AMBIENT TEMP SENSOR DEFROST TEMP COMPRESSOR DISCHARGE TEMP SENSOR ELECTRIC 4 WAY VALVE 7 50 1 2 TO INDOOR UNIT A TO INDOOR UNIT B POWER 51 1 87 21 DON T TOUCH CAPACITOR EVEN AFTER PLUG OFF DANGER OF ELECTRIC SHOCK THE CAPACITOR RETAINS HIGH VOLT...

Page 18: ...r for operation the compressor should run according to the calculated frequency and every determined frequency for protection should be prior to the calculated frequency 7 1 1 3 The speeds of increasing or decreasing the frequency of the compressor The speed of increasing or decreasing the frequency rapidly 1 1HZ second The speed of increasing or decreasing the frequency slowly 2 1HZ 10seconds 7 1...

Page 19: ...e maximum ability limitation of the system When the starting ability is not the maximum its maximum frequency limitation is calculated by the following equations The frequency limitation which is affected by the temperature and under the condition of actual ability the actural running system ability the maximum frequency which is limited by the temperature and under the condition of maximum abilit...

Page 20: ...methods 100 times one cycle of procedure run is one time and about 5ms detection method for each time continuously sampling for 8 times then order them and take the mean value of the middle 2 values take the mean value TTC Abnormal stop 110 Decreasing the frequency rapidly 1HZ second 100 Decreasing the frequency slowly 1HZ 10seconds 98 The frequency doesn t change 93 Increasing the frequency 1HZ 1...

Page 21: ...he compressor increases at the speed of no faster than 0 1HZ second The protection function of AC current During the starting process of the compressor if the AC current is greater than 15A the frequency of the compressor decreases at the speed of 1HZ second During the starting process of the compressor if the AC current is greater than 13A the frequency of the compressor decreases at the speed of...

Page 22: ...ow speed according to the temperature conditions of the outdoor environment The outdoor fan control when heating The temperature of the outdoor air Ta Airflow speed Ta 22 Low 19 Ta 22 Keeping the speed 16 Ta 22 Medium 14 Ta 16 Keeping the speed Ta 14 High 7 1 5 The control of the outdoor electronic expansion valve When starting the compressor the opening size of the valve must be guaranteed to hav...

Page 23: ...s not high enough the control driven chip will enter into weak magnetic control this will help to relieve the problem of modification rate If during the course of weak magnetic control the modification rate is still not high enough enter into the control of decreasing frequency until the alarm of modification rate is relieved Temperature protection of the outdoor refrigerating coil When the defros...

Page 24: ...ions are prior to the units malfunctions Annex 1 Malfunction codes of the whole unit Remarks under the mode of refrigeration the malfunctions of each unit s thin pipe temperature sensor are not reported under the mode of heating the malfunctions of each unit s thick pipe temperature sensor are not reported F12 1 Outdoor EEPROM error F1 2 The protection of IPM F22 3 Overcurrent protection of AC ele...

Page 25: ... 3028 84 0695 76 5017 1 76 1 62 19 87 2775 79 6222 72 5729 1 74 1 60 18 82 5577 75 4384 68 8710 1 72 1 59 17 78 1230 71 5010 65 3815 1 70 1 57 16 73 9543 67 7939 62 0907 1 68 1 55 15 70 0342 64 3023 58 9863 1 66 1 54 14 66 3463 61 0123 56 0565 1 64 1 52 13 62 8755 57 9110 53 2905 1 62 1 51 12 59 6076 54 9866 50 6781 1 60 1 49 11 56 5296 52 2278 48 2099 1 58 1 47 10 53 6294 49 6244 45 8771 1 56 1 4...

Page 26: ...4 17 14 5748 14 0079 13 4510 0 93 0 92 18 13 9436 13 4185 12 9017 0 91 0 90 19 13 3431 12 8572 12 3778 0 88 0 87 20 12 7718 12 3223 11 8780 0 86 0 85 21 12 2280 11 8126 11 4011 0 83 0 83 22 11 7102 11 3267 10 9459 0 81 0 80 23 11 2172 10 8634 10 5114 0 78 0 78 24 10 7475 10 4216 10 0964 0 75 0 75 25 10 3000 10 0000 9 7000 0 75 0 75 26 9 8975 9 5974 9 2980 0 76 0 76 27 9 5129 9 2132 8 9148 0 80 0 8...

Page 27: ... 2 5246 2 3498 2 22 2 09 63 2 6232 2 4413 2 2700 2 26 2 13 64 2 5396 2 3611 2 1932 2 31 2 17 65 2 4591 2 2840 2 1195 2 36 2 21 66 2 3815 2 2098 2 0486 2 40 2 25 67 2 3068 2 1383 1 9803 2 45 2 29 68 2 2347 2 0695 1 9147 2 49 2 34 69 2 1652 2 0032 1 8516 2 54 2 38 70 2 0983 1 9393 1 7908 2 59 2 42 71 2 0337 1 8778 1 7324 2 63 2 46 72 1 9714 1 8186 1 6761 2 68 2 50 73 1 9113 1 7614 1 6219 2 73 2 54 7...

Page 28: ... 107 0 7247 0 6482 0 5792 4 51 4 07 108 0 7059 0 6308 0 5632 4 57 4 12 109 0 6877 0 6140 0 5478 4 63 4 16 110 0 6700 0 5977 0 5328 4 69 4 21 111 0 6528 0 5820 0 5183 4 74 4 26 112 0 6361 0 5667 0 5043 4 80 4 31 113 0 6200 0 5518 0 4907 4 86 4 36 114 0 6043 0 5374 0 4775 4 92 4 41 115 0 5891 0 5235 0 4648 4 98 4 45 116 0 5743 0 5100 0 4524 5 04 4 50 117 0 5600 0 4968 0 4404 5 10 4 55 118 0 5460 0 4...

Page 29: ...368 3158 2046 1961 2 60 2 26 3 2581 6752 2236 3876 1935 5371 2 58 2 25 2 2434 5487 2112 5459 1831 4826 2 56 2 24 1 2296 6230 1996 2509 1733 6024 2 55 2 23 0 2167 2730 1887 0018 1641 4966 2 53 2 22 1 2045 9191 1784 3336 1554 7931 2 52 2 21 2 1932 0242 1687 8144 1473 1460 2 50 2 20 3 1825 0899 1597 0431 1396 2333 2 48 2 19 4 1724 6540 1511 6468 1323 7551 2 47 2 17 5 1630 2870 1431 2787 1255 4324 2 4...

Page 30: ...61 224 4465 1 76 1 64 42 250 2676 232 0436 214 9529 1 74 1 63 43 239 0983 221 9825 205 9065 1 71 1 61 44 228 4809 212 4060 197 2844 1 69 1 59 45 218 3860 203 2887 189 0648 1 67 1 57 46 208 7855 194 6066 181 2273 1 65 1 55 47 199 6531 186 3369 173 7524 1 63 1 54 48 190 9639 178 4584 166 6217 1 60 1 52 49 182 6945 170 9508 159 8181 1 58 1 50 50 174 8228 163 7951 153 3249 1 56 1 48 51 167 3280 156 97...

Page 31: ...7996 1 03 1 02 87 40 3241 38 8545 37 4048 1 07 1 06 88 38 9643 37 5045 36 0668 1 11 1 09 89 37 6569 36 2078 34 7831 1 14 1 13 90 36 3996 34 9622 33 5513 1 18 1 16 91 35 1903 33 7653 32 3689 1 22 1 19 92 34 0269 32 6151 31 2338 1 26 1 23 93 32 9075 31 5096 30 1438 1 30 1 27 94 31 8302 30 4467 29 0970 1 33 1 30 95 30 7933 29 4246 28 0915 1 37 1 34 96 29 7950 28 4417 27 1254 1 41 1 37 97 28 8337 27 4...

Page 32: ...1 2003 2 54 2 39 124 12 5840 11 6965 10 8617 2 58 2 43 125 12 2270 11 3545 10 5348 2 63 2 47 126 11 8817 11 0240 10 2191 2 68 2 51 127 11 5475 10 7046 9 9142 2 72 2 55 128 11 2242 10 3957 9 6197 2 77 2 59 129 10 9112 10 0970 9 3352 2 81 2 63 130 10 6084 9 8082 9 0602 2 86 2 67 131 10 3151 9 5288 8 7945 2 91 2 71 132 10 0312 9 2586 8 5378 2 95 2 75 133 9 7563 8 9971 8 2895 3 00 2 80 134 9 4901 8 74...

Page 33: ...Dimensinal drawings Domestic air conditioner 8 Dimensional drawings 9 Center of gravity Outdoor unit 31 A B C D Modello 2U50S2SF1FA Dimensioni impronta a terra A 113 5 mm B 583 mm C 113 5 mm D 319 5 mm ...

Page 34: ... outdoor units In either case conduct the diagnostic procedure described in the following pages 10 2 Parameter of primary electronic appliance e r u t c i P r e t e m a r a P e m a N O N 1 Compressor Rated voltage 220 230V Rated current 8 4A Rated frequency 50 60Hz Resistance 0 93 2 Fan motor Rated voltage DC 224 336V Rated current 0 236 0 288A Rated frequency 50 60Hz Rated power 41W 3 Reactor Rat...

Page 35: ...tes but does not cool or does not heat only for heat pump Check for faulty operation of the electronic expansion valve Set the units to cooling operation and compare the temperatures of the liquid side connection pipes of the connection section among rooms to check the opening and closing operation of the electronic expansion valves of the individual units Diagnosis by service port pressure and op...

Page 36: ...e 32 F1 ƶ ƾ ƾ 2 The protection of IPM Page 36 F22 ƾ ƾ Ƶ 3 Overcurrent protection of AC electricity for the outdoor model Page 37 F3 Ƶ ƾ Ƶ 4 Communication fault between the IPM and outdoor PCB Page 39 F19 Ƶ ƾ ƶ 6 Power voltage is too high or low Page 40 F4 Ƶ ƾ Ƶ 8 Overheat protection for Discharge temperature Page 41 F21 ƶ ƶ ƾ 10 Defrost temperature sensor failure Page 31 F7 Ƶ ƾ Ƶ 11 Suction temper...

Page 37: ...essor n o i t a r e p o n o i s i c e D Conditions Note The values vary slightly in some models Supposed Ŷ Faulty connector connection Causes Ŷ Faulty thermistor Ŷ Faulty PCB Troubleshooting Caution Be sure to turn off power switch before connect or disconnect connector or else parts damage may be occurred Thermistor resistance check method Remove the connector of the thermistor on the PCB and mea...

Page 38: ...CU Malfunction Detection Malfunction When the data of EEPROM is error or the EEPROM is damaged Decision Conditions Supposed Ŷ Faulty EEPROM data Causes Ŷ Faulty EEPROM Ŷ Faulty PCB Troubleshooting Caution Be sure to turn off power switch before connect or disconnect connector or parts damage may be occurred Replace the indoor or outdoor mainboard Service diagnosis Domestic air conditioner 36 ...

Page 39: ...rminal on the indoor mainboard is well inserted Is it normal Yes NO Reinsert the terminals Electrify the machine again and turn it on in the Cool state with the remote controller check whether motor can run Yes Measure the voltage between 3 and 6 of the terminal about 0 5v Is it normal N0 the motor of the indoor unit is damaged and needs replacing Measure the voltage between 1 and 4 of the termina...

Page 40: ...to faulty indoor unit PCB Troubleshooting Caution Be sure to turn off power switch before connect or disconnect connector or else parts damage may be occurred Check whether terminals on indoor pcb is well Electrify the machine again and turn it on in the cooling operation Measure voltage between the positions 1and 3 of Terminal CN9 on the indoor PCB the voltage is about 90 220vac check whether mot...

Page 41: ...ndition and so on Malfunction Detection Malfunction when the data of EEPROM is error or the EEPROM is damaged Decision Conditions Supposed Ŷ DC fan motor protection dues to the DC fan motor faulty Causes Ŷ DC fan motor protection dues to faulty PCB Troubleshooting Caution Be sure to turn off power switch before connect or disconnect connector or parts damage may be occurred 39 ...

Page 42: ...power switch before connect or disconnect connector or else parts damage may be occurred 12 6 Electrify the machine again and turn it on with the remote controller If malfunctions are reported before or upon the compressor being started up IPM Module is damaged and needs replacing The compressor is started normally but malfunctions are reported after it has run for some time 1ǃThe system may have ...

Page 43: ...ower switch before connect or disconnect connector or parts damage may be occurred Electrify the machine again and turn it on with the remote controller If malfunctions are reported before or upon the compressor being started up IPM Module is damaged and needs replacing Repair the power supply The system may have been over or under charged with gas which can be judged through the pressure of the m...

Page 44: ...rn off power switch before connect or disconnect connector or else parts damage may be occurred 1 Check whether Terminal CN23 and CN24 on the outdoor mainboard CN10 and CN11 on IPM module 2 Check whether the connected wire between IPM and outdoor Are they good Electrify the machine again and turn it on Check whether the voltage between 1 and 2 of Terminal CN23 is about DC5V Check whether the volta...

Page 45: ...module is broken Ŷ the outdoor PCB is broken Troubleshooting Caution Be sure to turn off power switch before connect or disconnect connector or else parts damage may be occurred Electrify the machine again and turn it on with the remote controller Check whether the compressor is started normally Is it ok Yes Maybe there is some disturbance NO No 230 is ok Yes Yes This question may be caused by the...

Page 46: ...on with the remote controller then measure the temperature at the exhaust temperature sensor of the compressor on the outdoor unit The temperature exceeds 110 ć shortly after the machine starts up 1 The cryogen may have been leaked during installation or there may be leakage in the piping system 2 There may be other causes to make the exhaust temperature too high Malfunctions occur after running f...

Page 47: ... PCB Malfunction Detection Malfunction Ŷ The outdoor PCB broken leads to communication fault Decision Ŷ The indoor PCB broken leads to communication fault Conditions Supposed Ŷ Communication wiring disconnected Causes Ŷ The indoor PCB is broken Ŷ The outdoor PCB is broken Ŷ The Module PCB is broken Troubleshooting Caution Be sure to turn off power switch before connect or disconnect connector or e...

Page 48: ...oor pcb is damaged replace it with a new one NO Measure the voltage Between 3 and 4 of IC9 on the Outdoor mainboard with a Multimete The voltage is a constant value of 0V DC to 5V DC The outdoor pcb is damaged replace it with a new one YES NO The outdoor pcb is well and then check the cable If the voltage is a constant value of 0V DC to 5V DC Or the voltage between Communication line red and N whi...

Page 49: ...e to turn off power switch before connect or disconnect connector or parts damage may be occurred Within 3 minutes after the machine is supplied with power and turned on with the remote controller check whether the compressor can start up 1 The wiring of compressor is incorrect or the connection is poor 2 The compressor is damaged At first the compressor start up soon the compressor stopped with t...

Page 50: ...r Ƶ Insufficient gas Troubleshooting Caution Be sure to turn off power switch before connect or disconnect connector or else parts damage may be occurred Electrify the machine again and turn it on with the remote controller check whether the wind temperature is below 65ć The malfunction is reported after the machine has run for some time 1 ǃ Check room temperature and pipe temperature sensor 2ǃ th...

Page 51: ...764 3543 2606 25 18 3086 3000 4920 4639 4207 3986 3853 2880 27 19 3171 3057 5014 4779 4340 4119 3941 2949 30 22 3371 3343 5389 5154 4739 4561 4429 3326 32 23 3400 3371 5482 5248 4827 4606 4473 3360 32 24 3457 3429 5576 5342 4916 4694 4561 3429 outdoor tem p hum idity 46 cooling value temerature table 9 12 performancecurves 1000 1500 2000 2500 3000 3500 4000 4500 5000 5500 6000 18 C 20 C 25 C 32 C ...

Page 52: ...1 4554 4286 2986 25 18 3549 3450 4530 4271 5089 4821 4661 3300 27 19 3647 3516 4616 4401 5250 4982 4768 3379 30 22 3877 3844 4961 4746 5732 5518 5357 3811 32 23 3910 3877 5048 4832 5839 5571 5411 3850 32 24 3976 3943 5134 4918 5946 5679 5518 3929 outdoor tem p hum idity 46 cooling value temerature table 12 12 performancecurves cooling capacity temp curves Performance curves diagram Domestic air co...

Page 53: ... 4 2 4 0 5 1 6 5 5 7 6 4 9 4 4 5 5 9 4 9 1 3 5 15 4 1 5 3 9 2 1 4 2 5 3 4 20 4 1 2 3 2 6 8 3 2 0 0 4 25 9 0 3 3 6 9 9 3 8 2 1 4 indoor tem p hum idity 46 heating capacity and indoor outdoor temp table 9 12 performancecurves heating capacity and indoor outdoor temp curves Performance curves diagram Domestic air conditioner 51 ...

Page 54: ... 2 1 6 0 7 5 6 15 1 5 0 4 0 6 8 4 7 1 0 5 20 0 7 6 3 2 2 5 4 9 6 5 4 25 8 7 7 3 8 7 6 4 3 1 7 4 indoor tem p hum idity 46 heating capacity and indoor outdoor temp table 12 12 performancecurves heating capacity and indoor outdoor temp curves heating capacity temp curves Performance curves diagram Domestic air conditioner 52 ...

Page 55: ... 1434 1514 1588 810 27 19 533 524 1309 1412 1456 1529 1617 817 30 22 539 545 1360 1470 1522 1632 1706 875 32 23 548 536 1375 1514 1544 1662 1728 976 32 24 558 527 1397 1544 1566 1691 1750 1048 outdoor tem p hum idity 46 power consumption value temp table 9 12 performancecurves 100 300 500 700 900 1100 1300 1500 1700 1900 p o w e r co n su m p tio n w indoor tem pe DB W B power consum ption temp cu...

Page 56: ...3 1726 1826 701 30 22 543 549 1006 1088 1718 1843 1926 750 32 23 552 539 1017 1121 1743 1876 1951 837 32 24 561 530 1034 1142 1768 1909 1975 899 outdoor tem p hum idity 46 power consumption value temp table 12 12 performancecurves 100 300 500 700 900 1100 1300 1500 1700 1900 2100 p o w e r co n su m p tio n w indoor tem pe DB W B power consum ption temp curves 18 20 25 32 35 40 43 46 Coolingpower ...

Page 57: ...494 515 559 25 497 520 562 indoor tem p hum idity 46 power consumption value temp table 9 12 performancecurves conoling capacity w 800 900 1000 1100 1200 1300 1400 1500 1600 1700 1800 15 5 5 7 6 15 20 25 co o lin g ca p a city w indoor tem pe DB W B heating capacity and indoor outdoor tem p curves 15 20 25 Performance curves diagram Domestic air conditioner 55 ...

Page 58: ...hum idity 46 power consumption value temp table 12 12 performancecurves conoling capacity w 800 900 1000 1100 1200 1300 1400 1500 1600 1700 1800 15 5 5 7 6 15 20 25 co o lin g ca p a city w indoor tem pe DB W B heating capacity and indoor outdoor tem p curves 15 20 25 heating power consumption temp curves Performance curves diagram Domestic air conditioner 56 ...

Page 59: ... 3366 3400 35 3332 3400 3502 40 3366 3536 3536 45 2600 2600 2700 9 12 performancecurves cooling discharge pressure table indoor tem p 1500 2000 2500 3000 3500 4000 15 25 30 35 40 45 D IS C H A R G E P R E S S U R E Outdoor Tem p COOLING DISCHARGE PRESSURE 16 19 22 Performance curves diagram Domestic air conditioner 57 ...

Page 60: ...0 3281 3447 3447 45 2154 2154 2237 12 12 performancecurves cooling discharge pressure table indoor tem p 1500 2000 2500 3000 3500 4000 15 25 30 35 40 45 D IS C H A R G E P R E S S U R E Outdoor Tem p COOLING DISCHARGE PRESSURE 16 19 22 Cooling discharge pressure Performance curves diagram Domestic air conditioner 58 ...

Page 61: ... DB W B 16 19 22 15 7 8 6 5 6 6 3 4 6 25 6 8 8 9 6 8 0 6 8 30 6 8 8 8 7 8 0 6 8 35 3 1 9 6 8 8 9 6 8 40 2 2 9 2 2 9 8 7 8 45 4 0 7 8 7 6 8 7 6 9 12 performancecurves cooling suction pressure table indoor tem p Performance curves diagram Domestic air conditioner 59 ...

Page 62: ... 563 574 580 35ć 784 800 824 40ć 792 832 832 45ć 520 520 540 performance curves cooling suction pressure table indoor tem p ć ć ć ć ć ć 68 7 21 35 6685 2XWGRRU 7HPS 22 1 68 721 35 6685 ć ć ć cooling suction pressure curves 12 12 Performance curves diagram Domestic air conditioner 60 ...

Page 63: ...3165 3261 5 3165 3197 3293 10 3062 3154 3200 15 2567 2644 2669 20 2459 2507 2531 9 12 performancecurves Heating discharge pressure table indoor tem p 1000 1500 2000 2500 3000 3500 4000 15 10 5 0 5 10 15 20 D IS C H A R G E P R E S S U R E Outdoor Tem p HEATING DISCHARGE PRESSURE 15 20 25 Performance curves diagram Domestic air conditioner 61 ...

Page 64: ...46 3090 15 2420 2492 2516 20 2317 2362 2384 12 12 performancecurves Heating discharge pressure table indoor tem p 1000 1500 2000 2500 3000 3500 4000 15 10 5 0 5 10 15 20 D IS C H A R G E P R E S S U R E Outdoor Tem p HEATING DISCHARGE PRESSURE 15 20 25 heating discharge pressure curves Performance curves diagram Domestic air conditioner 62 ...

Page 65: ...6 7 0 5 7 0 1 0 8 7 7 7 2 6 7 5 9 0 8 5 8 7 7 7 7 10 6 8 7 5 7 7 2 5 7 15 6 5 6 9 4 6 1 3 6 20 2 2 6 6 1 6 4 0 6 9 12 performancecurves heating discharge pressure table indoor tem p 400 500 600 700 800 900 15 10 5 0 5 10 15 20 S U C T IO N P R E S S U R E Outdoor Tem p 15 20 25 Performance curves diagram Domestic air conditioner 63 ...

Page 66: ... 5 2 8 6 1 8 10 1 8 7 0 7 7 7 4 7 15 6 3 6 0 3 6 1 1 6 20 2 0 6 7 9 5 5 8 5 12 12 performancecurves heating discharge pressure table indoor tem p 400 500 600 700 800 900 1000 15 10 5 0 5 10 15 20 S U C T IO N P R E S S U R E Outdoor Tem p 15 20 25 heating suction pressure curves Performance curves diagram Domestic air conditioner 64 ...

Page 67: ...Octave band center frequency Hz approximate threshold hearing for continuous noise 63 125 250 500 1000 2000 4000 8000 20 30 40 50 60 70 80 53 106 212 425 850 1700 3400 6800 NC 70 NC 60 NC 50 NC 40 NC 30 NC 20 Model Sound presure level 230V 50Hz Cooling heating Measuring location sound power level cooling heating H L SL Location of microphone 48 61 2U50S2SF1FA 2U18FEFFRA 12 Sound level Sound level ...

Page 68: ...B287 9 9 9 䇗䗳 ড作 Ⳉ 亢ᴎ 1 9 ॳ㡆 ゟᓣ N 5 5 N X 1B 1B 5 1 9 5 5 1 9 1 9 5 X 9 ć 5 5 X 9 9 X 9 5 N 9DOYH 9DOYH 5 N 5 N 9DOYH 5 N 9DOYH 9DOYH 9DOYH 9 DO YH 9 DO YH 5 N 5525 N 5 N 5 N 5 N 5 1 8 7 21 7 67 3 B7 3 B7 7B 1 2 2 B 1 7 67B 1 7B 1 22 B 1 7 67B 1 9 7 67 66 1 5 0 2 B5 0 2 B7 9 9 20 1 5 N 5 N N 5 5 1 ഫᵓ䗮䆃 咥 02 B5 02 B7 5 5 N 5 N 37 37 32 5 32 5 1 9 N 5 X UHTXF B M UHTXF B M 6 7 67 㪱 N 5 X 9DOYH DQB M...

Page 69: ...estic air conditioner Q 9 5 Q 9 9 9 5 5 5 7 Q 9 5 Q 9 9 9 5 5 5 7 1 1 1 5 5 1 6 1 6 20 20 1 1 20 20 1 20 20 1 5 1 9 5 5 1 1 20 3URWHFW 3URWHFW 3URWHFW 5 1 9 5 5 1 1 20 3URWHFW 1 1 1 86 0 86 0 5 N 5 N 5 N 5 N 5 N 5 N 5 N 5 N 5 N 5 N 7 3 36 7 3 36 7 3 36 7 3 36 7 3 3 7 3 3 7 3 3 7 3 3 5 5 67 ...

Page 70: ... 1 1 2 3 4 5 6 7 8 9 10 11 12 13 14 15 16 17 18 19 20 21 22 23 24 25 26 27 28 29 30 31 32 33 34 35 36 37 38 39 40 41 42 43 44 45 46 47 48 49 50 51 52 53 54 55 56 57 58 59 60 61 62 63 64 IC1 R5F562T7DDFK 5V R020 10K R021 10K R010 4 7K R025 10K 5V 5V 1 2 3 JP2 5V R001 10K TR4 MMBT9012 2SA1037AK R027 10K R028 2K R026 2K P N VUFB VP UN VVFB VWFB WP UP VP1 VN1 WN VNC VN FO CIN VNC VNO U V W 2 3 4 5 6 7...

Page 71: ...ic air conditioner Sincere Forever Haier Group Haier Industrial Park No 1 Haier Road 266101 Qingdao China_ Http www haier com Edited by Signed by Approved by Shi haiyan Yang xiaodong Wang caiping Yang wenjun ...

Page 72: ... advise non technical individuals of potential dangers in attempting to service a product Products powered by electricity should be serviced or repaired only by experienced professional technicians Any attempt to service or Repair the product or products dealt with in this service information by anyone else could result in serious injury or death WARNING Version V1 Date 2016 11 02 REMOVAL PROCEDUR...

Page 73: ...omestic air conditioner Removal of procedure 1 Removal of Outdoor panel 1 s t n i o P e r u d e c o r P p e t S 1 Features 1 Loosen the service cover screws and remove the service cover Be careful not to ...

Page 74: ... air conditioner Removal of procedure 2 s t n i o P e r u d e c o r P p e t S 2 Remove the panels 1 Loosen the 4 screws and lift the top panel 2 Loosen the screws of the panel 3 Pull and remove the front panel ...

Page 75: ...Domestic air conditioner 2 Removal of Electrical Box Removal of procedure 3 s t n i o P e r u d e c o r P p e t S screws and then lift the electrical box ...

Page 76: ...Domestic air conditioner 3 Romoval of the Side panel Removal of procedure 4 s t n i o P e r u d e c o r P p e t S 1 screws and remove the side panel ...

Page 77: ...Domestic air conditioner Removal of procedure 5 s t n i o P e r u d e c o r P p e t S 2 Remove the 3 screws and remove the side panel ...

Page 78: ...Domestic air conditioner 4 Removal of Fan and Fan motor Removal of procedure 6 s t n i o P e r u d e c o r P p e t S 1 Loosen the remove the fan Put the lead wire of motor when the propeller fan ...

Page 79: ...Domestic air conditioner Removal of procedure 7 s t n i o P e r u d e c o r P p e t S 2 screws and lift the fan motor ...

Page 80: ...Domestic air conditioner Removal of procedure 8 s t n i o P e r u d e c o r P p e t S 3 screws and then lift ...

Page 81: ...Domestic air conditioner Removal of procedure 9 s t n i o P e r u d e c o r P p e t S 4 loosen fixing screws and lift the proof plate ...

Page 82: ...Domestic air conditioner Removal of procedure 10 s t n i o P e r u d e c o r P p e t S 1 Remove compressor ...

Page 83: ...Domestic air conditioner Removal of procedure 11 s t n i o P e r u d e c o r P p e t S 2 ...

Page 84: ...Domestic air conditioner Removal of procedure 12 s t n i o P e r u d e c o r P p e t S 3 ...

Page 85: ...Domestic air conditioner Removal of procedure 13 s t n i o P e r u d e c o r P p e t S 4 Remove the ...

Reviews: