background image

LOCK

RESET

13

GUIDE TO OPERATION

TIMER operation

Hints

Set Clock correctly before starting Timer operation(refer to page 7)

You can let unit start or stop automatically at following times: Before you wake up in the
morning, or get back from outside or after you fall asleep at night.

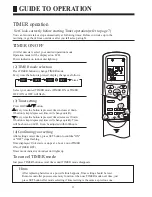
TIMER ON/OFF

(1)After unit start, select your desired operation mode.

Operation mode will be displayed on LCD.

Power indicator on indoor unit lights up.

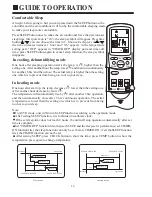
(2)TIMER mode selection

Press TIMER button to change TIMER mode.

Every time the button is pressed, display changes as follows:

Select your desired TIMER mode (TIMER ON or TIMER

OFF) ON or OFF will flash.

(3)Timer setting

Press HOUR           button.

    Every time the button is pressed, time increases 10min.
If button is kept depressed, time will change quickly.
    Every time the button is pressed, time decreases 10min.
If button is kept depressed, time will change quickly. Time
will be shown on LCD. It can be adjusted within 24hours.

(4)Confirming your setting

After setting correct time, press SET button to confirm "ON"
or "OFF" stops flashing
Time displayed: Unit starts or stops at x hour x min (TIMER
ON or TIMER OFF).
Timer mode indicator on indoor unit lights up.

To cancel TIMER mode

Just press TIMER button several times until TIMER mode disappears.

After replacing batteries or a power failure happens, Time setting should be reset.
Remote controller possesses memory function, when use TIMER mode next time, just
press SET button after mode selecting if timer setting is the same as previous one.

ON

OFF

ON

OFF

TIMER OFF

TIMER ON

TIMER ON-OFF

TEMP

SWING

FAN

ON

OFF

MODE

SLEEP

SET

CLOCK

TIMER

*

ON

AM

2

1

4

3

3

blank

Summary of Contents for AC142ACBAC

Page 1: ...AU242ABNAC HCFU 24CL03 R1 AC28NACNAC AU28NACNAC HCFU 28CM03 R1 AC36NACNAC AU36NABNAC HCFU 36CM03 R1 AC42NACNAC AU42NABNAC HCFU 42CM03 R1 AC142ACBAC AU142ABBAC HCFU 14HL03 R1 AC182ACBAC AU182ABBAC HCFU 18HL03 R1 AC242ACBAC AU242ABBAC HCFU 24HL03 R1 AC282ACBAC AU282ACBAC HCFU 28HL03 R1 AC36NACBAC AU36NABBAC HCFU 36HM03 R1 AC42NACBAC AU42NABBAC HCFU 42HM03 R1 ...

Page 2: ... PRECAUTIONS FEATURES AND FUNCTIONS NAME OF PARTS INTRODUCTION TO SPARE PARTS INSTALLATION REMOTE CONTROLLER OPERATION GUIDE TO OPERATION CLEANING AND CARE TROUBLE SHOOTING OPERATING TIPS 1 2 3 4 5 6 7 8 9 10 17 18 19 20 21 22 ...

Page 3: ...o the environment The cardboard box may be broken or cut into smaller pieces and given to a waste paper disposal service The wrapping bag made of polyethylene and the polyethylene foam pads contain no fluorochloric hydrocarbon All these valuable materials may be taken to a waste collecting center and used again after adequate recycling Consult your local authorities for the name and address of the...

Page 4: ...rigerant spurts out and gets into eyes it may result in serious eye injuries Do not obstruct or cover the ventilation grille of the air conditioner Do not put fingers or any other things into the inlet outlet and swing louver Do not allow children to play with the air conditioner In no case should children be allowed to sit on the outdoor unit Specifications The refrigerating circuit is leak proof...

Page 5: ...lled by staying for lengthy periods in the direct cooling airflow Do not insert fingers or objects into the outlet port or intake grills Do not start and stop air conditioner operation by connecting and disconnecting the power supply cord and so on Take care not to damage the power supply cord In the event of a malfunction burning smell etc stop operation immediately turn off the circuit breaker a...

Page 6: ...turns off HEAT COOL TYPE When the SLEEP button is pressed during Heating mode the air conditioner s thermostat setting gradually lowers during the period of operation When the set time is reached the unit automatically turns off WIRELESS REMOTE CONTROL UNIT The WIRELESS REMOTE CONTROL UNIT allows convenient control of air conditioner operation MILDEW RESISTANT FILTER The AIR FILTER has been treate...

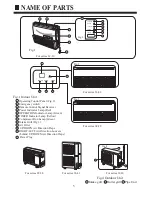
Page 7: ...8 Intake Grill Fig 3 9 Air Filter 10 UP DOWN Air Direction Flaps 11 RIGHT LEFT Air Direction Louvers behind UP DOWN Air Direction Flaps 12 Power Plug Fig 4 Outdoor Unit 13 Intake grill 14 Outlet grill 15 Pipe Unit 3 1 9 8 Fig 1 12 11 10 For series 14 18 For series 24 28 4 6 7 3 Fig 2 POWER OPER TIMER COMP EMER 2 4 5 6 2 3 POWER OPER TIMER EMER Fig 3 Fig 3 14 13 15 Fig 4 For series 36 42 For series...

Page 8: ...firm Timer and Clock settings Used to select sleep mode Used to select fan speed LO MID HI AUTO Used to select your desired temp Cautions On cooling only unit heating mode is not available After replacing batteries press ON OFF and display becomes as follows Operation mode AUTO Temp 24 C Timer mode No Fan speed AUTO Note 1 The above information is theexplanation of the displayed information theref...

Page 9: ...CLOCK button AM or PM flashes Press or to set correct time Each press will increase or decrease 1min If the button is kept depressed time will change quickly After time setting is confirmed press SET AM and PM stop flashing while clock starts working After replacing with new batteries remote controller will conduct self check displaying all information on LCD Then it will become normal TEMP SWING ...

Page 10: ...pours b Seaside with high salt content in the air c Near to hot spring with high content of sulfide gases d Area with frequent fluctuation of voltage e g factory etc e In vehicles or ships f Kitchen with heavy oil vapour or humidity g Near to the machine emitting electric magnetic waves h Places with acid alkali vapuor TV radio acoustic appliances etc are at least 1 m far away to the indoor unit o...

Page 11: ...der Remove the battery cover Slightly press and push down the cover Load the battery Be sure that the loading is in line with the pole request as illustrated Put on the cover again Confirmation indicator In disorderation reload the batteries or load the new batteries after 5mins Note Use two new same typed batteries when loading If the remote controller can t run normally or doesn t work at all us...

Page 12: ...s appears on display Not Timer setting Power indicator on indoor unit lights up Press MODE button For each press operation mode changes as follows Unit will run in selected mode stop display at FAN Press FAN button For each press fan speed changes as follows Unit will run at selected fan speed Adjust air flow direction if necessary refer to page15 Press ON OFF button Only time remains on LCD All i...

Page 13: ...s follows Unit will run in operation mode displayed on LCD Stop display at your desired mode Hints Unit will start running to reach the temp setting on LCD Remote controller can memorize each operation status When starting it next time just press ON OFF button and unit will run in previous status AUTO COOL DRY HEAT FAN Press TEMP button Every time the button is pressed temp setting increases 1 C E...

Page 14: ...rculation As warm air flows upward in HEAT mode adjusting air flow downward will be much more helpful for a better air circulation Be careful not to catch a cold when cold air blows downward It is harmful to your health in summer to go frequently in and out of places where temp difference is above 7 C Temp difference of 3 5 C will remove your fatigue More than this unit s load can be reduced and p...

Page 15: ...ases 10min If button is kept depressed time will change quickly Every time the button is pressed time decreases 10min If button is kept depressed time will change quickly Time will be shown on LCD It can be adjusted within 24hours 4 Confirming your setting After setting correct time press SET button to confirm ON or OFF stops flashing Time displayed Unit starts or stops at x hour x min TIMER ON or...

Page 16: ...ime displayed Unit starts at X hour X min To cancel TIMER mode Just press TIMER button several times until TIMER mode disappears According to the Time setting sequence of TIMER ON or TIMER OFF either Start Stop or Stop Start can be achieved Press HOUR button 1 After unit start select your desired operation mode Every time the button is pressed display changes as follows 2 Press TIMER button to cha...

Page 17: ...d downward directions continuously When the LOUVER button is pushed during SWING mode it stops swinging at the just angle Recommendable stopping angle of the louver Avoid direct air flow to the body for many hours Avoid downward blowing opera tion of cooling mode for many hours Do not touch the swing louver during swing operation Please use the Swing button of remote controller If adjusted by hand...

Page 18: ...se by more 2 C The temperature will automatically rise by 1 C after another 3 hrs operation and then automatically close after 3 hrs continuous operation The actral temperature is lower than the setting one which is to prevent from being too hot to your sleep In heating mode Note In AUTO mode unit will run in SLEEP function according to the operation mode After setting SLEEP function it is forbidd...

Page 19: ... the power failure compensation is set if the air conditioner will not be used for a long time please cut off the power supply to prevent its operation from being resumed after the power is supplied again or press the Switch On Off button after the power comes again After the power failure compensation is set if power failure suddenly occurs while the air conditioner is working it will resume the ...

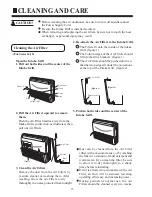
Page 20: ...shing them After washing allow the Air Filters to dry thoroughly in an area protected from sunlight 1 2 3 The Filters fit onto the inside of the intake Grill figure 1 The bottom edges of the Air Filters should fit into the filter brackets figure 1 The Air Filters should be pushed down so that their top edges fit under the projections at the top of the Intake Grill figure 2 Dust can be cleaned from...

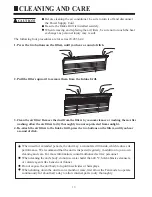
Page 21: ...e air filters to dry thoroughly in an area protected from sunlight 4 Re attach the air filters to the Intake Grill press the two buttons on the filters until you hear a sound of click When used for extended periods the unit may accumulate dirt inside which reduces its performance We recommend that the unit is inspected regularly in addition to your own cleaning and care For more information consul...

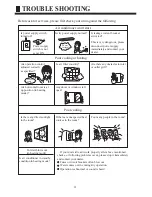
Page 22: ...d by the casing expanding or shrinking because of temperature changes This is because the system circulates smells from the interior air such as the smell of cigarettes or the painting on the furniture When unit is running at places like restaurant etc where dense edible oil fumes always exist this will happen To prevent frost from accumulating on indoor heat exchanger unit will switch to blowing ...

Page 23: ...stacles in inlet or outlet grill Are horizontal louvers at up position in heating mode Any doors or windows left open Is there any direct sunlight in the room If there are unexpected heat sources in the room Too many people in the room Poor cooling Is air conditioner in standby condition in heating mode Cold air blows out in heating mode If your unit still can t work properly after above mentioned...

Page 24: ...porarily stop and the defrosting circuit will operate briefly for about 7 to 15 minutes During Automatic Defrosting operation the OPERATION Indicator Lamp will flash Trouble alarming performance Only for series 24 28 36 42 During operation when there is any trouble the power indicator lamp will flash Temperature and Humidity Range Cooling Heating indoor outdoor indoor outdoor max C D B W B min C D...

Reviews: