Commercial Air Conditioner
Model: AU18
/22
2XFERA
AS072/092/122XVERA
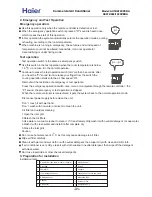
MODE
CLOCK
Used to set correct time.
TIMER
LIGHT
Used to set temp.,temp. range:16
C~30 C
SLEEP
Used to select sleep mode
HOUR
Used to set clock and timer
setting.
RESET
Used to reset the controller back
to normal condition.
LOCK
Used to select TIMER ON,
TIMER
OFF, TIMER ON/OFF.
Used to lock buttons and LCD
display.
ON
OFF
TEMP
HEALTH
FAN
MODE
SLEEP
SWING
CLOCK
TIMER
SET
LOCK
LIGHT
RESET
Power ON/OFF
Used for unit start and stop.
Used to select AUTO run,COOL,
DRY, HEAT and FAN operation.
2
SET
Used to confirm Timer and Clock
setting.
TEMP
HEALTH
Control the light up and go out of
the control panel's background
light source and control the
switch of the buzzer.
Used to set Health operation
function
FAN
Used to select fan speed: AUTO,
LOW FAN, MED FAN, HIGH
FAN.
Used to set UP/DOWN air
sending and RIGHT/LEFT air
sending direction.
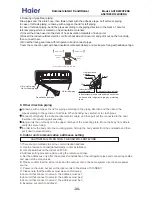
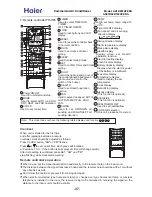
Health display
Display when set Health
operation function.
Battery Capacity display
Display when the electric power
of the battery is insufficient.
Timer ON/OFF display
Fan speed and air sending
direction display
Swing direction display
Room temperature display
Sterilize display
(This function is optional)
Humidifying display
Clock display
Temperature display
Used to display the set
temperature
Lock state display
Sleep state display
Electric Heating display
2
SWING
29
STERILIZE
Fresh Air state display
(This function is optional)
HEALTH AIRFLOW
FRESH
STERILIZE
CODE
LOW
MID
HIGH
AUTO
1
1
3
3
4
4
5
5
6
6
7
7
8
8
9
9
10
10
11
11
12
12
13
13
14
14
15
16
17
18
19
21
23
24
25
26
28
20
B A
27
22
Note: This model does not have the following related display and function
18 21
30
HEALTHAIRFLOW
Used to set healthairflow
CODE A/B selection
For this unit, please set to code A
31
23 27
o
2
7.
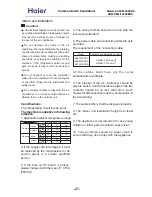
Remote controller YR-H65
15
16
17
18
19
20
21
22
23
24
25
26
27
28
29
30
31
MODE
SLEEP
SWING
CLOCK
TIMER
SET
LOCK
LIGHT
RESET
STERILIZE
1
2
3
HEALTH AIRFLOW
FRESH
CODE
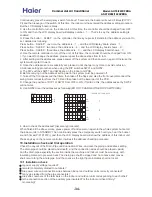
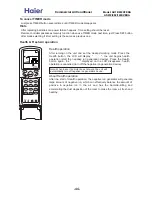
Clock set
When unit is started for the first time
and after replacing batteries in remote
controller, clock should be adjusted as follows:
Press CLOCK button, "AM"or "PM" flashes.
Press or to set correct time. Each press will increase
or decrease 1 min . If the button is kept pressed, time will change quickly.
After time setting is confirmed, press SET, "AM" and "PM"
stop flashing, while clock starts working.
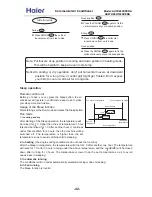
Remote controller's operation
When in use, put the signal transmission head directly to the receiver hole on the indoor unit
The distance between the signal transmission head and the receiver hole should be within 7m without
any obsacles as well.
Don't throw the controller, prevent it from being damaged.
When electronic-started type fluorescent lamp or change-over type fluorescent lamp or wireless
telephone is installed in the room, the receiver is apt to be disturbed in receiving the signal so the
distance to the indoor unit should be shorter.
-37-

