8
Uso del telecomando
•
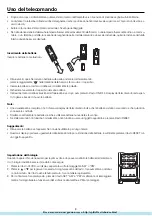
Dopo aver acceso il climatizzatore, puntare il telecomando direttamente verso il sensore di ricezione segnali sull’unità interna.
•
La distanza tra la testina di trasmissione del segnale e il sensore di ricezione non deve essere superiore ai 7 metri e non devono es-
serci ostacoli.
•
Evitare di far cadere il telecomando ed evitare che venga danneggiato.
•
Se nella stanza viene installata una lampada fluorescente ad avviamento elettronico, o una lampada fluorescente di tipo a commu-
tatore, o un telefono portatile, la ricezione dei segnali da parte del telecomando può essere disturbata, quindi la distanza dall’unità
interna dovrebbe essere diminuita.
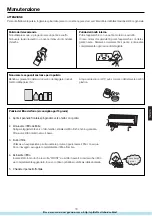
Inserimento delle batterie
Inserire le batterie come illustrato.
• Rimuovere il coperchio del vano batterie sulla parte posteriore del telecomando:
premere leggermente “
” nella direzione della freccia e far scorrere il coperchio.
• Inserire le batterie: accertarsi di allineare correttamente le polarità.
• Richiudere nuovamente il coperchio del vano batterie.
• Indicazione della corretta esecuzione dell’operazione: se dopo aver premuto il tasto ON/OFF, il display del telecomando resta spen-
to, togliere e inserire di nuovo le batterie.
Note:
• Una visualizzazione completa o non chiara sul display del telecomando indica che le batterie si stanno scaricando e che quindi de-
vono essere sostituite.
• Smaltire correttamente le batterie scariche e utilizzare batterie nuove dello stesso tipo.
• Se il telecomando non funziona normalmente o non funziona, usare un oggetto appuntito e premere il tasto RESET.
Suggerimenti:
• Rimuovere le batterie se l'apparecchio non viene utilizzato per lungo tempo.
• Qualora il display riportasse ugualmente delle indicazioni dopo la rimozione delle batterie, è sufficiente premere il tasto RESET con
un oggetto appuntito.
Impostazione dell'orologio
Quando l’apparecchio viene avviato per la prima volta e dopo aver sostituito le batterie del telecoman-
do, l’orologio dovrebbe essere impostato come segue:
1. Premere il tasto CLOCK, sul display apparirà la scritta lampeggiante “AM” o “PM”.
2. Premere
o
per regolare l’ora esatta. Ad ogni pressione del tasto, l’ora aumenterà o diminui-
rà di un minuto. Se il tasto viene tenuto premuto, l’ora cambierà rapidamente.
3. Per confermare l’ora predisposta, premere il tasto SET. “AM” e “PM” smetteranno di lampeggiare,
mentre l’orologio inizierà a funzionare. (AM si riferisce alla mattina e PM al pomeriggio).
STERILIZE
FRESH
Все каталоги и инструкции здесь:
http
:
//splitoff.ru/tehn-doc.html
Summary of Contents for AS072XVERA
Page 6: ...Все каталоги и инструкции здесь http splitoff ru tehn doc html ...
Page 7: ...Все каталоги и инструкции здесь http splitoff ru tehn doc html ...
Page 8: ...Все каталоги и инструкции здесь http splitoff ru tehn doc html ...
Page 9: ...Все каталоги и инструкции здесь http splitoff ru tehn doc html ...
Page 10: ...Все каталоги и инструкции здесь http splitoff ru tehn doc html ...
Page 11: ...Все каталоги и инструкции здесь http splitoff ru tehn doc html ...
Page 12: ...Все каталоги и инструкции здесь http splitoff ru tehn doc html ...
Page 13: ...Все каталоги и инструкции здесь http splitoff ru tehn doc html ...
Page 14: ...Все каталоги и инструкции здесь http splitoff ru tehn doc html ...
Page 15: ...Все каталоги и инструкции здесь http splitoff ru tehn doc html ...
Page 16: ...Все каталоги и инструкции здесь http splitoff ru tehn doc html ...
Page 17: ...Все каталоги и инструкции здесь http splitoff ru tehn doc html ...
Page 18: ...Все каталоги и инструкции здесь http splitoff ru tehn doc html ...
Page 19: ...Все каталоги и инструкции здесь http splitoff ru tehn doc html ...
Page 20: ...Все каталоги и инструкции здесь http splitoff ru tehn doc html ...
Page 21: ...Все каталоги и инструкции здесь http splitoff ru tehn doc html ...
Page 22: ...Все каталоги и инструкции здесь http splitoff ru tehn doc html ...
Page 23: ...Все каталоги и инструкции здесь http splitoff ru tehn doc html ...
Page 24: ...Все каталоги и инструкции здесь http splitoff ru tehn doc html ...
Page 25: ...Все каталоги и инструкции здесь http splitoff ru tehn doc html ...
Page 26: ...Все каталоги и инструкции здесь http splitoff ru tehn doc html ...
Page 27: ...Все каталоги и инструкции здесь http splitoff ru tehn doc html ...
Page 28: ...Все каталоги и инструкции здесь http splitoff ru tehn doc html ...
Page 29: ...Все каталоги и инструкции здесь http splitoff ru tehn doc html ...
Page 30: ...Все каталоги и инструкции здесь http splitoff ru tehn doc html ...
Page 31: ...Все каталоги и инструкции здесь http splitoff ru tehn doc html ...
Page 32: ...Все каталоги и инструкции здесь http splitoff ru tehn doc html ...
Page 33: ...Все каталоги и инструкции здесь http splitoff ru tehn doc html ...
Page 34: ...Все каталоги и инструкции здесь http splitoff ru tehn doc html ...
Page 35: ...Все каталоги и инструкции здесь http splitoff ru tehn doc html ...
Page 36: ...Все каталоги и инструкции здесь http splitoff ru tehn doc html ...
Page 37: ...Все каталоги и инструкции здесь http splitoff ru tehn doc html ...
Page 38: ...Все каталоги и инструкции здесь http splitoff ru tehn doc html ...
Page 39: ...Все каталоги и инструкции здесь http splitoff ru tehn doc html ...

