background image

EN

User manual

Washing machine

HW80-B14876N

HW100-B14876N

Summary of Contents for B14876N

Page 1: ...EN User manual Washing machine HW80 B14876N HW100 B14876N ...

Page 2: ...ctions carefully before using this appliance The instructions con tain important information which willhelp you get thebest outof the appliance and ensure safe and proper installation use and maintenance Keep this manual in a convenient place soyou can always refer to it for the safe and proper use of the appliance If you sell the appliance give it away or leave it behind when you move house make ...

Page 3: ...ation 4 2 Productdescription 7 3 Control panel 8 4 Programmes 12 5 Consumption 13 6 Daily use 14 7 Eco friendly washing 19 8 Care and cleaning 20 9 Troubleshooting 23 10 Installation 26 11 Technical data 30 12 Customer service 31 ...

Page 4: ... appliance un less they are constantly supervised Children shall not play with the appliance Do not let children or pets come close to the appliance when the door is open Store washing agents out of reach of children Pull up zips x loose threads and take care for small itemsto pre ventlaundry from being entangled If necessary use an appropri ate bag or net Do not touch or use the appliance when ba...

Page 5: ...liance Maintenance cleaning Make sure children are supervised if they carry out cleaning and maintenance Disconnect the appliance from the electrical supply before un dertaking any routine maintenance Keep the lower part of the porthole clean and open door and de tergent drawer if appliance is not in use to prevent odours Do not use water spray or steam to clean the appliance Replace adamaged supp...

Page 6: ...ectsunlightor in the near of heat sources e g stoves heaters Make sure that the electrical information on the rating plate agrees with the power supply If it does not contact an electri cian Do not use multi plug adapters and extension cables Make sure only the delivered electriccable and hose set areused Make sure not to damage the electric cable and the plug If dam aged have it replaced by an el...

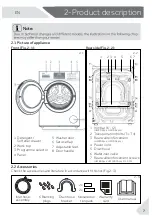
Page 7: ...ice flap 7 Adjustable feet 1 Iron bar I1 I2 2 Transportation bolts T1 T4 3 Rear wall reinforcement 4 Power cord 5 Water inlet valve 6 Drain hose 7 Rear wall reinforcement screws 2 1 2 2 Inlet hose assembly 6 Blanking plugs Drain hose bracket User manual Warranty card 1 2 4 5 6 7 3 Noisereduc tionpads 2x 2x 7 EN 2 Product description 8 Door handle s c p 2 0 0 1 W H s c p 0 0 8 W H s c p 2 0 0 1 W H ...

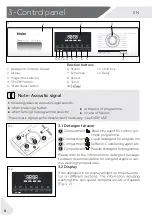
Page 8: ...mp 10 3 2 11 Child lock 12 Delay 12 11 8 9 10 7 6 5 2 3 1 4 Function buttons 3 1 Detergent drawer 1 Compartment Bleaching agent for cotton syn thetic programme 2 Compartment Liquid detergent for programme 3 Compartment Softener Conditioning agent etc 4 Compartment Powderdetergentforprogramme Please refer to the information on detergent package to obtain recommendation for using detergent in vari o...

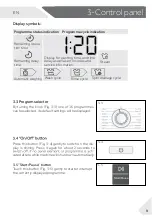
Page 9: ...weighing Steam Display symbols 3 3 Program selector By turning the knob Fig 3 3 one of 16 programmes can be selected its default settings will bedisplayed Press this button Fig 3 4 gently to switch on the dis play is shining Press it again for about 2 seconds to vated after a while machine will shut down automatically 3 5 Start Pause button Touch this button Fig 3 5 gently to start or interrupt th...

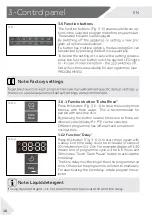
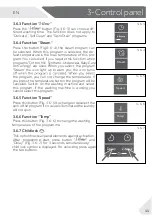
Page 10: ...this button Fig 3 6 1 to rinse the laundry more intense with fresh water This is recommended for people with sensitive skin By pressing the button several times one to three ad ditional cycles display P1 P3 can be selected Different programme has different extra maximum rinsing times 3 6 2 Function Delay Press this button Fig 3 6 2 to start the program with a delay End time delay could be increased ...

Page 11: ...ns the program you can not change the temperature If you press the temperature button the program will be canceled Switch on the washing machine and select this program If the washing machine is working you cannot select this program 3 6 5 Function Speed Press this button Fig 3 6 5 to change or deselect the spin of the program If no value is illuminated the laundry will not spun 3 6 6 Function Tem...

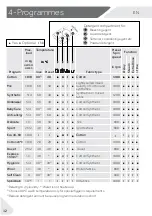
Page 12: ... Sports Wear 800 Delicate 1 1 30 30 º Silk 600 Duvet 2 5 2 40 40 800 Express 15min3 1 1 40 º Cotton Synthetic 1000 Hygienic 5 4 902 902 º Cotton Synthetic 1000 Wool 1 1 40 º Wollen fabrics 800 SelfClean 0 902 902 º 600 Spin Drain 10 All fabrics 1000 1 Relating to dry laundry Water is not heated up 2 Choose 90 C wash temperature only for special hygienic requirements 3 Reducedetergent amount becaus...

Page 13: ...gnition At low loading energy water and washing time will be reduced automatically in some programmes The display shows A U t O Scan QR code on energy label for energy consumption information The actual energy consumption may differ from the declared one according to local conditions ...

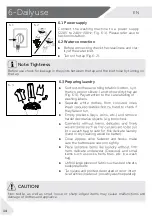
Page 14: ...ar Dessous and small items such as socks belts bras etc in a wash bag Unfold large pieces of fabric such as bed sheets bedspreads etc Turnjeans and printed decorated or color inten sive textiles inside out possibly wash separately 6 1 Power supply Connect the washing machine to a power supply 220V to 240V 50Hz Fig 6 1 Please refer also to section Installtion 6 2 Water connection Before connecting ...

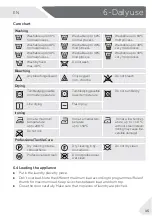
Page 15: ...ryingpossible lower temperature Do not tumble dry Line drying Flat drying Ironing Iron at a maximum temperature upto 200 C Iron at a medial tem perature up to 150 C Iron at a low temper ature up to 110 C without steam steam ironing may cause irre versibledamage Do not iron Professional Textile Care Dry cleaning in tetra chloroethene Dry cleaning in hy drocarbons Do not dry clean Professionalwet cl...

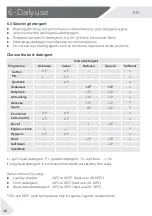
Page 16: ...onal _ no If usingliquiddetergent it is notrecommendedtoactivate the timedelay We recomment by using Laundry powder 20 C to90 C best use 40 60 C Color detergent 20 C to60 C best use 30 60 C Wool delicate detergent 20 C to30 C best use 20 30 C Choose 90 C wash temperature only for special hygienic requirements L P L P Cotton Mix Synthetic Underwear BabyCare Anti allergy Sport Delicate Duvet Express...

Page 17: ...ted beforeadding Do not use liquid detergent if function Delay is selected Carefully choose the programme settings according to the care symbols on all laun dry labels and according tothe programme table 6 8 Select a programme To get the best washing results select a programme type Turn the programme knob Fig 6 8 to select the right programme Thedefault settingsaredisplayed 6 9 Add individual sele...

Page 18: ...ocancel a runningprogramme and all its individual settings 1 Press Start Pause button tointerrupt the running programme Press this 2 3 Run programme Spin drain todrain the water 4 Select a newprogramme and start it Note Door lock For safety reasons the door is locked partially during the washing cycle It is only pos sible to open the door at the end of the programme or after the programme was can ...

Page 19: ...ad size Do not overload hand width clearance above laundry For slightly soiled laundry select the Quick Wash programme Apply exact dosages ofeach washing agent Choose the lowest adequate washing temperature modern detergents are e ciently cleaning below 60 C Raise default settings only due to heavy staining Select max spinningspeed ifa domestic dryer is used ...

Page 20: ... from the drum Fig 8 5 because they cause rust stains and damage Use a non chloride cleaner for removing rust stains Observe the warning hints of the cleaning agent manufacturer Donotuse any hardobjects or steel wool for clean ing 8 1 8 5 8 3 8 4 H W 70 B P1 275 8 Wo ol R Und er w e ar Sp ort An ti a ll ergy Dai ly Wa sh Ba by Care Sel f Cle an Sp in Dr ain Expre s s 1 5 min Duve t Cot ton Synth e...

Page 21: ...ctrical plug Fig 8 6 2 Turn o water supply Fig 8 7 3 Open the door to prevent formation of moisture and odours Let door open while not used Before next usage check carefully power cord water inlet and drain hose Make sure everything is properly installed and without leackage WARNING Scalding Risk Water in the pump lter can be very hot Before any action please ensure water has cooled down 8 6 Pump ...

Page 22: ...g has to be cleanand unhurt If the lid is not full tightened water can escape The lter must be in place or it may lead to leakage 9 Clean carefully pump lter e g using running water Fig 8 14 10 Re x it thoroughly Fig 8 15 11 Close service flap 8 14 8 15 ...

Page 23: ...25minutes 6 30 Theremainingwashcycletimeincludingchosenend timedelaywillbe6hoursand30minutes AUtO Automatic load detection is working only in some programs End Lock Door isclosed because of high water level high water temperature or spinning cycle bEEP OFF The buzzer is deactivated bEEP ON The buzzer is activated 9 2 Troubleshooting with display code Problem Cause Solution Drainage error Check dra...

Page 24: ...rly closed Water supply failure Check water tap Check inlet hose Check water pressure Close the door properly Ensure the water supply Machine is draining Height of drain hose is below 80 cm Drain hose end could reach into water Make sure that drain hose is properly installed Make sure the drain hose is not in water Drainage failure Drain hose is blocked Drain hose end is higher than 100 cm above fl...

Page 25: ...inse Tryto brushthe pointsfrom the dry laundry Choose an other detergent Laundry has grey patches Caused by fats suchas oils creams or ointments Pretreat the laundrywith a spe cial cleaner Should the error messages reappear even after the taken measures switch o the appli ance disconnect the power supply and contact the customer service 9 4 In case of power failure The current programme and its se...

Page 26: ...lts T1 T4 Fig 10 3 Note Packaging disposal Keep all packaging materials out ofchildren s reach and disposethem in an environmen tally friendly manner 10 2 OPTIONAL Install noise reduction pads 1 2 3 10 1 10 2 T1 T4 T3 T2 10 3 1 When opening the shrink package you will find four noise reduction pads Theseare used for reducing noise Fig 10 1 2 Lay the washing machine down to its side port hole pointi...

Page 27: ...ainst the housing 10 4 Moving the appliance If the machineistobemovedtoadistantlocation replacethetransportation bolts removed before installation to prevent damage The assembly takes placein reverse order Note Keep in safe place Keep all parts of the transport protection in a safe place for later use Whenever the ap 2 Remove the 10 screws R1 R10 from lower back reinforcement take out reinforcemen...

Page 28: ...ht of less than 80 cm the washing machine will continuously drain while being lled self si phoning Drain hose is not to be extended If necessary contact after sales service 10 6 3 Drain hose to sink connection The junction must lie above the siphon Aspigot connection is usually closed by a pad A That must be removed to prevent any disfunc tion Fig 10 10 Secure the drain hose with a clamp 10 6 Drai...

Page 29: ...WARNING Ensurealwaysthatall connections power supply drain and freshwater hose are rm dry and leack free Take care these parts are never to be crushed kinked or twisted If the supply cord is damaged it must be replaced by the service agent see warranty card in order to avoid a hazard 10 13 10 7 Fresh Water Connection Make sure that the gaskets are inserted 1 Connect the water inlet hose with the a...

Page 30: ...ch provide for CE marking Note The exact height of your washer is dependent on how far the feet are extended from the base of the machine The space where you install your washer needs to be at least 40mm wider and 20mm deeper than its dimensions TOP VIEW WALL FRONT VIEW HW100 HW80 B Overall width of product mm A Overall height of product mm C Overall depth of product To maincontrol board size mm D...

Page 31: ...arranty For general business enquiries please nd below our addresses in Europe European Haier addresses Country Postal address Country Postal address Italy Haier Europe Trading SRL Via De Cristoforis 12 21100 Varese ITALY France Spain Portugal Haier Iberia SL Pg Garcia Faria 49 51 08019 Barcelona SPAIN Belgium FR Belgium NL Netherlands Luxembourg Haier Benelux SA Anderlecht Route deLennik 451 BELG...

Page 32: ......

Page 33: ...IT Manuale dell utente Lavatrice HW80 B14876N HW100 B14876N ...

Page 34: ...Le istruzioni contengono informazioni importanti che vi aiuteranno a trarre il meglio da questo dispositivo e vi garantiranno altresì sicurezza in fase di installazione uso e manu tenzione del dispositivo Conservare questo manuale in un luogo pratico di modo da poterlo sempre consultare e garantire un utilizzo sicuro e adeguato del dispositivo Qualora il dispositivo venga venduto ceduto o lasciato...

Page 35: ... QI UPD L QL GL VL U D V UL L Q G O SU G 3DQQ OO GL Q U OO 3U JUDPPL QV P 6 Uso quotidiano 7 Lavaggiorispettoso dell ambiente UD S OL LD LGD DOOD ULV O L Q G L SU EO PL QV DOOD L Q D L QL L VVLV Q D OL Q L ...

Page 36: ... lontano dal dispositivo a meno che non siano sotto costante supervisione I bambini non devono giocare con l apparecchiatura Evitare che bambini e animali si avvicinino all apparecchiatura mentre l oblò è aperto Riporre gli agenti detergenti fuori dalla portata dei bambini Chiudere le cerniere riparare i li allentati e fare attenzione agli og gettidipiccoledimensioniperevitarecheil bucatosiimpigli...

Page 37: ...ni di pulizia e manutenzione Scollegare il dispositivo dall alimentazione elettrica prima di intra prendere qualsiasi intervento di manutenzione Tenere pulita la parte bassa dell oblò quindi pulire l oblò e il cas evitare i cattivi odori Non usare acqua spray o vapore per pulire il dispositivo Sostituire un cavo danneggiato unicamente rivolgendosi al pro cate per evitare di correre inutili rischi ...

Page 38: ...recchiatura direttamente sul tappeto o vicino a una parete o a mobili Noninstallareildispositivodirettamenteespostoallalucedel soleo vicino a sorgentidi alimentazione ad esempio stufe riscaldatori siano in linea con l alimentazione disponibile In caso contrario contattare un elettricista Non usare ciabatte e prolunghe in dotazione stituzione Servirsi di una presa con massa aterraseparata per l ali...

Page 39: ...k g 1 Detersivo Cassetto ammorbi dente 2 Piano di lavoro 3 Display 4 Selettore del pro gramma 5 Pannello 6 Aletta di servizio 7 Piedini regolabili 8 Maniglia dell oblò 1 Barra di ferro I1 I2 2 Bulloni di trasporto T1 T4 3 Rinforzo parete posteriore 4 Cavo di alimentazione 5 Valvola di ingresso dell acqua 6 Tubo di scarico 7 Viti rinforzo pareteposteriore 2 1 2 2 Gruppo tubo ingresso 6 Tappi di chi...

Page 40: ...isciacquo 8 Centrifuga 3 2 9 Temp 10 11 Blocco bambini 12 Fine ritardata Pulsanti funzione 3 1 Cassetto del detersivo 1 Scomparto Agente candeggiante per il pro gramma cotoni sintetici 2 Scomparto Detersivo liquido per il programma 3 Scomparto Ammorbidente agenti condizio nanti ecc 4 Scomparto Detersivo in polvereper il program ma Fare riferimento alle informazioni sulla confezione del detersivope...

Page 41: ...vvio Pausa Toccare questo pulsante Fig 3 5 delicatamente per avviare o interrompere il programma attualmente in fase di visualizzazione mbols Indicazione status programma Indicazione ciclo programma Pannello di cont rollo bloccato tempo di ritardo codici di errore e informazioni di servizio Tempo di funzio namento restante Tempo di ritardo rimanente Ciclo dirisciacquo Ciclo di lavaggio Ciclo dicen...

Page 42: ...esto pulsante Fig 3 6 1 per risciacquare il bucato più intensamente con acqua fresca Questa opzione è particolarmente consigliata per le persone Q QD S OO V QVLELO Premendo il pulsante diverse volte sarà possibile sele zionare da uno a tre cicli aggiuntivi 3 6 2 Funzione Fine ritardata 3U P U LO S OVDQ Fig 3 6 2 per avviare il program ma in maniera ritardata La nedel tempodiritardopuò essere aumen...

Page 43: ...eratura Se si preme il pulsante della temperatura il programma verrà annullato Accendere la lavatrice e selezionare questo programma Se la lavatrice è in fun zione non è possibile selezionarequesto programma 3 6 5 Funzione Centrifuga Premere questo pulsante Fig 3 6 5 per cambiare o deselezionare la centrifuga del programma Se non vie ne illuminato alcun valore la biancheria non viene cen trifugata...

Page 44: ...portivi 800 10 8 20 º 1400 Delicati 1 1 30 30 º Seta 600 Piumone 2 5 2 40 40 Piumone 800 Express 15 min3 1 1 40 º Cotone Sintetici 1000 Hygienic 5 4 902 902 º Cotone Sintetici 1000 Lana 1 1 40 º Tessuti in lana 800 A u t o p u litura 0 902 902 º 600 Centrifuga Scarico Tutti i tessuti 1000 1 Relativamente al bucato asciutto L acqua non viene riscaldata 2 Scegliere una temperatura di lavaggio 90 C s...

Page 45: ... indicati potrebbero variare a seconda delle condizioni locali Nota Peso automatico L apparecchiatura è dotata di un sistema di riconoscimento del carico Con un carico piccolo energia acqua e tempo di lavaggio verranno ridotti automaticamente in alcuni programmi Sul display compare la dicitura R I valori di ...

Page 46: ...amente cuciti Mettere i capi più particolari ad esempio quelli senza orlo oppure quelli delicati intimo e quelli piccoli come ad esempio calzini cinghie reggi seni ecc all interno di unsacchetto da lavaggio Srotolare i pezzi più grandi di tessuto quali ad esempio lenzuola copriletto ecc Capovolgere i jeans i tessuti stampati decorati o particolarmente carichi di colore se possibile lavare separata...

Page 47: ...assare in lava V L JD Asciugatura su lo da E D V L JD UD LQ SLDQ 6WLUR 6 LUDU DOOD PS UD UD PDVVLPD no a 200 C 6 LUDU D PS UD UD P GLD no a 150 C 6 LUDU D PS UD UD bassa no a 110 C senza vapore stira re a vapore potrebbe D VDU GDQQL LUU SD rabili 1 Q V LUDU UD SURIHVVLRQDOH SHU RVWUL WHVV WL Lavaggio a secco in UD O U LO Q Lavaggio a secco in LGU DUE UL No lavaggio a secco 3 OL LD D PLG SU I V VL ...

Page 48: ...i Sintetici Intimo Baby Care Antiallergico Delicati Sport Eco 4 Piumone Express 15 min Hygienic Lana Autopulitura Centrifuga Scarico L detergente gel liquido P detergentein polvere O opzionale _ no Consigliamo di usare Polvere per il bucato da 20 C a 90 C miglior utilizzo 40 60 C Detersivo per i colori da 20 C a 60 C miglior utilizzo 30 60 C Detergente Lana delicati da 20 C a 30 C miglior uso Sceg...

Page 49: ...mma a seconda dei simboli sulle etichette del bucato e conformementealla tabella programma 6 8 Selezionare un programma Per ottenere risultati di lavaggio impeccabili selezio nare un programma che si adatti al livello di sporcizia e al tipo di bucato Ruotare la manopola del programma Fig 6 8 per se lezionare il programma giusto vengono visualizzate le imposta 6 9 Aggiungeresingole opzioni Selezion...

Page 50: ...licatamente il pulsante Avvio Pausa Premerlo nuovamenteper riprendere il funzionamento Per annullare un programma di lavaggio e tuttele sue impostazioni individuali 1 Premere il pulsante Avvio Pausa per interrompere il programma in funzione 2 3 Avvio programma CENTRIFUGA per scaricarel acqua 4 Selezionare un nuovo programma quindi avviarlo Nota Blocco oblò Per ragioni di sicurezza l oblò della lav...

Page 51: ... relativamenteal carico massimo Non sovraccaricare lasciare lo spaziodi una mano sopra al bucato Per indumenti leggermente sporchi selezionare il programma di Lavaggio Rapido Applicare dosaggi esatti per ogni lavaggio Scegliere la temperatura di lavaggio adeguata più bassa possibile i detergenti mo Selezionare la velocità di centrifuga massima qualora venga asciugata un asciugatri ce domestica ...

Page 52: ...o quindi installare il tubo di ingresso 3 OL LD GHO FHVWHOOR Togliere le componenti metalliche lavate per sba glio come ad esempio spille monete ecc dal ce stello Fig 8 5 dato che causano macchine di rug JLQ GDQQL Servirsi di un detergente senza cloroper la rimozio ne delle macchie di ruggine Osservare i segnali di avvertenza del produttore dell agente detergente 1 Q VDU JJ L S VDQ L ODQD GL U LD ...

Page 53: ...idrica Fig 8 7 Aprire l oblò per evitare la formazione di umidità e cattivi odori Lasciare l oblò aperto mentre non viene utilizzato Prima dell uso successivo controllare con attenzione il cavo di alimentazione la linea di ingresso dell acqua e il tubo di scarico Veri care che tutto sia installato cor rettamente e che non vi siano perdite 99 57 1 Attenzione Rischio di scottatura L acqua all intern...

Page 54: ...o non sia completamente chiuso l acqua potrebbe fuoriuscire Il ltro deve essere in posizione oppure potrebbe portarea perdite Rimuovere i contaminanti e lo sporco Fig 8 13 Pulire accuratamente il ltro della pompa ad es usando acqua corrente Fig 8 14 Riposizionarloaccuratamente Fig 8 15 Chiudere l aletta di servizio ...

Page 55: ... lavaggio restante sarà di 1 ora e 25 minuti 6 30 sarà di 6 ore e 30 minuti Auto Il rilevamento automatico del carico è in funzione solo in alcuni programmi End Il ciclo di lavaggio è concluso L apparecchiatura si spegne automaticamente Lock L oblò viene chiuso dato l elevato livello dell acqua la temperatura dell acqua elevata o il ciclo di centrifuga bEEP OFF Il cicalino è disattivato bEEP ON Il...

Page 56: ...cato La pressione dell acqua è inferiore a 0 03 MPa L oblò non è stato chiuso corretta mente Guasto dell alimentazione dell ac qua Controllare il rubinetto dell ac qua Controllare il tubo di ingresso gresso Controllare la pressione dell ac qua Chiudere correttamente l oblò Controllare che l alimentazione dell acqua funzioni corretta mente La macchina scarica mentreè in fase di riempimento L altezz...

Page 57: ...rticelle insolubili di detergente possono ripresentarsi come punti ni bianchi sul bucato Eseguire un ulteriore risciacquo Provare a spazzolare via i punti bianchi dal bucato Scegliere un altro detergente Il bucato presenta delle chiazze di coloregrigio Queste chiazze sono causate da grassi quali ad esempio olio panna o pomate pretrattare il bucato con un de tergente speciale Nota Formazione di sch...

Page 58: ...terni Tutti gli elementi I R S e T Fig 10 2 devono essererimossi prima dell uso 1 Togliere tutti e 4 i bulloni T1 T4 Fig 10 3 Nota Smaltimento dell imballaggio Conservare tutti i materiali dell imballaggio fuori dalla portata dei bambini e smaltirli in modo rispettosodell ambiente 10 2 OPZIONALE Installare i cuscinetti di riduzione del rumore 1 Aprendo la confezione troverete i pannelli per la rid...

Page 59: ...odi blocco 1 control alloggiamento 10 4 Spostamento dell apparecchiatura Se l apparecchiatura deve essere spostata in un luogo lontano riposizionare i bulloni di nell ordine inverso Nota Conservare in un luogo sicuro Tenere tutte le componenti della protezione di trasporto in un luogo sicuro per poterle consultare in futuro Quando l apparecchiatura va spostata come prima cosa procedere alla re ins...

Page 60: ...e il tubo di scarico con una fascetta 77 1 21 Il tubo di scarico non va immerso in acqua e va saldamente ssato per non causare perdite Qualorailtubo di scaricovengaposizionatoa terra oppure se il tubosi trova a un altezzainferiore agli80 cm la lavatricecontinueràa scaricare infase diriempimen to autosifonaggio Il tubodiscarico non va allungato Ovenecessario contattare il serviziopost vendita ROOH ...

Page 61: ...ri care sempre che tutti i collegamenti alimentazione tubo di scarico e tubo dell acqua siano saldamente ssati e senza perdite Fare attenzione ed evitare che queste componenti vengano schiacciate piegate o D U LJOLD Se il cavo di alimentazione è danneggiato deve essere sostituito dall agente di servi zio cfr scheda garanzia al ne di evitaresituazioni di pericolo ROOH DPHQWR DFT D FRUUHQWH Veri car...

Page 62: ...conferisce la marcatura CE TOP VIEW L L A W FRONT VIEW HW100 HW80 B A C D E 850 850 595 595 530 460 1120 1050 300 300 11 2 Dimensioni del Prodotto Altezza mm m m a z z e h g r a L m m à t i d n o f o r P m m o t r e p a ò l b o à t i d n o f o r P a l l a ò l b o l l a d a m i n i m a z n a t s i D Nota parete adiacente mm L altezza esatta della lavatrice dipende da quanto sono allungati i piedi d...

Page 63: ...BBBBBBBBBBBBBBBBBBBBB QVLJOLDP LQ O U GL Q U OODU OD 6 GD DUDQ LD I UQL D LQ G D L Q O SU G qualora si debba fare ricorso alla garanzia Per richiestecommerciali generiche indichiamo qui di seguito i nostri indirizzi in Europa GLUL L LHU H URSHL H H GLUL R SR H H H GLUL R SR H L Haier Europe Trading SRL Via De Cristoforis 12 9DU V ITALIA U FL Haier Francia SAS 3 5 rue des Graviers 1 LOO V U 6 LQ FR...

Page 64: ...0020509288AM ...

Reviews: