background image


SERVICE MANUAL

Model: BD-181SAA, BD-271SAA 

14

Issue  2011-2-10 

Rev.  

Ref1102S001V0


Chapter 5 Control and display system 

5-1. Control panel 


Freezing temperature selection is made by setting the control from 

min

 to 

max

 (coldest).   

If you want colder or warmer temperatures, adjust the control one step at a time. 

Allow several hours after each one-step adjustment for the freezer temperature to stabilize. 

5-2. Starting the Freezer


1.  Clean the inside of the freezer with a mild solution of baking soda and water   

2.  Connect cord to power outlet.   

3.  Make sure the temperature control is set at 4. 

4.  Allow freezer to operate for at least four hours before placing food inside. 

Chapter 6 System flow principle   

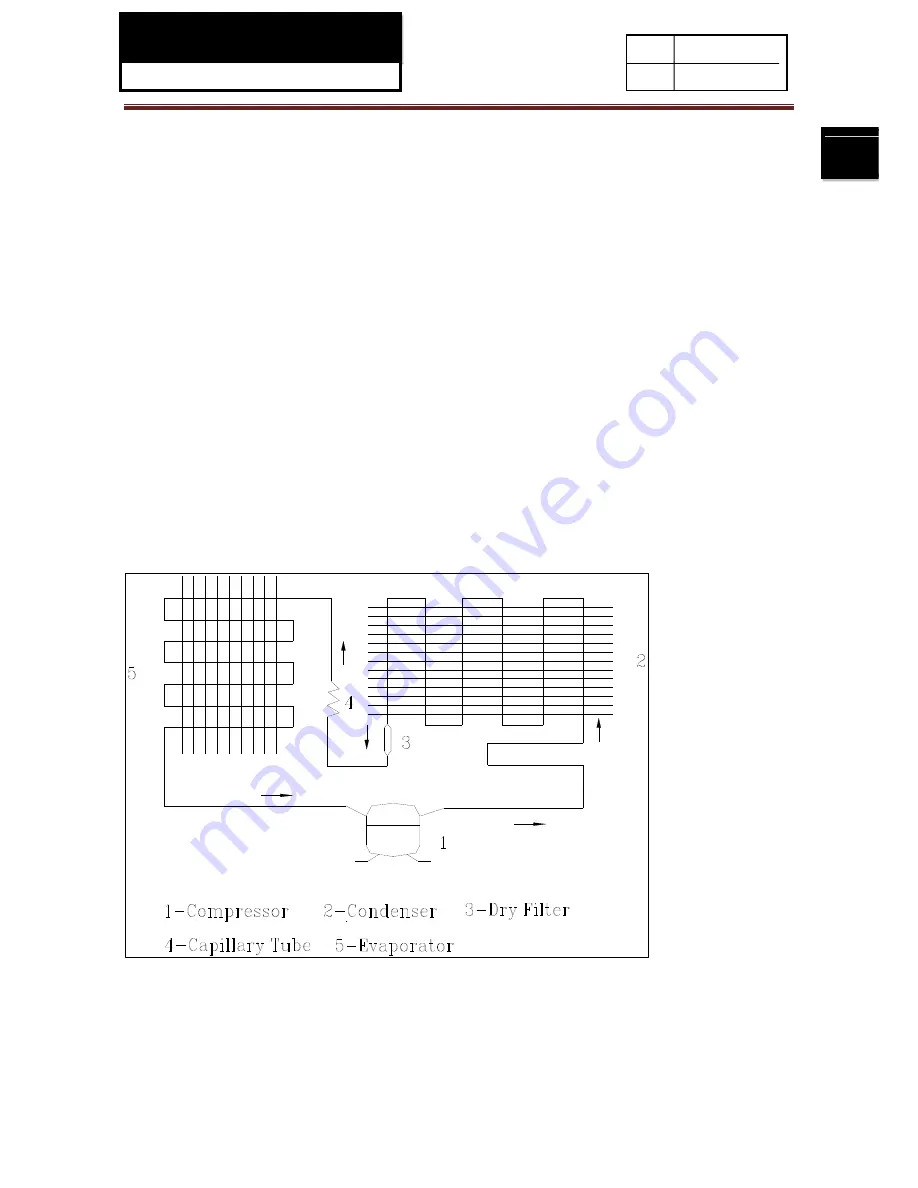
6-1. Refrigeration flow chart 


The refrigeration system of direct cooling single-system cooler belongs to the category of a 
single-temperature and single-control refrigerating system with one evaporators and is controlled by 
a single temperature control. 


Summary of Contents for BD-181SAA

Page 1: ...ir technicians only and is not designed for use by the general public It dose not contain warnings and cautions to advice non technical individuals of potential dangers in attempting to service a product Product powered by electricity should by serviced or repaired only by experienced professional technicians Any attempt to service or repair the product or products dealt with in this service infor...

Page 2: ...ing and draining 10 3 3 Cleaning your freezer 11 4 Disassembly 12 4 1 Door assembly Door hinge hinge cover 12 4 2 Compartment Grill assembly 12 4 3 Control panel assembly Panel cover board knob indicator light 13 4 4 Thermostat assembly 13 5 Control and display system 14 5 1 Control and display panel 14 5 2 Starting the Freezer 14 6 System flow principle 14 6 1 Refrigeration flow chart 14 6 2 Refr...

Page 3: ...SERVICE MANUAL Model BD 181SAA BD 271SAA 3 Issue 2011 2 10 Rev Ref1102S001V0 8 3 Abnormal phenomena 19 8 3 1 Compressor doesn t start 19 8 3 2 Poor cooling 20 ...

Page 4: ...rical shock 4 Confirm the rated current voltage and capacity before testing with any kinds of instruments 5 Watch if the upper door is open when you check something at a lower position 6 Take out every part in the cabinet before moving the machine especially things like panels e g glass shelf 7 Please wear intact cotton gloves when repair any parts of the evaporator so that scratches by the sharp ...

Page 5: ...d photos used in this Manual may not base on the final design of products which may differ from your products in some way 1 3 How to read this Service Manual 1 3 1 Using Icons Icons are used to attract the attention of the reader to specific information The meaning of each icon is described in the table below Note A note provides information that is not indispensable but may nevertheless be valuab...

Page 6: ...Climate class SN 16 32 N 16 32 ST 16 38 T 18 43 SN T Freezer star rating Approvals VDE TÜV IMQ NF ÖVE DEMKO etc CE GS Certifications 2 Key features Gross capacity l 181 Total net capacity l 181 Freezing capacity kg 24h kg 24h 19 Energy consumption year kWh year 139 Max storage time at breakdown h 66 Defrosting Manual Automatic Manual Kind of coolant R134a R600a R600a Foaming components R141b C P C...

Page 7: ...ickness cm 7 8 Walls thickness cm 7 Baskets number n 2 metal Defrost drain Interior light Calendar Adjustable thermostat Fast freeze lamp yellow On light green Breakdown light red Fast freeze switch Freezer temperature warning indicator LED by sound Thermometer Outside In partition Maximum loading level marking Adjustable feet front rear n unable adjustable feet Mobility wheels front rear n Flush ...

Page 8: ...Freezer star rating Approvals VDE TÜV IMQ NF ÖVE DEMKO etc CE GS Certifications 2 Key features Gross capacity l 271 Total net capacity l 271 Freezing capacity kg 24h kg 24h 23 Energy consumption year kWh year 179 Max storage time at breakdown h 70 Defrosting Manual Automatic Manual Kind of coolant R134a R600a R600a Foaming components R141b C P C P 3 Technical data Voltage frequency V Hz 220 240 50...

Page 9: ... 7 Baskets number n 2 metal Defrost drain Interior light Calendar Adjustable thermostat Fast freeze lamp yellow On light green Breakdown light red Fast freeze switch Freezer temperature warning indicator LED by sound Thermometer Outside In partition Maximum loading level marking Adjustable feet front rear n unable adjustable feet Mobility wheels front rear n Flush back skin evaporator 6 Product ne...

Page 10: ...enough to support it when it is fully loaded The freezer must be solidly positioned on the floor if it is to function at its best Shims may be used to accomplish this wherever the floor is too uneven If the place selected for the freezer is damp or moist place 2 X 4 s 51 mm X 102 mm under its entire length to assure adequate support 3 2 Defrosting and Draining In most climates defrosting will be n...

Page 11: ... Plug in the freezer Return the temperature control to its previous position and return food to the freezer Water may drip from the back flange of the lid cover during defrosting This is normal Ice builds up in the lid insulation when the lid is open for adding or removing food and melts during the defrosting operation 3 3 Cleaning the Freezer Outside Protect the paint finish The finish on the out...

Page 12: ... cleaners An open box of baking soda in the freezer will absorb stale freezer odors Change the box ever y three months Care should be taken in moving the freezer away from the wall All types of floor coverings can be damaged particularly cushioned coverings and those with embossed surfaces Chapter 4 Disassembly 4 1 Door assembly Door hinge hinge cover Disassemble the hinge assembly and the hinge c...

Page 13: ... time pull panel outside then take away it Take away the knob with a sharp edged tool Press the cover board and take away it Press two claws on indicator light side and push it from back to front 4 4 Thermostat assembly First take off the knob refer 4 3 Use turnbuckle spanner or acutilingual plier unscrew the turnbuckle then thermostat can be moved from back of panel Note When assembly thermostat ...

Page 14: ...emperature to stabilize 5 2 Starting the Freezer 1 Clean the inside of the freezer with a mild solution of baking soda and water 2 Connect cord to power outlet 3 Make sure the temperature control is set at 4 4 Allow freezer to operate for at least four hours before placing food inside Chapter 6 System flow principle 6 1 Refrigeration flow chart The refrigeration system of direct cooling single sys...

Page 15: ...1 2 10 Rev Ref1102S001V0 6 2 Refrigeration flow scenograph Chapter 7 Circuit diagram 7 1 Brief principle diagram XP Power plug M Compressor SAT Thermostat HGN Green lamp HYE Yellow lamp HRD Red lamp RT Starter F Motor protector C Running capacitor L Lamp ...

Page 16: ...d the door or reduce the times of opening the door Temperature control set too cold See About the operation of your freezer Inadequate air circulation space around cabinet See Preparing to install the freezer Fast Freeze switch is in the ON position on some models See About the operation of your freezer Noisy operation or cabinet vibrates Floor may be weak causing freezer to vibrate when compresso...

Page 17: ...side of cabinet Not unusual during periods of high humidity Wipe surface Interior light does not work on some models No power at outlet Replace fuse or reset the breaker Freezer is unplugged Push the plug completely into the outlet Light bulb burned out Replace bulb Door lid wont fully close by itself Package holding door lid open Get rid of all the packages Slow starting time after being off Buil...

Page 18: ...hort Circuited 0 Ω Starter Measure the resistance with a tester Ambient temperature Room temperature 25 C Model TSD Normal 30 Ω 20 Abnormal Open Ω or Short Circuited 0Ω Overload Protector Measure the resistance with a tester Ambient temperature Room temperature 25 C Model 4TM189KFBYY 53 or BT53 105A61D3 Normal Less than 1 Ω Abnormal Open Ω or Short Circuited 0Ω Running Capacitor Measure the resist...

Page 19: ...pin is tight contact is good Whether input and output voltage of main control board is normal Whether each contact of main control board is normal Tighten each contact and test machine again Y Trouble of lighting and display system Adjust the grade according to fact Compressor is open circuit or short circuit Inner trouble of compressor If it is infinite or 0 then the starter is out of work Heat p...

Page 20: ...SERVICE MANUAL Model BD 181SAA BD 271SAA 20 Issue 2011 2 10 Rev Ref1102S001V0 8 3 2 Poor cooling ...

Page 21: ...Sincere forever Haier Group Haier Industrial Park No 1 Haier Road 266101 Qingdao China http www haier com ...

Reviews: