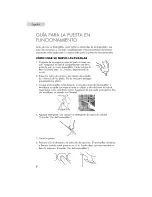
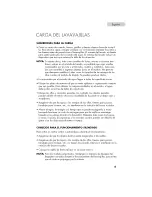
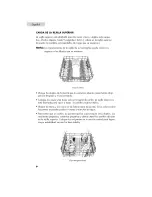
background image

Summary of Contents for DWL3525DBBB

Page 1: ...24 _ 24 24 Built In Dishwasher Lave Vaisselme In orpere Lavavaiilmas Empofraao Part DW 9999 17 O L J O J User Manual Guide de I Utilisateur Manual del Usuario Modelo DWL3525DBWW DWL3525DBBB DWL3525SBSS ...

Page 2: ... not so marked check the manufacturer s recommendations 6 Do not touch the heating element during or immediately after use 7 Do not operate the dishwasher unless all enclosure panels are properly in place 8 Do not tamper with controls 9 Do not abuse sit on or stand on the door lid or dish racks of the dishwasher 10 11 12 To reduce the risk of injury do not allow children to play in or on the dishw...

Page 3: ...uide you in getting the best performance from your Haier dishwasher Remember to record the model and serial number They are on a label in the dishwasher Model number Serial number Date of purchase Staple your receipt to your manual You will need it to obtain warranty service ...

Page 4: ... 10 Loading Bottom Rack 11 12 Loading Silverware Basket 13 Dishwasher Use 13 23 Proper Use of Detergent 14 Detergent Dispenser 14 16 RinseAid Dispenser 17 Cycle Selection Charts 18 19 Canceling a Cycle 20 Changing a Cycle or Setting 20 Adding Items During a Cycle 21 Option Selections 21 22 Cycle Status Indicators 23 Wash System 23 Drying System 24 Overfill Protection Float 24 Washing Special Items...

Page 5: ...n result in death fire or electrical shock Install where dishwasher is protected from the elements Protect against freezing to avoid possible rupture of fill valve Such ruptures are not covered by the warranty See Storing in the Dishwasher Care section for winter storage information Install and level dishwasher on a floor that will hold the weight and in an area suitable for its size and use Remov...

Page 6: ...installed and grounded in accordance with all local codes and ordinances WARN I NG Improper connection of the equipment grounding conductor can result in a risk of electric shock Check with a qualified electrician or service representative if you are in doubt whether the dishwasher is properly grounded Do not modify the plug provided with the dishwasher if it will not fit the outlet have a proper ...

Page 7: ...p Rack Track 3 Water Inlet Opening in tub wall 4 Lower Spray Arm 5 Bottom Rack 6 Vent System 7 Upper Rack 8 Middle Spray Arm 9 Removable Silverware Basket 10 Overfill Protection Float 11 Heating Element 12 Detergent and Rinse Aid Dispenser 6 ...

Page 8: ...g will last about 1 to 3 months depending on your usage 2 Scrape leftover food and hard items toothpicks or bones from dishes You do not need to pre rinse your dishes 3 Properly load the dishwasher See Dishwasher Loading Load dishes with space in between so water will reach the soiled surfaces Make sure nothing prevents the spray arm s from spinning freely 4 Add detergent Always use a quality bran...

Page 9: ... For best drying results water must be able to drain from all surfaces Load heavy pots and pans carefully Heavy items can dent the stainless steel interior of the door if they are dropped or bumped Make sure pot lids and handles pizza pans cookie sheets etc do not interfere with the spray arm rotation Conserve water energy and save time spent hand rinsing by running a rinse cycle to keep dishes mo...

Page 10: ...her rack may vary from the drawings shown Place items so open ends face down for cleaning and draining Load glasses and cups in top rack only The bottom rack is not designed for glasses and cups Damage can occur Place cups and glasses in the rows beh veen tines Placing them over the tines can lead to breakage and water spots To avoid chipping do not let stemware touch other items Small bowls pans ...

Page 11: ...not touch each other during dishwasher operation Damage may occur Load plastic items in the top rack only Only plastic items marked dishwashe safe are recommended Load plastic items so the force of the spray does not move them during the cycle 10 ...

Page 12: ...small items in the bottom rack only if they are secured in place Load plates soup bowls etc between tines Overlap the edges of plates for large loads Load soup cereal and serving bows in the rack in a variety of ways depending upon their size and shape Load bowls securely between the rows of tines Do not nest bowls because the spray will not reach all surfaces Load cookie sheets cake pans and othe...

Page 13: ...er tub because they might block the water inlet opening NOTE Spin the spray arms Be sure items in the basket do not stop the rotation of the spray arms Fold Down Rack You can fold down two rows of tines at the back of the bottom rack 1 Grasp the tip of the tine that is in the tine holder 2 Gently pull the tine out of the tine holder 3 Lay the row of tines down in the rack to make room for larger d...

Page 14: ...jar lids corncob holders etc in the section s with hinged cover s Close the cover to hold small items in place When covers are up mix items in each section of the basket with some pointing up and some down to avoid nesting Spray cannot reach nested items IMPORTANT Always load sharp items knives skewers etc pointing down Be sure that nothing protrudes through bottom of the basket or rack that may b...

Page 15: ...pties detergent into dishwasher when you close the door 1 2 1 Cover latch 2 Main Wash section 3 Pre Wash section 4 Cover The larger Main wash section automatically empties detergent into the dishwasher during the wash See the cycle Selection Charts Use automatic dishwashing detergent only Other detergents can produce excessive suds that can overflow out of the dishwasher and reduce washing perform...

Page 16: ...h section for cycles with 1 wash See the Cycle Selection Charts for more details How much detergent to use The amount of detergent to use depends on the hardness of your water and the type of detergent If you use too little dishes won t be clean If you use too much in soft water glassware will etch Different brands of dishwasher detergent have different amounts of phosphorous for softening water I...

Page 17: ...ill the Pre Wash section Very Hard Water 13 grains per gallon and above NOTE It might be necessary to use the Pots and Pans or a normal cycle with Hi Temp Scrub for best wash performance with very hand water For normally and heavily soiled loads Completely fill the main wash section Completely fill the Pre Wash section Turn the rinse aid dispenser to a higher setting See Rinse Aid Dispenser later ...

Page 18: ...out three months Rinse aid is released through an open ing in the dispenser You do not need to wait until the dispenser is empty to refill it Try to keep it full but be careful not to overfill it 1 Make sure the dishwasher door is fully open 2 Open the dispenser by pushing the cover latch c 3 Add rinse aid until the indicator window looks full 4 Clean up any spilled rinse aid with a damp cloth 5 C...

Page 19: ...s what steps are in each cycle Temperatures indicate where extra heat is added Water usage is shown in U S gallons liters This model meets the ENERGY STAR guidelines for energy efficiency Cycle time does not include dry time An asterisk by the cycle time indicates the cycle time might be longer depending on the temperature of the water enter ing the dishwasher Use for all soil types and dish loads...

Page 20: ... If the incoming water temperature is less than the recommended temperature or food soils are heavy the cycle will automatically compensate by adding time heat and water as needed 19 ...

Page 21: ...clear the indicators PressCANCEL before starting the dishwasher to clear all options and cycles CHANGING A CYCLE OR SETTING During the first fill of a cycle 1 Press a new cycle and or options 2 Check the detergent dispensers They must be filled properly for the new cycle After the first fill of a cycle 1 Press OAN EL DRAIN Cancel Your dishwasher will start a 2 minute drain if needed Letthe dishwas...

Page 22: ...g begins Hi Temp Wash Select this option to heat the water during parts of the cycle Higher water temperatures helps clean tough soils Hi Temp Wash with the Pots Pans or Normal cycles raises the water temperature in the main wash This option adds heat water and wash time to a cycle kt_TEMP WASH NOTE Hi Temp Wash is an option with the Pots Pans and Normal cycles Always use Hi Temp Wash if you have ...

Page 23: ...tion to run your dishwasher at a later time or during off peak hours You can add items to the load anytime during the delay countdown After adding items close the door firmly until it latches 5HOUR DELAY You can delay the start of a cycle up to 6 hours To delay the start 1 Repeatedly press Delay Hours until you see the desired hours of delay lighted in LED indicator on the left When the delay reac...

Page 24: ...periods Drying Lightsup when the dishwasher is drying after the final rinse Sanitized Displayed when cycle has met sanitization conditions The light will remain ON until door is opened Wash System An energy saving soak interval is used for most cycles shortly after the initial water fill During the 5 minutes of soaking dried and baked on food is loosened without using energy Later in the cycle the...

Page 25: ...any objects on the strainer Drying System During drying you can see hot vapor escaping through the vent at the upper left corner of the door This is normal as the heat dries your dishes IMPORTANT The vapor is hot Do not touch the vent Overfill Protection Float The overfill protection float in the front right corner of the dishwasher tub keeps the dishwasher from overfilling It must be in place for...

Page 26: ...ls attached with glue can loosen and clog the spray arms or pump and reduce washing performance Cast Iron No Seasoning will be removed and iron will rust China Stoneware Yes Always check manufacturer s recommendations before washing Antique hand painted or over the glaze patterns may fade gold leaf can discolor or fade Crystal Yes Check manufacturer s recommendations before washing Some types of l...

Page 27: ...ood containing salt acid or sulfide eggs mayonnaise and seafood can damage finish Tin No Can rust Wooden Ware No Wash by hand Always check manufacturer s instructions before washing Untreated wood can warp crack or lose its finish DISHWASHER CARE Cleaning Cleaning the exterior In mostcases regular useof a soft damp cloth or sponge and a mild detergent is all that is necessaryto keep the outside of...

Page 28: ...nk or countertop near the dishwasher NOTE The drain air gap is an external plumbing device that is not part of your dishwasher The warranty provided with your dishwasher does not cover service costs directly associated with the cleaning or repair of the external drain air gap To clean the drain air gap Clean the drain air gap periodically to ensure proper drainage of your dishwasher Follow the cle...

Page 29: ...until the water reaches the proper temperature Water remains in the dishwasher Is the cycle complete and not in a pause It is normal to have a small amount of clean water around the outlet in the bottom of the tub to keep the water seal lubricated If the drain hose is connected to a food waste disposer make sure the dispenser is empty Make sure the knockout plug has been removed from the food wast...

Page 30: ...abels clogging the pump or spray arm Is the home water pressure high enough for proper dishwasher filling Home water pressure should be 20 to 120 psi 138 to 828 kPa for proper dishwasher fill A booster pump on the water supply can be added if pressure is too low Are high suds slowing the wash arm Never use soap or laundry detergents Use recommended dishwasher detergents only SPOTS AND STAINS ON DI...

Page 31: ...e to prevent the problem except by hand washing To slow this process use a minimum amount of detergent but not less than 1 tb 15 g per load Use a liquid rinse aid and under load the dishwasher to allow thorough rinsing Silica film and etching are permanent and cannot be removed Do not use heated drying White spots on cookware with non stick finish Has the dishwasher detergent removed cookware seas...

Page 32: ...use an air dry or energy saving dry option Use a heated drying option for dryer dishes DISHES ARE DAMAGED DURING A CYCLE Chipping of dishes Did you load the dishwasher properly Load the dishes and glasses so they are stable and do not strike together from washing action Minimize chipping by moving the rack in and out slowly NOTE Antiques feather edged crystal and similar types of china and glasswa...

Page 33: ...e model and serial number of your appliance This information will help us to better respond to your request If you need replacement parts If you need to order replacement parts we recommend that you only use factory specified parts These parts will fit right and work right To locate factory speci fied replacement parts in your area call our Customer Interaction Center tele phone number 1 877 337 3...

Page 34: ... is not covered by this warranty Replacement or repair of household fuses circuit breakers wiring or plumbing A product whose original serial number has been removed or altered Any service charges not specifically identified as normal such as normal service area or hours Damage to dishware Damage incurred in shipping Damage caused by improper installation or maintenance Damage from misuse abuse ac...

Page 35: ... 6 No toque el elemento calentador durante el uso o inmediatamente despu6s del uso 7 No ponga en funcionamiento el lavavajillas a menos que todos los pan eles de cerrado est6n correctamente en su lugar 8 No manipule indebidamente los controles 9 No realice un mal uso ni se siente ni se pare sobre la puerta la tapa o las rejillas para vajilla del lavavajillas 10 Para reducir el riesgo de lesiones n...

Page 36: ..._para obtener elmejor servicio desu lavaplatos Recuercte registrar aqui losnOmeros deserie y modelo delam_quina Los encontrar_ en unaetiqueta enelrespaldo del lavaplatos Modelo Serie Fecha de Compra Adjunte aqui su recibe de compra Lo necesitara para obtener servicio de garantia ...

Page 37: ...ompartimiento para el detergente 14 Compartimiento para eJagente de enjuague 17 Tablas de selecci6n de ciclos 18 C6mo cancelar un ciclo 20 C6mo cambiar un ciclo o una configuraci6n 20 C6mo agregar objetos durante un ciclo 21 Selecci6n de las opciones 21 C6mo utilizar el Calentador de Platos 23 Incticadores del estado del ciclo 24 Sistema de Javacto 25 Sistema de secacto 25 FJotantede Protecci6n 26...

Page 38: ...trica Instale el lavavajillas en un lugar donde est_ protegido del ambiente Prot_jalo del congelamiento para evitar la posible rotura de la v61vula de Ilenado Dichas roturas no est6n cubiertas por la garantia Consulte C6mo cuidar el lavavajillas en verano e invierno en la secci6n Cuidado del lavavajillas para obtener informaci6n sobre el cuidado en invierno Instale y nivele el lavavajillas sobre u...

Page 39: ...conductor a tierra del equipo puede ocasionar un riesgo de descarga el_ctrica Haga que un electricista calificado o un representante de servicios de mantenimiento realice un control si tiene dudas acerca de si el lavavajillas tiene una conexi6n a tierra apropiada No modifique el enchufe que viene con el lavavajillas si no se puede introducir en el tomacorriente haga que un electricista calificado ...

Page 40: ...Paso de entrada de agua desde tuberia de la pared 4 Brazo rociador inferior 5 Bandeja inferior 6 Sistema de aire 7 Bandeja superior 8 Tubo rociador medio 9 Canasto removible de vajilla 10 Flotador de protecci6n de Ilenado 11 Calentador 12 Dispensador de detergente y agente de enjuague 6 ...

Page 41: ...Raspe los restos de comida y los objetos duros palil los o huesos de los platos No es necesario enjuagar previamente los platos 3 Cargue el lavavajillas correctamente Consulte Carga del Lavavajillas Introduzca la vajilla con espacio entre un objeto y otro de forma tal que el agua Ilegue alas superficies sucias AsegOrese de que nada evite que los bra zos rociadores se muevan con libertad 4 Agregue ...

Page 42: ...odas las superficies Ubique las ollas y cacerolas pesadas con cuidado Los objetos pesados pueden abollar el interior de acero inoxidable de la puerta si se dejan caer o se golpean Aseg0rese de que las tapas y las manijas de las ollas fuentes para pizzas bandejas para hornear etc no interfieran en la rotaci6n del brazo rociador Ahorre el agua la energia y el tiempo que se pierde enjuagando a mano h...

Page 43: ...iren hacia abajo para la limpieza y el escurrimiento Coloque los vasos y las tazas s61o en la rejilla de arriba La rejilla inferior no est6 dise_ada para vasos y tazas Se pueden producir da_os Ubique las tazas y los vasos en las hileras entre las puntas Si los coloca sobre las puntas se pueden producir roturas y manchas de agua Para evitar que se cachen no permita que las copas toquen otros objeto...

Page 44: ...avavajillas Se pueden producir da_os Coloque los objetos de pl6stico s61o en la rejilla superior Es recomendable que se laven s61o los objetos de pl6stico que tengan la indicaci6n para uso en lavavajillas Coloque los objetos de pl6stico de forma tal que la fuerza del rociador no los mueva durante el ciclo 10 ...

Page 45: ...rejilla inferior s61osi est6n asegurados en su lugar Ubique los platos soperas etc entre las puntas Superponga los bordes de los platos para cargas grandes Coloque los platos soperas y tazones para cereales en la rejilla de varias maneras distintas de acuerdo con su tamaio y forma Coloque los recipientes asegurados entre las hileras de puntas No superponga los recipientes ya que el rociador no Ile...

Page 46: ...ue pueden bloquear la abertura de ingreso del agua NOTA Haga girar los brazos rociadores Aseg0rese de que los objetos en la canasta no detengan la rotaci6n de los brazos rociadores Rejilla plegable Puede desplegar dos hileras de puntas en la parte de atr6s de la rejilla inferior 1 Tome el extremo de la punta que est6 en el soporte de las puntas 2 Con suavidad saque la punta del soporte de las punt...

Page 47: ... 6reas con cubiertas con bisagras Cierre las cubiertas para que los objetos peque_os se mantengan en su lugar Cuando las cubiertas est6n abiertas mezcle los objetos en cada 6rea de la canasta con algunos hacia abajo y algunos hacia arriba para evitar que se superpongan El rociador no puede alcanzar los objetos superpuestos IMPORTANTE Siempre coloque los objetos con filo cuchillos pinchos etc hacia...

Page 48: ...cierra la puerta 1 2 1 Traba de la tapa 2 Secci6n de Lavado Principal 3 Secci6n de Prelavado 4 Tapa La secci6n m6s grande de Lavado Principal libera el detergente autom6ticamente en el lavavajillas durante el lavado Consulte las Tablas de Selecci6n de Ciclo Use detergente para lavado en lavavajillas autom6tico solamente Los otros detergentes pueden producir espuma excesiva que puede rebalsar el la...

Page 49: ... de Selecci6n de Ciclo para obtener m6s detalles Cuanto detergente usar La cantidad de detergente que debe usarse depende de la dureza del agua y del tipo de detergente Si usa muy poco la vajilla no quedar6 limpia Si usa demasiado con agua blanda los utensilios de vidrio se marcar6n Lasdistintas marcas de detergentes para lavavajillas tienen diferentes canti dades de f6sforo para ablandar el agua ...

Page 50: ... muy dura 13 granos por gal6n o m6s NOTA Puede ser necesario usar el ciclo Utensilios usa dos para Asar o un ciclo normal con Limpieza a Alta Temperatura para obtener un mejor lavado cuando el agua es muy dura Para cargas con suciedad normal y mucha suciedad Llene completamente la secci6n de Lavado Principal Llene completamente la secci6n de Prelavado Gire el compartimiento del agente de enjuague ...

Page 51: ... de enjuague se libera por una aber tura en el compartimiento No es necesario esperar hasta que el compartimiento est_ vacio para volver a Ilenarlo Intente mantenerlo Ileno pero tenga cuidado de no Ilenarlo demasiado 1 Aseg6rese de que la puerta del lavavajillas est_ completamente abierta 2 Abra el compartimiento empujando la traba de la tapa 3 Agregue agente de enjuague hasta que se vea Ileno en ...

Page 52: ...n en cada ciclo Lastemperaturas indi can cu6ndo se aumenta la temperatura El uso de agua se muestra en galones estadounidenses litros Este modelo cumple con las pautas de ENERGY STAR en cuanto a la eficiencia energ_tica La duraci6n de ciclo no incluye tiempo seco Un asterisco al lado del tiempo del ciclo indica que el tiempo del ciclo puede ser mayor de acuerdo con la tem peratura del agua que ing...

Page 53: ...1 Si la temperatura del agua que ingresa es menor que la temperatura recomen dada o si la suciedad de la comida es dificil el ciclo se compensar6 autom6ti camente agregando tiempo calory agua segOn sea necesario 19 ...

Page 54: ...ELAR antes de poner en funcionamiento el lavavajillas para borrar todas las opciones y los ciclos COMO CAMBIAR UN ClCLO O UNA CONFIGURAClON Durante el primer Ilenado de un ciclo 1 Seleccione un nuevo ciclo y las opciones 2 Revise los compartimientos del detergente Debe Ilenarlos correctamente para comenzar el nuevo ciclo Durante el primer Ilenado de un ciclo 1 Presione ANCEI DY_A_N Cancelar Su lav...

Page 55: ...ara calentar el agua durante partes del ciclo Una tem peratura mayor del agua ayuda a remover la suciedad m6s resistente El lavado a alta temperatura Hi Temp Wash junto con Ollas y Cacerolas Pots Pans o ciclos normales Normal Cycles eleva la temperatura del agua en el lavado principal Esta opci6n agrega tiempo de calor agua y lavado al ciclo HIi TEMP WASU NOTA El Lavado a Alta Temperatura es una o...

Page 56: ...te las horas en las que el consumo no est6 en su pico Puede agregar objetos a la carga en cualquier momento durante el lapso de la demora Despu_s de cargar los objetos cierre la puerta con firmeza hasta que trabe 6_OUR E _AY Puede demorar el comienzo de un ciclo hasta 6 horas Para demorar el comienzo 1 Presione varias veces Delay Hours Horas de demora hasta que vea las horas deseadas de demora ilu...

Page 57: ...enjuague final Desinfectado Aparece cuando el ciclo ha cumplido las condiciones de desinfecci6n La luz continuar6 encendida hasta que se abra la puerta Sistema de Lavado Los intervalos de remojo y ahorro de energia suceden en la mayoria de los ciclos poco despu_s del Ilenado inicial de agua Durante los 5 minutos de remojo la suciedad seca o la comida pegada se despenden sin utilizar energia M6s ad...

Page 58: ... SISTEMA DE SECA DO Durante el secado se puede observar el vapor que escapa por la salida de aire en el extremo superior izquierdo de la puerta Esto es normal ya que la vajilla se seca con calor IMPORTANTE El vapor est6 caliente No toque la salida de aire FLOTANTE DE PROTECCION El flotante de protecci6n en el extremo frontal izquierdo de la tina del lavavajil las evita que el lavavajillas se Ilene...

Page 59: ...l rendimiento del lavado Hierro fundido No Se perder6 la curaci6n y el hierro se oxidar6 Porcelana Cer6mica de gres Si Lea siempre las recomendaciones del fabricante antes del lavado LosdiseBos antiguos pintados a mano o pintados sobre esmalte pueden desteBirse las 16minas doradas pueden decolorarse o desteBirse Cristal Si Lea las recomendaciones del fabricante antes del lavado Algunos tipos de cr...

Page 60: ...r6 inmediatamente El contacto prolongado con alimentos que contienen sal 6cido o sulfuro huevos mayonesa y mariscos puede daBar el acabado Hojalata No Puede oxidarse Utensilios de madera No L6velos a mano Lea siempre las instrucciones del fabricante antes del lavado La madera que no ha sido tratada puede torcerse partirse o perder su acabado CUIDADO DEL LAVAVAJILLAS Limpieza Limpieza del exterior ...

Page 61: ...tivo externo de la tuberia que no es parte de su lavavajillas La garantia proporcionada con su lavavajillas no cubre los costos del servicio asociados directamente con la limpieza o reparaci6n del respiradero del desagOe externo Para limpiar el respiradero del desagi ie Limpie el respiradero del desagOe peri6dicamente para asegurarse que el lavavajillas desagOe correctamente Siga las instrucciones...

Page 62: ...a en el lavavajillas _Se ha completado el ciclo y no esta pausado Es normal que haya una pequeBa cantidad de agua limpia alrededor del desagLie en el fondo de la cuba para mantener el sello de agua lubricado Si la manguera del drenaje est6 conectada a un balde de desperdicios asegOrese de que el recipiente este vacio AsegOrese de que el tap6n haya sido removido del dispensador de desperdicios Veri...

Page 63: ...l lavavajillas se Ilene correctamente La presi6n de agua en el hogar debe ser de 20 a 120 libras por pulgada cuadrada 138 a 828 kilopascales para permitir que el lavavajillas se Ilene correctamente Se puede agregar una bomba elevadora de presi6n al suministro de agua si la presi6n es demasiado baja _La espuma aha hace m6s lenta la actividad del brazo de lavado Nunca utilice jab6n o detergentes par...

Page 64: ...s alcalinas enjuague insuficiente sobrecarga del lavavajillas y el calor del secado Puede que sea imposible evitar el problema salvo con el lavado manual Para hacer m6s lento este proceso utilice una cantidad minima de deter c_ entepero no menos de 1 cucharada 15g por carga Utilice un agente e enjuague liquido y disminuya la carga del lavavajillas para permitir un enjuague completo La pelicula de ...

Page 65: ... se cache introduciendoy retirando las rejillas lentamente NOTA Las antig0edades el cristal de filo fino y tipos similares de porcelana y vajilla de cristal pueden ser demasiado delicados para el lavado autom6tico L6velos a mano RUIDOS Chirridos crujidos o zumbidos Un objeto duro ha ingresado en el m6dulo de lavado en algunos modelos Cuando se retira el objeto el sonido deberia detenerse ASISTENCI...

Page 66: ...aci6n de fusibles inter ruptores automdticos cableado o tuberias del hogar Un producto cuyo nOmero de serie haya sido quitado o modificado Los gastos pot servicios que no se identifican especificamente como normales tales como la zona normal de servicio o las horas normales Los da_os al lavavajillas Los dahos ocurridos durante el envio DaBos causados pot instalaci6n y mantenimiento incorrectos DaB...

Page 67: ...ction Center au 1 877 337 3639 UNE PREUVE D ACHAT DATEE EST REQUISE POUR BENEFICIER DE LA GARANTIE IMPORTANTE No regrese este producto a la tienda Si tiene alg_n problema con este producto por favor contacte el Centro de Servicio al Consumidor al 1 877 337 3639 V_lido solo en E U A NECESITA UNA PRUEBA DE COMPRA FECHADA PARA EL SERVICIO DE LA GARANTIA 115V 60 Hz Made in China Fabriqu en Chine Hecho...

Reviews: