background image

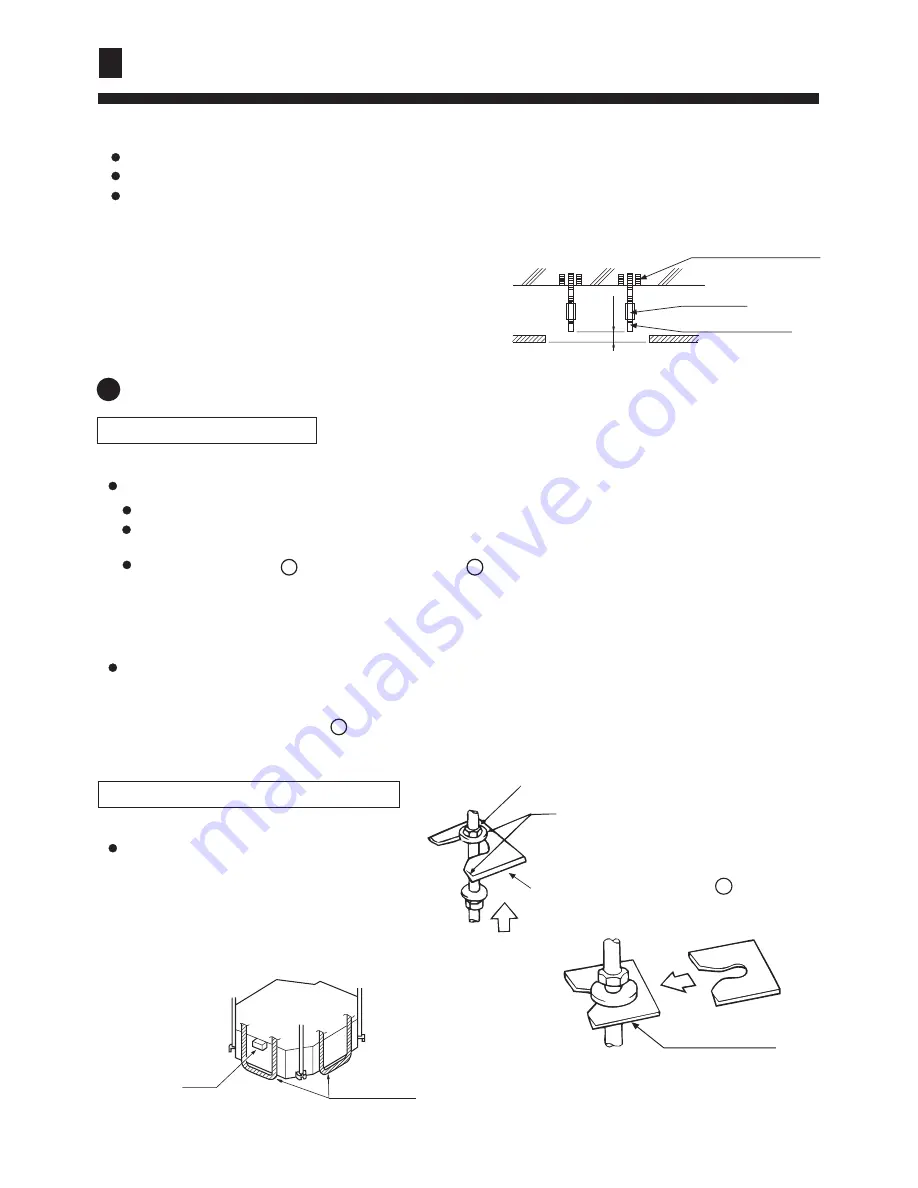
< After installation on the ceiling >

(3) Adjust unit to its right position. (Refer to preparation for the installation-(1))

(4) Check unit's horizontal level.

Watert pump and flating switch is installed inside indoor unit, check four corners of the unit for its level

using horizontal compartor or PVC tube with water. (If unit is tilting against the direction of water

drainage, problem may occur on floating switch, causing water leakage.)

(5) Remove the washer mounlting      , and tighten the nut above.

(6) Remove the paper pattern.

As for the dimensions of ceiling hole, see paper pattern. Ask your real estate dealer for details.

Center of the hole is marked on the paper pattern.

Center of the unit is marked on the card in the unit and on the paper pattern.

Mount paper pattern      onto unit using 3 screws     .  Fix the corner of the drain pan at piping outlet.

(1) Install unit temporarily

Put suspending bracket on the suspending bolt. Be sure to use nut and washer at both ends of the bracket.

In the case of ceiling already exists

(1) Install unit temporarily
      Put suspending bracket on the suspending
bolt. Be sure to  use  nut  and washer at both ends
of the bracket. Fix the bracket firmly.
(2) Adjust  the  height  and position of the unit.
(Refer to preparation for the installation (1) ).
(3) Proceed with  (3) and (4) of "In the case of
new ceiling".

Nut (Prepare in field)

Washer (Prepared in field)

Suspending bolts

Fasten (double nuts)

Insert

Washer fixing pad

(prepared in feild)

[ secure the washer firmly]

(2) Cut an opening in ceiling for installation if necessary. (when ceiling already exists.)

(3) Install a suspending bolt.(Use a M10 bolt)

To support the unit weight, anchor bolt shall be used

in the case of already exists ceiling. For new ceiling,

use built-in type bolt or parts prepared in the field.

Before going on installing adjust space between ceiling.

Note: All the above mentioned parts shall be

prepared in field.

Refer to paper pattern for dimension of ceiling hole.

Connect all pipings (refrigerant, water drainage), wirings (inter unit cable) to indoor unit, before installation.

Cut a hole in ceiling, may be a frame should be used to ensure a smooth surface and to prevent vibration.

Contact your real estate dealer

Installation of indoor unit

4

(2)

In the case of new ceiling

18

Level

Polythene pipe

5

6

<Installation example>

Ceiling

Roof

Anchor bolt

Long nut

Suspending bolt

50~150

2

2

Installation Procedure

Summary of Contents for HBU-42CH03

Page 1: ...e air conditioner No 0150500604 C Operation Installation Manual HBU 28CH03 HBU 28HH03 HBU 36HH03 HBU 42CI03 HBU 42CH03 HBU 42HI03 HBU 48CH03 HBU 48HJ03 HBU 48CK03 CASSETTE TYPE AIR CONDITIONER Please...

Page 2: ...Contents Cautions Introduction to Spare Parts Maintenance Trouble Shooting When Trouble Happens Customer Need to know Installation Procedure 1 5 6 7 8 9 10 11 12 13 14 24...

Page 3: ...ylene and the polyethylene foam pads contain no fluorochloric hydrocarbon Consult your local authorities for the name and address of the waste materials collecting centers and waste paper disposal ser...

Page 4: ...oner Do not put fingers or any other things into the inlet outlet and swing louver Do not allow children to play with the air conditioner In no case should children be allowed to sit on the outdoor un...

Page 5: ...to continue using the conditioner will damage the conditioner and may cause electrical shock or fire hazard When need maintenance and repairment call dealer to handle it Incorrect mainten ance and re...

Page 6: ...tted to placed on or stand on outdoor unit The falling of goods and people may cause acci dents Pets and plants should not be blowed directly in the air flow Otherwise will suffer damage Don t operate...

Page 7: ...high salt content in the air c Near to hot spring with high content of sulfide gases d Area with frequent fluctuation of voltage e g factory etc e In vehicles or ships f Kitchen with heavy oil vapour...

Page 8: ...Introduction to Spare Parts 6 adjust air outlet direction by the air direction adjusting button on remote controller Air ourlet blade Suction grill Air filter located in the suction grill...

Page 9: ...r one time B Wash with water Swing off the water and then place in cool place Pull the two handles at the same time slowly draw them out 2 Dismantle air filter Clip cpening Bottom of filter Frame of a...

Page 10: ...n the air filter indoor unit and outdoor unit and cover the unit with dustcoat Pre season Care See that there is no obstacles blocking the air inlet and air outlet of both indoor and outdoor unit to a...

Page 11: ...tobacco absorbed by indoor unit During operation white fog comes out of indoor unit When in COOL or DRY mode a thin water fog can be seen blown out of unit this is the condensed fog because the sudden...

Page 12: ...et ride of the excess heat indoor fan will continue running for a while after unit autom atically stops Water or vapor generated from the outdoor unit during heating Please check the following things...

Page 13: ...in the room Sunlight direct into the room Too crowed in the room Cooled air blown out when heating When the air conditioner does not operate properly after you have checked the above mentioned items...

Page 14: ...e temp over 120 for 3 times continuously in 30m E5 5 overcurrent Indicate phase failure when been electrified for the first time indicate overcurrent protection during working procedure E6 6 16 High p...

Page 15: ...ter installation please use the air conditioner according to the specification in the operation manual Using Directions Adjust suitable airflow direction Avoid direct sunlight and airflow Keep the pro...

Page 16: ...ife 9 Pincers 10 Leakage detector or soapy water 11 Band tape 12 Scraper 13 Refrigerant oil The installation tools listed in the following sheet can be used as required The following parts mentioned i...

Page 17: ...t falling down may happen Unit should be placed on a place strong enough to hold the unit Or unit will fall down causing injuries When install the unit take in consideration of storms typhoom earthqua...

Page 18: ...ntenance Indoor and outdoor unit piping length is within limit Refer to Installation Manual for outdoor unit Indoor and outdoor unit power cable inter unit cable are at least 1 m away fromT V radio Th...

Page 19: ...g bolts 790 Distance between suspending bolts 890 890 Ceiling opening Ceiling opening A 20 Over drain pipe 950 Ornament panel 890 Ceiling opening 840 Indoor unit 780 Distance between suspending bolts...

Page 20: ...e sure to use nut and washer at both ends of the bracket Fix the bracket firmly 2 Adjust the height and position of the unit Refer to preparation for the installation 1 3 Proceed with 3 and 4 of In th...

Page 21: ...insulator with seal Refrigerant piping 5 19 Table 1 7 Apple refrigerant oil Torque spanner spanner Piping joing Flare nut Clamp Gas pipe Liquid pipe Insulator accessory For liquid pipe Insulator acce...

Page 22: ...uch force on it Installation of water drainage pipe 6 Note 20 Use the self provided stiff pipe and clamp 1 with unit Insert water pipe into water plug until it reaches the white tape Tighten the clip...

Page 23: ...cting hole Watering can of plastic pipe should be about 100 mm long 100mm Water drainage port for maintenance Drain water from this hole Self provided stiff pipe Inspecting hole NOTE L N and 1 2 are e...

Page 24: ...match that on terminal block 1 Prepare ornament panel Handling of ornament panel Ornament panel shall not be placed face down or against wall neither on an uneven object Don t bend carelessly the swi...

Page 25: ...connecting Side of ornament panel Side of indoor unit Check whether indoor unit is horizontal with leveler or polythene pipe filled with water and check that the dimension of the ceiling opening is co...

Page 26: ...ount Unit might fall down make vibration or noise This may lead to gas shortage Dew or water drop may occur Dew or water drop may occur Problem may occur or parts got burned Problem may occur or parts...

Page 27: ......

Page 28: ......

Reviews: