background image

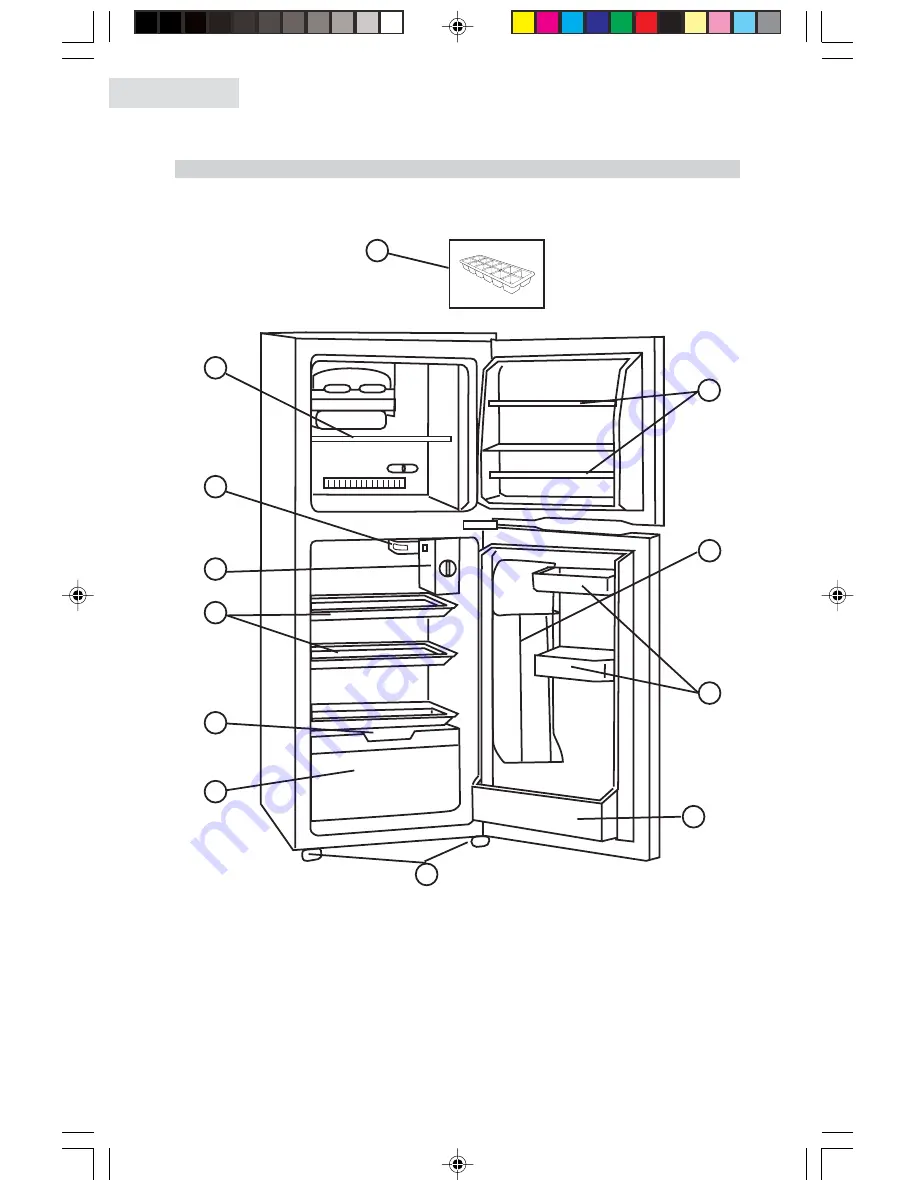
Parts And Features

4

1

1.  1 Ice Cube Tray
2.  2 Full-Width Freezer Door Shelves
3.  “Dispence-A-Can” Storage
4.  2 Half Width Door Shelves
5.  1 Full Width Door Shelf
6.  Adjustable Front Leveling Legs

(Not Shown)

7.  Clear Crisper
8.  Clear Glass  Crisper Cover
9.  2 Adjustable Full-Width Shelves
10.  Adjustable Temperature Control
11. Automatic Interior Light
12. Freezer Shelf

2

3

4

5

6

7

8

9

10

11

English

12

English

4

Summary of Contents for HDF05WNAWW

Page 1: ...efrost Refrigerator Le Manuel de Deux Portes Dégivrent le Réfrigérateur El Manual de Dos Puertas Descongela el Refrigeradore User Manual Guide de l Utilisateur Manual del Usuario Model Modèle Para Modelo de HDF05WNAWW ...

Page 2: ...defrosting your refrigerator 7 If your old refrigerator is not being used we recommend that you remove the doors and leave the shelves in place This will reduce the possibility of danger to children 8 After your refrigerator is in operation do not touch the cold surfaces in the freezer compartment particularly when hands are damp or wet Skin may adhere to these extremely cold surfaces 9 Do not ref...

Page 3: ...You will need it to obtain warranty service 10 This refrigerator should not be recessed or built in an enclosed cabinet It is designed for freestanding installation only 11 Do not operate your refrigerator in the presence of explosive fumes SAVE THESE INSTRUCTIONS for future use DANGER Risk of child entrapment Before you throw away your old refrigerator or freezer take off the doors Leave the shel...

Page 4: ...Alignment 7 Reversing the Door Swing 8 Refrigerator Features And Use 10 General Features 10 Refrigerator Interior Shelves 10 Crisper and Crisper Cover 11 Food Storage Information 12 Normal Operating Sounds 13 Proper Refrigerator Care and Cleaning 14 Cleaning and Maintenance 14 Light Bulb Replacement 15 Power Interruptions 15 Vacation and Moving Care 15 Troubleshooting 16 Warranty Information 18 En...

Page 5: ...age 4 2 Half Width Door Shelves 5 1 Full Width Door Shelf 6 Adjustable Front Leveling Legs Not Shown 7 Clear Crisper 8 Clear Glass Crisper Cover 9 2 Adjustable Full Width Shelves 10 Adjustable Temperature Control 11 Automatic Interior Light 12 Freezer Shelf 2 3 4 5 6 7 8 9 10 11 English 12 English 4 ...

Page 6: ...g your refrigerator in its final position you can level your refrigerator Leveling legs can be adjusted by turning them clockwise to raise your refrigerator or by turning them counterclockwise to lower your refrigerator The refrigerator door will close easier when the leveling legs are raised To assure your refrigerator works at the maximum efficiency it was designed for you should install it in a...

Page 7: ... and may result in shock hazard Do not install your refrigerator in any location not properly insulated or heated e g garage etc Your refrigerator was not designed to operate in temperature settings below 55 Fahrenheit Select a suitable location for the refrigerator on a hard even surface away from direct sunlight or heat source e g radiators baseboard heaters cooking appliances etc Any floor unev...

Page 8: ...n between and then tighten the screws 5 Replace the top hinge cover Refrigerator Door see fig 2 1 Loosen and remove the bottom hinge using a phillips head screwdriver 2 Adjust the door or put a spacer in between and then tighten the screws Door Alignment 7 fig 1 Hinge box cover Top hinge fig 2 lower bracket lower pivot pin lower pivot pin hole bottom hinge pad English English 7 ...

Page 9: ...er door with a phillips head screwdriver Then remove the three screws from the hinge Take out the hinge by pulling it vertically and keep it in a safe place 3 Remove the adhesive tape on freezer door lift and take the door down and carefully put it aside 4 Dismantle two screws of the central hinge lift and take down the central hinge and keep them in a safe place see fig 3 5 Remove the adhesive ta...

Page 10: ...straight and in alignment with central hinge Install the central hinge again turn the hinge axle until it completely enters the door body then fix it with screws 5 To install freezer door make the left bottom hole of freezer door fall over the central hinge axle raise upper hinge so that hinge axle can be installed in the upper hole of the upper part of the freezer door adjust door to make it stra...

Page 11: ...ur refrigerator will automatically maintain the temperature level you select The temperature control dial has 7 settings plus off 1 is the warmest 7 is the coldest Turning the dial to OFF stops cooling in both the refrigeration and freezer sections At first set the dial to 4 and allow 24 hours to pass before adjusting the temperature to your needs Note If the refrigerator has been placed in a hori...

Page 12: ... in position and gently sliding it back into place Removing or replacing the crisper cover see fig 8 1 Carefully grasp the crisper cover and slide out to remove 2 To replace slide the rear of the crisper cover into the right and left slots above the crisper area and gently slide back into place Crisper and Crisper Cover fig 7 fig 8 English English 11 ...

Page 13: ...with skins should be stored in plastic bags or containers Leafy vegetables should be washed and drained and then stored in plastic bags or containers Hot food should be allowed to cool before storing in the refrigeration This will prevent unnecessary energy use Fresh seafood should be used the same day as purchased When storing meats in the fresh food section keep in the original packaging or rewr...

Page 14: ...containers with air tight lids Heavy duty aluminum foil Plastic wrap made from saran film Self sealing plastic bags Do not refreeze defrosted thawed foods It is recommended that the freezing date be marked on the packaging The fan circulating air inside the interior of your unit to maintain the temperature you have selected Boiling water gurgling sounds or slight vibrations that are the result of ...

Page 15: ...ning solution to wipe down your refrigerator Rinse with clean warm water and dry with a soft cloth Do not use harsh chemicals abrasives ammonia chlorine bleach concentrated detergents solvents or metal scouring pads SOME of these chemicals may dissolve damage and or discolor your refrigerator Clean door gaskets every three months according to general instructions Gaskets must be kept clean and pli...

Page 16: ...rstorms or other causes Remove the power cord from AC outlet when a power outage occurs When power has been restored replug power cord to AC outlet If outage is for a prolonged period inspect and discard spoiled or thawed food in freezer and refrigerator Clean refrigerator before reusing For long vacations or absences empty food from refrigerator and freezer move the temperature DIAL to the OFF po...

Page 17: ...r temperature Check gaskets for proper seal Adjust temperature control to colder setting Food temperature is too cold If temperature control setting is too cold adjust to a warmer setting and allow several hours for temperature to adjust Refrigerator runs too frequently This may be normal to maintain constant temperature during high temperature and humid days Doors may have been opened frequently ...

Page 18: ...efrigerator has an odor Interior needs cleaning Foods improperly wrapped or sealed are giving off odors Refrigerator light does not work Check power supply Tighten bulb in socket Replace burned out bulb Refrigerator Freezer door does not shut properly Level the refrigerator Re align refrigerator freezer door Check for blockages e g food containers crisper cover shelves bins etc English 17 ...

Page 19: ...12 month period Beyond this period only parts are covered in the remain ing warranty Labor is not provided and must be paid by the customer 3 Contact your nearest authorized service center For the name of the nearest service center please call 1 877 337 3639 THIS WARRANTY COVERS APPLIANCES WITHIN THE CONTINENTAL UNITED STATES PUERTO RICO AND CANADA IT DOES NOT COVER THE FOLLOWING Damages from impr...

Page 20: ...TANT Ne pas Réexpédier ce Produit au Magasin Pour tout problème concernant ce produit veuillez contacter le service des consommateurs Haier Customer Satisfaction Center au 1 877 337 3639 UNE PREUVE D ACHAT DATEE EST REQUISE POUR BENEFICIER DE LA GARANTIE IMPORTANTE No regrese este producto a la tienda Si tiene algún problema con este producto por favor contacte el Centro de Servicio al Consumidor ...

Reviews: