background image

- 18 - 


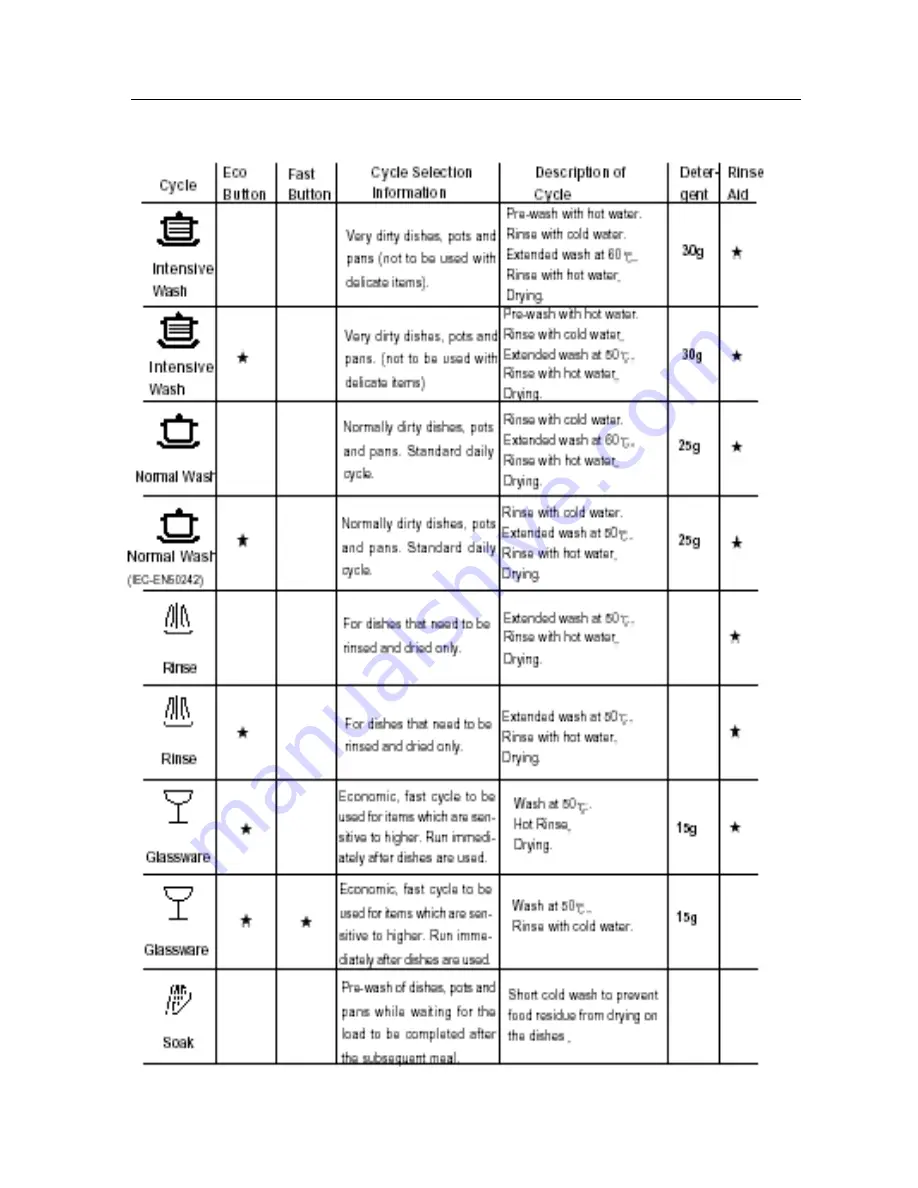
Program Diagram         


10. Program Diagram


Summary of Contents for HDW101SS

Page 1: ...eatures l Two Stars for energy consumption of Autralian New Zealand standard l Economic Washing l Overflow Protection Function l Net for separating forks or knives l Super capacity for 12 settings Hai...

Page 2: ...ions 5 4 Safety Precaution 8 5 Warning and Cautions 10 6 Net Dimension 12 7 Installation and Accessory Parts 12 8 Parts and Functions 15 9 Function Schedule 18 10 Program Diagram 19 11 Maintenances Se...

Page 3: ...ctory design C Colour of dishwasher s appearance WH White SS Stainless Steel BK Black Example HDW101WH It represents automatic spraying electronic freestanding dishwasher the cavity capacity is 12 sta...

Page 4: ...his product can contain 12 sets of eating utensils applicable to big family 2 3 Knife and fork can be separated by net and cleaned more easily 2 4 Detergent and rinse aid automatic dispenser is provid...

Page 5: ...SO 9001 2 Technical equipment Work top removable l Decor frame optional l l Water heating element hidden open l Refill spy lamps salt rinse aid l Program progress indicator LED visual Inner door S sta...

Page 6: ...ngs optional function keys Half load l Economic l 50 Rapid l Delicate glasses Pots 6 Technical data Voltage frequency V Hz 240V 50Hz Nominal power W 2200 Main fuse intensity A 13 7 Product dimensions...

Page 7: ...s to end customer pc 11 Packing materials Recycling symbols RS REzY Carton weight g 4 600 Polistyren weight g 1 518 Polyetylenefoil weight g 65 Other packing materials weight g 55 Wood weight kg 0 15...

Page 8: ...8 Safety Precaution Warning and cautions 4 Safety Precaution...

Page 9: ...9 Safety Precuation...

Page 10: ...10 5 Warning and cautions 1 Shelf The container which dishes are put in is called shelf 2 Put the shelf into the washing box 3 Put in detergent 4 End of cycle...

Page 11: ...11 Warning and Cautions 5 Weekly maintenance...

Page 12: ...along the adjacent cabinets or wall The dishwasher is equipped with water supply and drain hoses that can be positioned on the right or the left to facilitate proper installation 7 2 Leveling the Appl...

Page 13: ...fficiency slightly reduced 7 5 Drain Hose Connection Insert the drain hose into a drain pipe with a minimum diameter of 4cm or let it run into the sink making sure to avoid bending or crimping it Use...

Page 14: ...14 Parts and Functions 8 Parts and functions...

Page 15: ...id This product makes dishes sparkle and helps them to dry without spotting The dispenser is located on the inside panel of the door and should be filled after every 80 wash cycle or when the rinse ai...

Page 16: ...16 Parts and functions...

Page 17: ...wash and economic button 10 Glasses wash and rapid button and economic button Pre wash 60 Main wash Hot rinse Hot rinse Drying Cold rinse Pre wash 60 Main wash Rinse with cold water Rinse with hot wat...

Page 18: ...18 Program Diagram 10 Program Diagram...

Page 19: ...g 11 1 Maintenances Services It may occur that the dishwasher does not function or does not function properly Before calling for assistance Iet us see what can be done first have you forgotten to pres...

Page 20: ...vices and Trouble Shooting analysis of the common breakdowns Water supply trouble Phenomenon water level cannot reach the required location N Y N Y Y Y N N Y measure whether solenoid valve is electrif...

Page 21: ...common breakdowns Drain pump trouble Phenomenon water cannot be drained N N Whether drain pump is working Whether drain pump is electrifyed circuit is damaged Y Y Drain pump is broken Drain hose is t...

Page 22: ...d well The cable or the controller board is suspected damaged Check whether the circuit between the two teminals is open Check the resistence between the heater resistor Maintenances Services and Trou...

Page 23: ...d Trouble Shooting Whether the water overflow swich is ok Whether water is deposited is the bottom case Whether water flows out of the water overflow conduit Bottom case is leaking change water overfl...

Page 24: ...upply switch is OK analysis of the common breakdowns Power supply trouble Phenomenon water cannot be heated Check check whether the power connector N is in position Y N Y Connect it properly check whe...

Page 25: ...25 Circuit Diagram 12 Circuit Diagram CL 1 e...

Page 26: ...26 List of Parts 13 Exploded View Model HDW101SS 1 Exploded View...

Page 27: ...op 0120803797 1 2 Shelf fastening small block 012G2150035 3 3 Upper front crosspiece 012G1310022 1 4 Right upright assembly 012G9350003 1 5 Painted right side pannel 0120104772 1 6 Upper basket 012080...

Page 28: ...ock 012G2150036 1 26 Left baseboard side plate 0120200655 1 27 Adjustable foot 012G1610002 2 28 Front foot support 012G1451091 2 29 Lower front crosspiece 012G1310027 1 30 Painted left side pannel 012...

Page 29: ...y 012G9380538 1 60 Motor bracket assembly 012G9350006 1 61 Heater Support block 012G1020032 1 62 Lower sprayer base fixing piece 012G2160193 1 63 Ring nut for lower spayer fastening 0120201006 1 64 O...

Page 30: ...w cap 0120201028 1 93 Overflow seat 0120201029 1 94 Overflow outlet pipe 0120300281 1 95 Overflow protection pipe 0120300282 1 96 Connection for 3rd sprayer 012G2160200 1 97 3rd sprayer 0120201003 1 9...

Page 31: ...138 Suction condenser group 0120201282 1 139 Condenser support 0120201283 1 140 O Ring gasket for condenser 0120300464 1 31...

Page 32: ...32...

Page 33: ...0801993 1 11 Rear intermediate crosspiece 012G1310023 1 12 Drain hose stop 012G2160204 1 13 Lower rear crosspiece 012G1310028 1 14 Terminal box assembly 012G2150046 1 15 Wheel for lower basket 0120200...

Page 34: ...ig 012G2160194 1 42 Feeding dispenser assembly 0120801832 1 43 Water diversion pipe 0120201011 1 44 Pin for inner duct hooking 0120201010 1 45 Upper sprayer assembly 0120801726 1 46 Support for float...

Page 35: ...162 2 74 Connector 012G2140093 1 75 Cylindric stainless steel filter 012G1040013 1 76 Microfilter polyesthere 012G1040014 1 77 Lower sprayer 012G1020070 1 78 Lower sprayer column 0120201005 1 79 Rubbe...

Page 36: ...109 Painted outer door 012G1120047 1 110 right hinge articulation 012G9380558 1 111 Complete hinge assembly 0120800589 1 112 Left hinge articulation 012G9380559 1 113 Door spring 012G1040015 2 114 Cl...

Page 37: ...128 Closing lever 012G2150050 1 138 Suction condenser group 0120201282 1 139 Condenser support 0120201283 1 140 O Ring gasket for condenser 0120300464 1 37...

Page 38: ...38...

Reviews: