background image

In Home Service
Full ONE Year Warranty 

For 12 months from the date of original 

retail purchase, Haier will repair or replace 

any part free of charge including labor that 

fails due to a defect in materials or 

workmanship.

Limited Warranty 

After one year from the original retail 

purchase date, Haier will provide a part at 

no cost, as indicated below, to replace said 

part as a result of a defect in materials or 

workmanship.  Haier is solely responsible 

for the cost of the part.  All other costs such 

as labor, trip charge, etc are the 

responsibility of the owner.

Second through Fifth Year 

Haier will provide the outer washtub and 

related outer tub assembly parts should the 

part fail to hold water.

Second through Seventh Year 

Haier will provide the inner stainless steel 

wash tub if defective in material or 

workmanship.

Note:  

This warranty commences on the 

date the item was purchased and the 

original purchase receipt must be presented 

to the authorized service representative 

before warranty repairs are rendered.

Exceptions: 

Commercial or Rental Use 

Warranty

90 days labor from date of original 

purchase
90 days parts from date of original 

purchase
No other warranty applies
For Warranty Service 

Contact your nearest authorized service 

center. All service must be performed by 

a Haier authorized service center. For the 

name and telephone number of the nearest 

authorized service center please call 

1-877-337-3639.

Before calling please have available 

the following information:

Model number and serial number of your 

appliance. The name and address of the 

dealer you purchased the unit from and the 

date of purchase.
A clear description of the problem.
A proof of purchase (sales receipt).

This warranty covers appliances 

within the continental United States, 

Puerto Rico and Canada. What is 

not covered by this warranty

Replacement or repair of household fuses, 

circuit breakers, wiring or plumbing. 

A product whose original serial number has 

been removed or altered. 

Any service charges not specifically 

identified as normal such as normal 

service area or hours. 

Damage to clothing. 

Damage incurred in shipping. 

Damage caused by improper installation or 

maintenance. 

Damage from misuse, abuse accident, fire, 

flood, or acts of nature. 

Damage from service other than an 

authorized Haier dealer or service center. 

Damage from incorrect electrical current, 

voltage or supply. 

Damage resulting from any product 

modification, alteration or adjustment not 

authorized by Haier. 

Adjustment of consumer operated controls 

as identified in the owner’s manual. 

Hoses, knobs, lint trays and all attachments, 

accessories and disposable parts. 

Labor, service transportation, and shipping 

charges for the removal and replacement of 

defective parts beyond the initial 12-month 

period. 

Damage from other than normal household 

use. 

Any transportation and shipping charges.

THIS LIMITED WARRANTY IS GIVEN 

IN LIEU OF ALL OTHER WARRANTIES, 

EXPRESSED OR, INCLUDING THE 

WARRANTIES OF MERCHANTABILITY 

AND FITNESS FOR A PARTICULAR 

PURPOSE

The remedy provided in this warranty is 

exclusive and is granted in lieu of all other 

remedies.
This warranty does not cover incidental or 

consequential damages, so the above 

limitations may not apply to you. Some 

states do not allow limitations on how long 

an implied warranty lasts, so the above 

limitations may not apply to you.
This warranty gives you specific legal rights, 

and you may have other rights, which vary, 

from state to state.

Haier America  

New York, NY 10018

English

English

 limited warranty

26

Summary of Contents for HLP021WM - PULSATOR Portable Washer

Page 1: ...oad Washer French Spanish Quality ß Innovation ß Style S P PO O STATUS HEAVY CYCLE QUICK WASH NORMAL Welcome to the world of Haier Compact Portable Laundry Efficient Compact and Portable Easy Installation and Use Uses Convenient Standard120VAC 15 amp Outlets You can install them anywhere HLP021 WM HLP021 WM HLP021 WM ...

Page 2: ...ey are on a label in back of the washer Model number Serial number Date of purchase 1 unpacking your washing machine English 1 Inspect and remove all packing materials This includes the foam and any adhesive tape both inside and outside of the unit 2 Inspect and remove any remains of packing tape or printed materials before powering on the Washer product registration Staple your receipt to your ma...

Page 3: ...sibility of danger to children 9 Do not operate your appliance in the presence of explosive fumes 10 Do not use this appliance to wash clothes that have been soaked spotted or washed in gasoline dry cleaning solvents or any other explosive or flam mable substances that may ignite and explode 11 Clothes or rags used to clean flammable or explosive materials should not be washed in this appliance un...

Page 4: ...process by refraining from turning ON any electrical appliances smoking lighting a match lighter and using flames 23 Do not repair or replace any part of the appliance or attempt any servicing unless specifically recommended in the user repair instructions which you understand and have the skill to carry out If for any reason this product requires service we strongly recommend that a certified tec...

Page 5: ... and cause a risk of fire However if it is necessary to use an extension cord A Use only 3 wire extension cord with 3 blade grounding plug B The marked rating of the extension cord must be equal to or greater than the rating of this appliance C It should be positioned such that it does not drape over the counter or tabletop where it can be pulled on children or tripped over Attempting any maintena...

Page 6: ...PERATING YOUR WASHER 6 11 UNPACKING AND ACCESSORIES INVENTORY 12 PROPER LOCATION 13 INSTALLATION INSTRUCTIONS 14 16 UNIT DIMENSIONS 17 ELECTRICAL CONNECTIONS 18 PROPER CARE AND CLEANING 19 TROUBLESHOOTING GUIDE 20 21 WARRANTY 22 English table of contents 5 ...

Page 7: ...sed for protection and box a b c d f g Sink Faucet Quick Sink Faucet Adapter Silver Faucet Connector HOSE Check to make sure that the accessories are present and in good condition If you find that they are not in good condition or are missing please contact our customer service department for assistance Our Toll Free number is 1 877 337 3639 English unpacking and checking parts Parts a 1 Bottom Pa...

Page 8: ...th sides of the washer 6 Control panel 7 Water Inlet Fitting 8 Water Absorption Cushion 9 Water Level Selector 10 Power Cord Holder Clip 11 Drain Hose 12 Power Cord 120 Volt 60 Hz 4 5 2 3 1 6 10 8 9 7 11 12 washer parts and features Front View Back View English 7 S P PO O STATUS HEAVY CYCLE QUICK WASH NORMAL ...

Page 9: ...ights Indicates cycle chosen with stages of cycle in operation 3 Start Pause Button With Power ON Press the Start Pause button to start washing cycle pause operation or resume operation 4 Power ON OFF Button Press in the Power On Off button to turn on the power of the washer 1 2 3 4 Water Level Selector Knob Select water height in drum based on laundry being washed Low Manual Water Level Medium Hi...

Page 10: ...ok 5 Make sure the lint filter is in place it is installed on the side of the drum 6 Ensure nothing but clothing is in the washer then plug power cord into a 15 AMP 110 120 VOLT 60 HZ GROUNDED OUTLET ONLY 7 Proceed by pressing the POWER ON button 8 Select water height 9 Select NORMAL washing using the CYCLE button then press the START button Power CYCLE S t a r t Pause NORMAL Drain Hook English Qu...

Page 11: ...s The washer must be placed and used at room temperatures ONLY You must not place the washer where the temperature is at or below freezing or outside This appliance must be stored at room temperature Do not install or operate this appliance in an area where room temperature is below freezing If you received this appliance when the outside temperature is below freezing do not operate until this app...

Page 12: ... panel with the holes in the washer 3 Insert the screws through the holes of the panel into the bottom of the washer and tighten 6 screws are supplied 4 Once all screws have been installed and the panel is in place return the washer to its standing position Note During this time you may reroute the drain hose to the left or right side for draining Just remove hose clamp and snake to other side the...

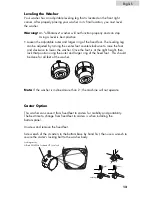
Page 13: ...Once the foot is at the right height then lock that position using the outer and larger ring of the fixed foot This should be done for all feet of the washer Note If the washer is inclined more than 2 the machine will not operate English Caster Option This washer can convert from fixed feet to casters for mobility and portability The best time to change from fixed feet to casters is when installin...

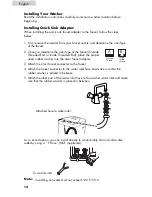
Page 14: ...f the faucet 2 Once you determine the size type of the faucet Outside Threaded End or Inside Threaded End place the proper sized rubber washer into the silver faucet adapter 3 Attach the silver faucet connector to the faucet 4 Attach the faucet connector to the water inlet hose and make sure that the rubber washer is placed in between 5 Attach the other end of the water inlet hose to the washer wa...

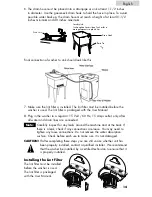
Page 15: ...water absorption cushion Check before each use to make sure it is not damaged CAUTION If after completing these steps you are still unsure whether unit has been properly installed contact a qualified installer We recommend that the washer be installed by a certified technician to ensure that it is properly installed Final connection of washer to sink should look like this English 6 The drain hose ...

Page 16: ...el Selector knob to select the proper water level setting You may select from low medium and high water level settings depending on the wash load There is also a MANUAL overide by holding the knob in the manual position until the desired water level is achieved Function and Status Indicator Lights 5 The function display lights indicate that a selected feature is ON or what the cycle is about to be...

Page 17: ...s Push down the tab in the filter to remove Clean and slide the filter back in place There is also a filter in the water inlet valve This prevents foreign particles in the water from entering the washer Clean this at least once a month Steps for the Wash Process 1 The lint filter must be cleaned and in place before you start washing 2 Turn the power ON by pressing the ON button 3 Press Cycle Selec...

Page 18: ... wash cycle Choose between 7 various washing cycles options Each time you press the CYCLE button you will move throught the washers cycle menu When you finalize your selection please press the START button Program Select Wash Program Application 1 Power ON Normal Wash Cycle Wash Rinse Spin 2 Press Once Wash only No Spin or Rinse 3 Press Twice Wash Rinse only No Spin 4 Press Three Times Rinse Spin ...

Page 19: ...ter inlet pressure and water level The spin time is the time from the intermittent running to the finishing of the cycle In the Heavy Wash program heavy soiled laundry the first soak is approximately 20 minutes pre wash is approximately 8 minutes Clothes are soaked again for approximately 5 minutes The washing rinsing and spinning will then be completed The wash time includes the pre wash time In ...

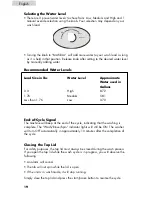
Page 20: ... the lid is open If the unit is in wash mode it will stop running Simply close the top lid and press the start pause button to resume the cycle Selecting the Water Level There are 3 pre set water levels to chose from Low Medium and High and 1 manual overide selection using the knob Your selection may depend on your wash load Turning the knob to MANUAL will add more water to your wash load as long ...

Page 21: ...ater level Add the detergent Load the washer Select the water level Note The amount of detergent used depends on the size of the load the water type hard or soft and whether the clothes are heavily soiled or lightly soiled Besides the performance of the washing machine the quality of the detergent also affects the wash result For best results use low sudsing detergents only Refer to the detergent ...

Page 22: ...or discolor your appliance Remove pins and other sharp objects from clothing to prevent scratches on interior parts The lint filter must be cleaned before each use for optimal efficiency DO NOT USE YOUR WASHER WITHOUT THE LINT FILTER IN PLACE The filter screen of the water inlet valve may become blocked by soil and residue Please clean it with a brush monthly Long Absences Moving Turn OFF the wate...

Page 23: ...uring the operation of the washer Tumbling sounds can be heard as heavy wet clothes in the washer are tossed around continuously Air rushing noise is the result of the washtub spinning at a very high RPM Clicking sounds are caused by the wash and rinse cycles turning ON and OFF ...

Page 24: ...ections are set properly You may have to adjust the settings Check the Power ON OFF button to see if it is in the OFF position You may need to press the button to set it in the ON position Check if the Start Pause button is on Pause mode Press this button to start the wash process The wash process is paused This is normal The clothing sensor is checking to verify that there are clothes inside the ...

Page 25: ...s due to improper installation of the drain hose You may need to connect the drain hose properly Check the position of the drain hose The drain hose may be clogged or bent Water flows out of the drain hose during the first use of the machine This may be the water left in the tub after the factory inspected the unit to test its performance in order to ensure the best quality Washer makes noises Was...

Page 26: ...ose sharp objects Fasten belts zippers metal snaps etc Check if you are using undiluted bleach Never add undiluted bleach to the wash Other The spinning is intermittent when it starts The laundry needs to be balanced to avoid slanting Move the laundry around to equalize tehe load The Spin does not work in Program Select The program is setting the drain time Spinning will start in a few minutes Dur...

Page 27: ...e problem A proof of purchase sales receipt This warranty covers appliances within the continental United States Puerto Rico and Canada What is not covered by this warranty Replacement or repair of household fuses circuit breakers wiring or plumbing A product whose original serial number has been removed or altered Any service charges not specifically identified as normal such as normal service ar...

Page 28: ...cet appareil au magasin Si vous avez un problème avec cet appareil veuillez contacter le service à la clientèle de Haier au 1 877 337 3639 IL EST OBLIGATOIRE DE FOURNIR UNE PREUVE D ACHAT DATÉE LE NUMÉRO DU MODÈLE ET SON NUMÉRO DE SÉRIE AFIN DE BÉNÉFICIER DE LA COUVERTURE DE LA GARANTIE IMPORTANTE No Devuelva Este Producto al Establecimiento Compra Si tiene problemas con este producto por favor pó...

Reviews: