background image


13

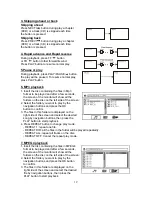
4. Press NEXT or PREV button, the player will play the next or previous file. 
5. Press REPEAT button to change play mode. 

- REPEAT 1: repeat one file. 
- REPEAT DIR: all the files in the folder will be played repeatedly. 
- REPEAT ALL: repeat all tracks on the disc. 
- REPEAT OFF: Cancel the repeat play mode. 


8. JPEG 

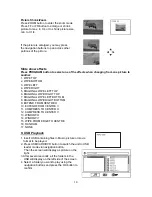
For JPEG picture CD, select the folder you   
want to play by the navigation buttons and   
press OK button to confirm. 
The files in this folder are displayed and   
select your pictures by using the up/down   
navigation buttons and press OK button to 
start playback. Thumbnail of picture will be   
displayed while you scrolling across the file   
name. 
 
Once a folder and file is selected, the picture is loaded onto the screen. 


NOTE: The time to load and display picture depends on the file size of the pictures. 
During playback, press STOP button to enter preview mode. 
Press REPEAT button to change play mode: 
- REPEAT 1: repeat one file. 
- REPEAT DIR: all the files in the folder will be played repeatedly. 
- REPEAT ALL: repeat all tracks on the disc. 
- REPEAT OFF: Cancel the repeat play mode. 

 
Skip to next/previous picture 

Press NEXT button to skip to the next picture or PREV button to skip to the previous picture. 
Press Play button to resume normal play. 

 
Rotating pictures 

Press RIGHT navigation button to rotate the picture 
clockwise. 
Press LEFT navigation button to rotate the picture 
counter-clockwise.  

 
Flipping pictures 

Press UP navigation button to flip the picture   
vertically.  
Press DOWN navigation button to flip the picture 
horizontally. 


Summary of Contents for HLTD7

Page 1: ...Instruction Manual 7 LCD TV DVD PLAYER COMBO MODEL NO HLTD7 BEFORE USING THIS PRODUCT READ UNDERSTAND AND FOLLOW THESE INSTRUCTIONS Save this booklet for future reference ...

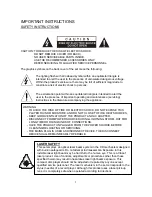
Page 2: ...AIN OR MOISTURE AND DO NOT CLOSE TO FIRE HEAT SOURCES KEEP GOOD VENTILATION OF THE PRODUCT AND AC ADAPTER DISCONNECT FROM POWER SOURCE DURING LIGHTNING STORM OUT FOR LONG TIME OR DOING KINDS OF CONNECTIONS HAVE THE PRODUCT UNPLUGGED FROM THE POWER SOURCE BEFORE CLEANING RELOCATING OR SERVICING THE MAINS PLUG IS USED AS DISCONNECT DEVICE THE DISCONNECT DEVICE SHALL REMAIN READILY OPERABLE LASER SAF...

Page 3: ...WER SOCKET UNPLUG AC CABLE FROM POWER SOCKET IF YOU ARE NOT USING THE UNIT FOR LONG TIME BATTERY USAGE AND HANDLING KEEP BATTERY AWAY FROM CHILDREN AND PETS REMOVE THE BATTERY FROM THE REMOTE CONTROL WHEN THE PRODUCT WILL NOT BE USED FOR AN EXTENDED PERIOD NEVER THROW BATTERY INTO A FIRE DO NOT EXPOSE BATTERY TO FIRE OR OTHER HEAT SOURCES FEATURES 7 TFT DISPLAY This player has a built in 7 TFT dis...

Page 4: ... operations and settings can be performed by operating the remote control while monitoring screen MULTI AUDIO FUNCTION The audio soundtrack can be heard in up to 8 languages The number of audio sound languages depends on the software and the transmission MULTI SUBTITLES FUNCTION Subtitles may be displayed in one of a maximum of 32 languages depending on the software PARENTAL LOCK FUNCTION This pre...

Page 5: ... 2 FEATURES 2 3 ACCESSORIES 3 PARTS AND CONTROLS 5 7 MAIN UNIT 5 6 REMOTE CONTROL 6 7 BASIC CONNECTION 7 9 REMOTE CONTROL PREPARATION 10 OPERATIONS DVD 11 19 TV 20 27 FOR REFERENCE SPECIFICATIONS 28 MAINTENANCE 29 TROUBLESHOOTING 29 30 REGION CODE SETTING 31 ...

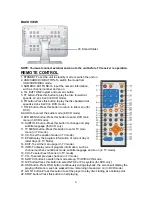
Page 6: ...r DVD mode or press and hold it to enter TV menu page for TV mode 8 BUTTON To move left in menu mode 9 BUTTON To move right in menu mode 10 VOL BUTTON Press it to decrease the volume 11 VOL BUTTON Press it to increase the volume 12 Remote control sensor standby and battery charge indicator 13 External antenna jack 14 USB port 15 CARD slot 16 POWER switch 17 DC IN 9 12V input jack 18 Earphone jack ...

Page 7: ... button to change and play subtitle language for DVD only 11 TV MENU button Press this button to enter TV main menu in TV mode 12 CC To set the caption mode in TV mode 13 EPG Display the program information of current day or latter days in TV Mode 14 EXIT To exit the menu page in TV mode 15 INFO To display current program information such as channel number soundtrack mode subtitle language and so ...

Page 8: ...ure size max to X 4 or to shrink picture size min to X1 4 29 PROGRAM button Press this button to setup the memory order of chapter or title for DVD or tracks for CD 30 SETUP button Press this button to enter initial settings menu in DVD mode 31 OK button Press this button to confirm what you have selected 32 Navigation buttons Press this button to move up down left or right 33 MUTE To mute the sou...

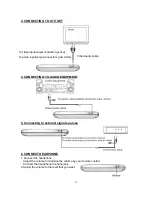
Page 9: ...tic of this battery and is not a malfunction In this case recharge it two or three times before the first use and it needs more than 8 hours to recharge battery Noises may be generated during recharging In this case use a more distant power socket Do not recharge or discharge battery near a heating element such as a heater or direct sunlight 2 CONNECT EXTERNAL ANTENNA TO UNIT Install external ante...

Page 10: ...rces 6 CONNECT HEADPHONE 1 Connect the headphone Adjust the volume to minimize the volume by your remote control Connect the headphone to phone jack 2 Adjust the volume to the level that you want To video input output connector yellow To audio input output connectors red white Video audio cable ...

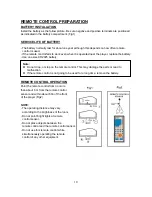
Page 11: ...e z Do not drop or step on the remote control This may damage the parts or lead to malfunction z If the remote control is not going to be used for a long time remove the battery REMOTE CONTROL OPERATION Point the remote control from no more than about 6 m from the remote control sensor and within about 60o of the front of the player Fig2 NOTE The operating distance may vary according to the bright...

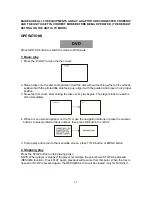
Page 12: ...position 3 Close the disc cover after closing the disc cover play begins The player starts to read the disc immediately 4 When a menu screen appears on the TV move the navigation buttons or press the numeric buttons to select preferred track number then press OK button to confirm 5 To stop play and return to the menu title screen press TITLE button or MENU button 2 Stopping play Press the STOP but...

Page 13: ... folder you want to play by the navigation buttons and press the OK button to confirm 3 The files in this folder are displayed on the right side of the screen and select the desired song by navigation buttons then press the PLAY button to start playback 4 Press REPEAT button to change play mode REPEAT 1 repeat one file REPEAT DIR all the files in the folder will be played repeatedly REPEAT ALL rep...

Page 14: ...ile is selected the picture is loaded onto the screen NOTE The time to load and display picture depends on the file size of the pictures During playback press STOP button to enter preview mode Press REPEAT button to change play mode REPEAT 1 repeat one file REPEAT DIR all the files in the folder will be played repeatedly REPEAT ALL repeat all tracks on the disc REPEAT OFF Cancel the repeat play mo...

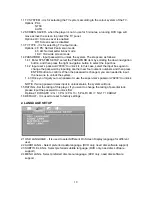
Page 15: ...GONAL WIPE RIGHT TOP 7 DIAGONAL WIPE LEFT BOTTOM 8 DIAGONAL WIPE RIGHT BOTTOM 9 EXTEND FROM CENTRE H 10 EXTEND FROM CENTRE V 11 COMPRESS TO CENTER H 12 COMPRESS TO CENTER V 13 WINDOW H 14 WINDOW V 15 WIPE FROM EDGE TO CENTRE 16 RANDOM 17 NONE 9 USB Playback 1 Insert USB containing files in Music picture or movie format to be played 2 Press USB CARD DVD button to switch the unit to USB reader mode ...

Page 16: ...lect a folder you want to play by using the navigation buttons and press the OK button to confirm 5 The files in this folder display on the right side of the screen and select the desired file by navigation buttons then press the OK button to start playback 6 Press REPEAT button to change repeat playing mode REPEAT 1 repeat one file REPEAT DIR all the files in the folder will be played repeatedly ...

Page 17: ...tton to select CLEAR on the menu then press OK button to confirm and use PROGRAM button to exit the program menu 13 Repeat play Press REPEAT button during play it will repeat play one chapter or one title or the whole disc for DVD disc or repeat play a track or all tracks for CD DVD disc CD disc A B repeat play Repeating sections between two specific points A B repeat 1 Press A B REPEAT button dur...

Page 18: ...es are recorded 1 Press AUDIO button while playing DVD disc to cycle the soundtrack languages available on the disc 2 Pressing AUDIO button while playing CD disc will change audio output mode Mono Left Mono Right and Stereo soundtrack NOTE When no soundtrack languages are recorded pressing this button will not work When the power is turned on or the disc is removed 18 Initial Settings Once the ini...

Page 19: ...to change the password by inputting another new four numeric numbers and then press ENTER button to confirm When the password is changed you are needed to input the new one to unlock the system 1 4 3 Once you forget your own password use the supervisor s password 8200 to unlock it NOTE If wrong password was input in unlock status the system will lock 1 5 RATING Set the rating of this player If you...

Page 20: ...ions 0 2 4 6 8 10 12 3 3 HUE to set the colour impression for display Options 6 4 2 0 2 4 6 3 4 SATURATION to set the saturation level for display Options 0 2 4 6 8 10 12 4 SPEAKER SETUP 4 1 SPEAKER SETUP it is used to set the speaker Output levels Options LT RT Left Right mix mode STEREO Select this option if you don t have a 2 1 channel amplifier ...

Page 21: ...s CH button to play previous channel 3 Press numeric buttons on the remote control directly to select program that you want Example Track 9 press 9 three seconds later it will automatically switch to track 9 or press ENTER button to confirm directly Track 12 press 1 and 2 three seconds later it will automatically switch to track12 or press ENTER button to confirm directly Note If one frequency poi...

Page 22: ...AM GUIDE It shows you the program guide for the past and future Information in the EPG includes current and future program titles date show lengths and episode summaries How far into the future the program guide display as well as the specific information contained in the guide depends on your signal provider Press the right navigation button to access future time slots When viewing a digital chan...

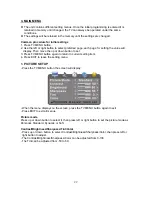
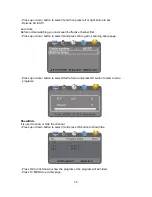
Page 23: ...3 Press TV MENU button again to return to current setting item 4 Press EXIT to leave the setting menu 1 PICTURE SETUP Press the TV MENU button the screen will display When the menu displays on the screen press the TV MENU button again to exit Press EXIT to exit all menus Picture mode Press up or down button to select it then press left or right button to set the picture mode as Personal Standard D...

Page 24: ...s left or right button to enter time setup page OSD Duration Select it and press left or right button to set the OSD display time as 15 30 45 60 Seconds Sleep Timer Select it and press left or right button to switch the timer function off or set different sleep time The sleep time can be set as OFF 5 10 15 30 60 90 120 Min by pressing left or right button The TV will be in standby mode automatical...

Page 25: ...s in digital TV mode 4 OPTION SETUP Press left or right button to enter time setup page Menu Language OSD Press up or down button to select it and press left or right button to change the OSD language Options English or other languages It depends on the software Color mode Press up or down button to select it and press left or right button to change the color mode Options Normal Warm Cool Zoom Mod...

Page 26: ...tion Press up or down button to select it and press left or right button to set as desired Restore Default It is used to reset to factory settings Press up or down button to select it and press OK button to confirm then the screen displays as below Press left or right button to select YES or NO and then press OK to confirm 5 CHANNEL SETUP Press left or right button to enter setup page Antenna It i...

Page 27: ...r down button to select it and press OK to get in scanning setup page Press up or down button to select Start to Scan and press OK button to start to scan programs Show Hide It is used to show or hide the channel Press up or down button to select it and press OK button to show hide Press OK to tick Show to show the program or the program will be hided Press TV MENU to exit this page ...

Page 28: ...s up or down button to select it Press the left button to swap the current channel number with the previous channel s Press the right button to swap the current channel number with the next channel s CHANNEL LABEL It is used to set the channel label as desired Press up or down button to select and press OK to enter Press up or down button to input symbol or letter as desired Press left or right bu...

Page 29: ...X 0 372 V mm 9 Visible Range 154 08 H X87 05 V mm 10 Power Source AC adaptor or car adaptor normal DC 9V 2A 11 Video input level 1 0 Vp p 12 Audio input level 1V 13 Operation Temperature 5 C to 45 C 14 Measurement 10 236 L X 6 89 W X 1 575 H INCH 15 Weight Approx 2 359 LBS 16 Connection terminals 1 Antenna Jack 2 Headphone Jack 3 AV IN OUT Jack 4 Card Reader 5 USB Jack 6 DC IN Jack Specifications ...

Page 30: ...re TV reception channel is not right and try to reset the unit Relocate the TV set to the place where reception is better No sound Volume is too low Mute function is switched on The headphone has been plugged in or the signal is too weak Poor reception TV antenna is not correctly adjusted or TV channel is not right Dark or blurred picture The bright contrast is too low The battery voltage is too l...

Page 31: ...of not more than 6 m from the remote control sensor Remove the obstacles between the remote control and remote control sensor No key operation by the main unit and or the remote control unit is effective Disconnect the power adaptor and then reconnect it The player may not be operating properly due to lightning static electricity or some other external factor Symptom DVD Remedy Play does not start...

Page 32: ...ing All DVD discs are coded by the sales territory Please note the player is set to region 1 coding by the factory which cannot be changed This is in compliance with the DVD patent requirements The region number for this DVD player is ...

Reviews: