background image

04

BEFORE USE

PREPARING THE MACHINE

Remove all the packing materials to prevent unsteadiness, including the polystyrene base. Upon 
opening the package, water drops may be seen on the plastic bag and the porthole. This is normal 
phenomenon resulting from water tests in the factory. 

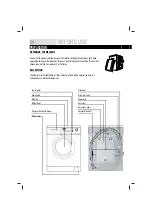
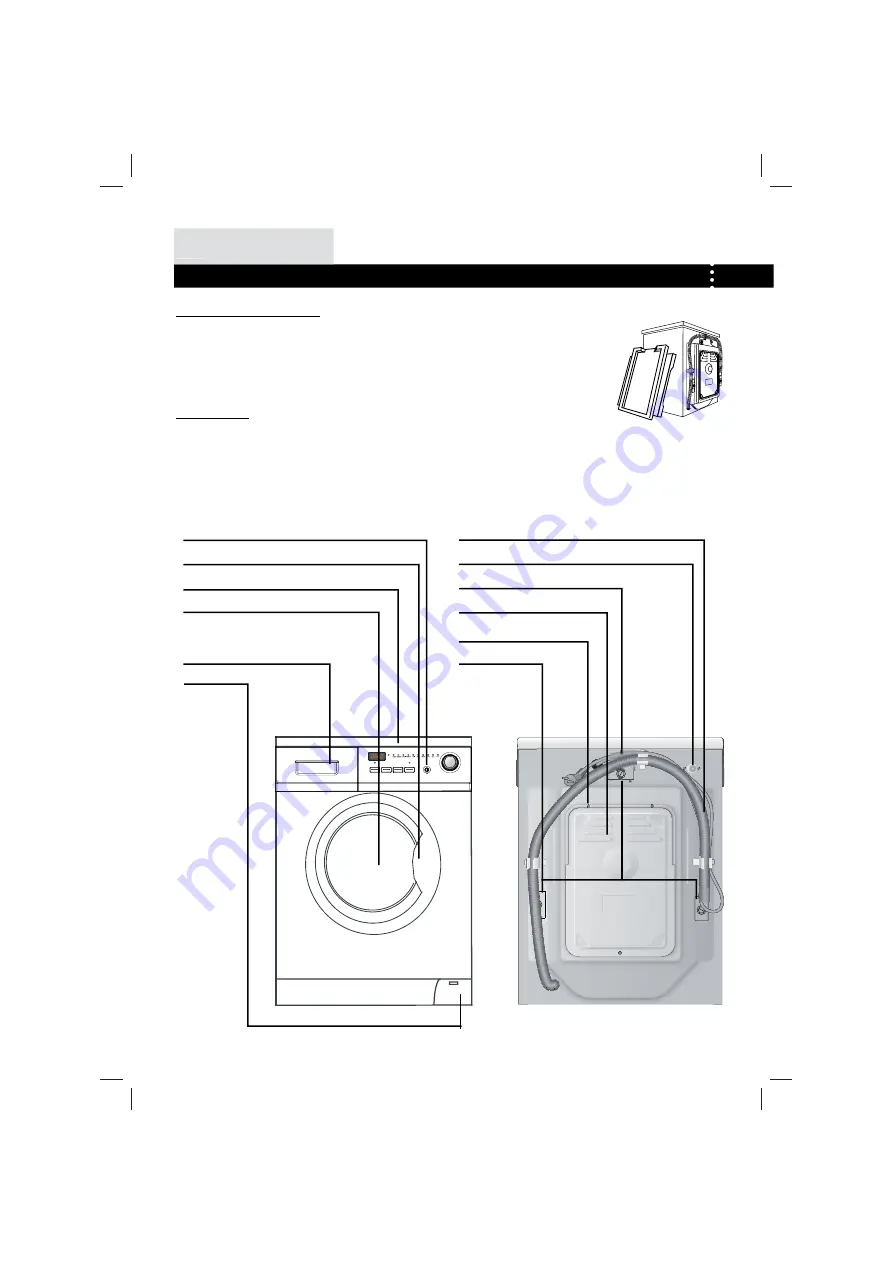
DESCRIPTION

This diagram may be slightly different from the layout of the washing machine you have just 
purchased due to technical improvements.

PREPARATION

Control panel

Door handle

Work top

Washer door

Detergent distribution drawer

Bottom cover

Prewash

'HOD\

7HPSHUDWXUH

6SLQ

6WDUW3DXVH

S1

S2

S3

T3

T2

T1

Drain hose

Water inlet valve

Power cord

Bock cover

Bock cover screws

Transportation bolts

Summary of Contents for HNS1460TVE-FD

Page 1: ...LAVE LINGE FRONTAL NOTICE D UTILISATION Prewash HOD 7HPSHUDWXUH 6SLQ 6WDUW 3DXVH HNS1460TVE FD ...

Page 2: ...plus amples détails au sujet du recyclage des appareils de ce genre veuillez vous adresser au bureau compétent de votre commune à la société de collecte des déchets ou directement à votre revendeur Pour votre sécurité observez scrupuleusement les notices marquées avec le signal Attention Oui Non Option 10 15 16 20 LÉGENDE ÉLÉMENTS 03 PRÉPARATION 04 NOTICE DE SÉCURITÉ 05 NOTICE D INSTALLATION 06 BA...

Page 3: ...et entretien corrects et sûrs Conservez ce mode d emploi dans un endroit facilement accessible afin de vous y référer ultérieurement En cas de vente remise ou cession de l appareil pendant un éventuel déménagement remettez ce mode d emploi au nouveau propriétaire pour qu il puisse prendre connaissance de l appareil et des notices de sécurité ACCESSOIRES Vérifiez si les accessoires fournis coïncident...

Page 4: ...ie du tuyau d arrivée et du tyau d évacuation d eau Ce phénomène est normal Il est causé par des tests sur l appareil effectués en usine DESCRIPTION Le dessin au dessous peut présenter des différences avec l appareil que vous avec acheté à cause des améliorations techniques introduites PRÉPARATION Bandeau de commandes Poignée d ouverture du hublot Plan de travail supérieur Hublot Bac à produits Tr...

Page 5: ... après vente agréé ou d un technicien agréé en cas de détérioration de celui ci s assurer que l appareil n est pas utilisé par des personnes infirmes ou par des personnes qui ne disposent pas d un savoir faire nécessaire sans surveillance ou l assistance de personnes responsables empêcher les jeunes enfants de jouer avec l appareil Il ne faut pas toucher ni manipuler l appareil les pieds nus ou les...

Page 6: ...essus de l appareil vous trouverez un panneau en plastique fig 1 Il faut l installer au dessous du lave linge afin de réduire le bruit fig 2 ENLÈVEMENT DES VIS DE BRIDAGE Les vis de transport bloquent les éléments mobiles du lave linge pendant le transport 1 Enlevez le panneau postérieur 2 Enlevez les trois vis qui se trouvent dans la partie postérieure de l appareil et les éléments stabilisants situ...

Page 7: ...n à l attache qui se trouve dans la partie postérieure du lave linge afin d éviter qu il tombe Attention le tuyau d évacuation ne peut pas être submergé par de l eau Il doit être étanche et bien fixé Si le tuyau d évacuation se trouve par terre ou au dessous de 80 cm le lave linge continuera à évacuer de l eau au fur et à mesure qu il se remplit BRANCHEMENT DE L ALIMENTATION Avant de brancher l alim...

Page 8: ...du lave linge Si vous le faites l appareil s arrêtera et les chiffres sur l afficheur commenceront à clignoter Pour faire redémarrer l appareil appuyez encore une fois sur la touche Pour arrêter le lavage appuyez sur la touche et au moment où les chiffres commencent à clignoter enfoncez le bouton d allumage D Eessorage _ Pour choisir la vitesse d essorage appuyez sur cette touche Après avoir choisi...

Page 9: ...ouplissant H Ecran d affichage _Affiche les informations telles que le temps restant à la fin du lavage la température la vitesse ainsi que les codes erreurs Attention après la mise sous tension l écran s allume et affiche le temps de lavage En cas de variation de la pression et de la température de l eau sélectionnée le temps de lavage peut subir des variations Si le linge n est pas réparti d une man...

Page 10: ... à 90 C 40 C Coton 1000 rpm 3 Mixte jusqu à 60 C 40 C Synthétiques colorés 1000 rpm 4 Laine jusqu à 40 C 40 C Laine 600 rpm 5 Délicat jusqu à 40 C 40 C Cachemire 600 rpm 6 Soie jusqu à 40 C 40 C Soie 400 rpm 7 Rapide jusqu à 40 C 40 C Moyennement sale 1000 rpm 8 Lavage jusqu à 60 C 40 C Moyennement sale Attention ce programme ne concerne que le lavage sans rinçage ni essorage 0 9 Rinçage Moyenneme...

Page 11: ...ression d arrivée d eau et la température de lavage sélectionnée etc PROGRAMME Charge max CONSOMMATION EN ÉNERGIE CONSOMMATION EN EAU Température TEMPS DE LAVAGE Intensif 6 kg 0 95 kWh 64l 40 C 2 40 h Coton 6 kg 1 14 kWh 49l 60 C 2 58 h Coton 6 kg 0 50 kWh 53l 40 C 2 22 h Mixte 3 kg 0 43 kWh 39l 40 C 1 28 h Laine 2 kg 0 42 kWh 40l 40 C 1 08 h Délicat 2 kg 0 42 kWh 39l 40 C 1 08 h Soie 2 kg 0 55 kW...

Page 12: ... endommager le lave linge et rendre indispensable une réparation aux frais de l utilisateur Lavez le linge sans ourlets la lingerie les tissus tissés comme les rideaux etc dans un sac à linge malgré tout il n est pas recommandé de laver ce type de linge dans le lave linge Fermez les fermetures éclairs et les agrafes Assurez vous que tous les boutons soient bien fixés et que les petits textiles tels...

Page 13: ...e de choisir le programme adéquat au type de linge Choisissez le programme désiré à l aide du programmateur CHOIX DE L OPTION Choisissez les options nécessaires voir Bandeau de commandes pages 08 et 09 METTRE LE DÉTERGENT Tirez le bac à produits Mettez le détergent et l assouplissant dans les compartiments adéquats Repoussez délicatement le bac à produits Attention Dans le cas d un programme de pr...

Page 14: ...ge à froid température de l eau à la sortie du robinet apparaissent sur l écran 1 Chargez la machine au maximum 2 Ne surchargez pas la machine 3 Ne faites de prélavage que pour le linge très sale 4 Pour le linge peu sale réduisez la quantité de détergent et choisissez les programmes pour le linge délicat 5 Choisissez toujours une température adéquate Les détergents contemporains sont efficaces à de...

Page 15: ...ture max 95 C Température max 60 C Température max 40 C Température max 30 C Lavage à la main Lavage exclu Laine Blanchir à l eau froide Ne pas blanchir Repassage max 200 C Repassage max 150 C Repassage max 100 C Repassage exclu Nettoyage à sec possible tous solvants usuels autorisés Nettoyage à sec possible tous solvants usuels sauf trichlor Solvants autorisés essences minérales Nettoyage à sec e...

Page 16: ...chez l appareil Nettoyez la carrosserie et les éléments en caoutchouc avec un chiffon doux et du détergent liquide N utilisez pas de produits organiques ni de solvants NETTOYAGE DU FILTRE Nettoyez le filtre au moins une fois par mois 1 Ouvrez le couvercle qui se trouve en bas 2 Sortez le filtre en le faisant tourner à gauche 3 Rincez bien le filtre à l eau courante 4 Remontez le filtre en le faisant t...

Page 17: ...installation de la machine 1 Enlevez les bouchons 2 Enlevez le couvercle postérieur 3 Montez les éléments stabilisants et les vis de transport 4 Serrez les vis avec une clé 5 Remontez le couvercle postérieur LONGUES PÉRIODES DE NON USAGE Si vous n utilisez pas votre lave linge pendant une longue période débranchez l alimentation électrique et coupez l arrivée d eau Ouvrez le hublot afin d éviter la...

Page 18: ... pas s enclencher à cause du déséquilibre des linges _ Dans ce cas là arrangez les linges afi n d équilibrer le tambour avant de démarrer l essorage CODES AFFICHÉS ET FONCTIONS SPÉCIALES Le blocage du bandeau de commandes après le démarrage du programme appuyez et retenez environ 3 secondes les touches Fin Différée et Température Maintenant il n est plus possible de changer de programme à l aide de...

Page 19: ...ne soit pas plongé dans l eau Problème d évacuation Le tuyau est bouché Le bout du tuyau d évacuation est à une hauteur supérieure à 100 cm au dessus du sol Le filtre est bouché _ Nettoyez le tuyau d évacuation _ Assurez vous que le bout du tuyau soit à une hauteur inférieure que 100 cm au dessus du sol _ Nettoyez le filtre Fortes vibrations pendant l essorage Toutes les vis de transport n ont pas é...

Page 20: ...20 ENTRETIEN ...

Page 21: ...VRIJSTAANDE EN WASDROGER GEBRUIKSAANWIJZINGEN HNS1460TVE FD Prewash HOD 7HPSHUDWXUH 6SLQ 6WDUW 3DXVH ...

Page 22: ... de juiste manier wordt verwijderd helpt u bij het voorkomen van mogelijke negatieve gevolgen voor het milieu en voor de menselijke gezondheid wat het gevolg kan zijn van de onjuiste verwerking van dit apparaat Neem voor meer informatie over de recycling van dit product contact op met het gemeentehuis de gemeentelijke afvaldienst of de winkel waar u het apparaat hebt gekocht Onderdelen 03 Voorbere...

Page 23: ...ebruik neemt De instructies bevatten belangrijke informatie voor optimaal functioneren van het apparaat alsmede voor het bewerkstelligen van veilige en juiste installatie gebruik en onderhoud hiervan Bewaar deze handleiding op een handige plaats zodat u ten allen tijde kun controleren of u het apparaat veilig en juist gebruikt Indien u dit apparaat verkoopt weggeeft of achterlaat bij verhuizing zo...

Page 24: ...waterdruppels aanwezig zijn in de plastic zak en in de vulopening dat is een normaal gevolg van watertests die op de fabriek zijn uitgevoerd DESCRIPTION This diagram may be slightly different from the layout of the washing machine you have just purchased due to technical improvements Nedieningspaneel Deurknop Werkblad Deur van wasvak Wasmiddellade Filterdeksel Afvoerslang Aansluiting waterinvoer V...

Page 25: ...wordt heet rubber schuim of sponsachtige materialen haarnetten of waterbestendige textielen heet wassen of drogen de la voor het wasmiddel openen wanneer de machine draait de deur van de wasdroger open forceren De deur is verzekerd met een zelfsluitend mechanisme en zal pas 2 3 minuten na afloop van het programma te openen zijn de deur van de machine openen wanneer er water zichtbaar is via het kij...

Page 26: ...laatst onder de wasmachine om het geluid te verminderen fig 2 VERWIJDER DE TRANSPORTBOUTEN De transportbouten zijn bedoeld voor het vastzetten van losse componenten in de wasmachine tijdens het vervoer 1 Verwijder de achterkant 2 Verwijder de drie bouten achterop en verwijder de synthetische stabilisatoren uit de machine 3 Plaats de achterkant terug 4 Vul de gaten waaruit de transportbouten zijn ve...

Page 27: ...en de 80 100 cm zijn Zet de afvoerbuis vast aan de klem aan de achterkant van de wasmachine zodat deze er niet af kan vallen Opmerking De afvoerbuis mag niet onder water staan en moet veilig en zonder lekkages gemonteerd zijn Indien de afvoerbuis op de grond is geplaatst of korter dan 80cm is dan zal de machine constant water afvoeren terwijl het aan het vullen is zelfoverhevelend AANSLUITEN OP HE...

Page 28: ...ramma te annuleren drukt u op deze knop als de getallen op het scherm gaan knipperen drukt u op de aan uit knop het programma wordt vervolgens geannuleerd D Centrifugeren _ Raak deze knop lichtjes aan voor het kiezen van de gewenste snelheid de ingestelde snelheid wordt op hetscherm getoond Opmerking verschillende watertemperaturen en spinnen snelheden kunnen worden ingesteld voor verschillende wa...

Page 29: ...de programma s 1 t m 8 Compartiment 3 Wasverzachter conditioner parfum enz H Display _ Informatie zoals resterende wastijd temperatuur en snelheid evenals foutmeldingen worden hier getoond Opmerking nadat de machine is ingeschakeld licht de display op en neemt de resterende wastijd af Omdat de waterdruk en temperatuur kunnen verschillen kan u de resterende tijd afwijken Als het wasgoed tijdens het...

Page 30: ...ig vervuild 1000 rpm 2 Katoen tot 90 C 40 C Katoenen stoffen 1000 rpm 3 Mix tot 60 C 40 C kleuren synthetisch 1000 rpm 4 Wol tot 40 C 40 C Wollen stoffen 600 rpm 5 Fijne was tot 40 C 40 C Materiaal van kasjmier 600 rpm 6 Zijde tot 40 C 40 C Zijden stoffen 400 rpm 7 Snel tot 40 C 40 C Matig vervuild 1000 rpm 8 Wassen tot 60 C 40 C Matig vervuild Let op dit programma bestaat slechts uit een hoofdwas...

Page 31: ...druk MPa 0 03 P 1 Max lading kg 6 Centrigfugeersnelheid r min 1400 Wasprogramma s 11 Max vermogen W 2000 Afmetingen HxDxB mm 850 x 565 x 595 Netto gewicht kg 68 PROGRAMMA MAX BELASTING ENERGY CONSUMPTION WATERGEBRUIK TEMPERATUUR WASTIJD Intensief 6 kg 0 95 kWh 64L 40 C 2 40 h Katoen 6 kg 1 14 kWh 49L 60 C 2 58 h Katoen 6 kg 0 50 kWh 53L 40 C 2 22 h Mix 3 kg 0 43 kWh 39L 40 C 1 28 h Wol 2 kg 0 42 k...

Page 32: ...katoen synthetisch wol of zijde en op de mate van vervuiling Houd witgoed gescheiden van gekleurd goed Was nieuwe stoffen eerst met hand om te zien of de kleuren vervagen of doorlopen Maak zakken leeg sleutels munten enz en verwijder harde versieringen zoals broches Opgelet kleine onderdelen zoals knopen kunnen schade aan de machine veroorzaken en reparaties die de gebruiker zelf moet betalen Kled...

Page 33: ...Waarschuwing voeg niet meer wasmiddel toe dan u nodig hebt Volg de dosering die op de verpakking van het wasmiddel is aangegeven Voor een voorwasprogramma moet u in de vakken 1 en 2 wasmiddel toevoegen Bij andere programma s moet vak 1 leegblijven Gebruik vloeibaar wasmiddel volgens de aanwijzingen op de verpakking Gebruik geen vloeibaar wasmiddel als de voorwasmodus of einduitstel is geselecteerd...

Page 34: ...N Draai de kraan dicht en trek de stekker uit het stopcontact Open de deur om vocht en geurvorming te voorkomen Laat de deur openstaan als de machine niet wordt gebruikt SNELHEID CENTRIFUGEREN INSTELLEN Houd de temperatuurknop ingedrukt tot de gewenste snelheid is gekozen of het symbool 0 voor niet centrifugeren is gekozen Zie Operationele functies op de pagina s Bedieningspaneel 8 en 9 voor het k...

Page 35: ...eriaal Ongeveer 70g Resistent materiaal Kwetsbaar materiaal Wasbaar op 95 C Wasbaar op 60 C Wasbaar op 40 C Wasbaar op 30 C Handwas Alleen chemisch reinigen Wol Te bleken in koud water Gebruik geen bleekmiddel Te strijken op 200 C Te strijken op 150 C Te strijken op 100 C Niet strijken Chemisch reinigen elk oplosmiddel Schoonmaakmiddel Chemisch reinigen met perichloride Niet chemisch reinigen Plat...

Page 36: ...inigen Gebruik geen organische chemische middelen of schurende schoonmaakmiddelen DE WASMIDDELENLADE REINIGEN Reinig regelmatig de lade voor wasmiddelen Draai de lade naar buiten spoel hem schoon met water en plaats hem terug DE FILTER REINIGEN Reinig de filter eens per maand 1 Open het deksel aan de onderkant 2 Verwijder de filter door het tegen wijzersin te draaien 3 Spoel grondig de kraan 4 Plaat...

Page 37: ...e zetten die voor de installatie zijn verwijderd om schade te voorkomen zie afbeelding 1 Verwijder de afdekpluggen 2 Verwijder de achterklep 3 Plaats de synthetische stabilisatoren en de transportbouten 4 draai de bouten met een sleutel aan 5 Plaats de achterkant terug LANGERE PERIODEN NIET GEBRUIKEN Als de machine gedurende langere perioden niet wordt gebruikt trekt u de stekker uit het stopconta...

Page 38: ...erdeeld _ Verdeel het wasgoed opnieuw om de trommel te balanceren Alarm geluid optie Alarm geluid kan worden geannuleerd indien dit nodig is volg dan de instructies zoals hieronder Schakel de wasmachine en draai de knop om het programma cyclus spin druk vervolgens op de knop en vertraging centrifugetoerental knop en houd deze voor 3 seconden De bEEP oFF zal worden weergegeven op het scherm die dat...

Page 39: ...meer dan 100 cm boven het vloerniveau De filter is verstopt _ Deblokkeer de afvoerbuis _ Zorg ervoor dat het einde van de afvoerslang zich lager dan 100 cm boven de vloer bevindt _ Reinig de filter Sterke vibraties tijdens draaien Niet alle transportbouten zijn verwijderd De ondergrond van de wasmachine is niet vlak De lading van de machine weegt meer dan 6 kg Niet alle transportbouten zijn verwijde...

Page 40: ...20 ONDERHOUD ...

Page 41: ...Prewash HOD 7HPSHUDWXUH 6SLQ 6WDUW 3DXVH AUTOMATIC DRUM WASHING MACHINE USER MANUAL HNS1460TVE FD ...

Page 42: ... inappropriate waste handling of this product For more detailed information about recycling of this product please contact your local city office your household waste disposal service or the shop where you purchased the product LEGEND DISPOSAL For your safety any instructions in this manual with this Warning sign must be followed strictly Yes No Optional 03 09 10 15 16 20 COMPONENTS 03 PREPARATION ...

Page 43: ...nance Keep this manual in a convenient place so you can always refer to it for the safe and proper use of the appliance If you sell the appliance give it away or leave it behind when you move house make sure you also pass on this manual so that the new owner can become familiar with the appliance and safety warnings ACCESSORIES Check the accessories and literature in accordance with this list 1x B...

Page 44: ...resulting from water tests in the factory DESCRIPTION This diagram may be slightly different from the layout of the washing machine you have just purchased due to technical improvements PREPARATION Control panel Door handle Work top Washer door Detergent distribution drawer Bottom cover Prewash HOD 7HPSHUDWXUH 6SLQ 6WDUW 3DXVH S1 S2 S3 T3 T2 T1 Drain hose Water inlet valve Power cord Bock cover Bo...

Page 45: ...is not used by persons with reduced physical sensory or mental capabilities lack of experience and knowledge without supervision or instruction by a person responsible for their safety Supervise children to ensure that they do not play with the appliance DO NOT Touch or use the appliance when barefoot or with wet or damp hands or feet Use flammable detergent or dry cleaning agent Use any flammable s...

Page 46: ...2 stabilisers from within the machine Replace the back cover 3 Fill the holes left by the bolts with blanking plugs 4 Note 1 When you replace the back cover the convexity must face to outside and you have to insert the back cover from the two gaps as shown in fig 3 2 Keep the transportation bolts and synthetic stabilisers in a safe place for later use INSTALLATION ADJUSTING THE WASHING MACHINE Ther...

Page 47: ... clip at the back of the washing machine to prevent it from dropping off Note The drain hose should not be submerged in water and should be securely fixed and leak free If the drain hose is placed on the ground or if the pipe is at a height of less than 80cm the washing machine will continuously drain while being filled self siphoning CONNECTING TO THE POWER SUPPLY Before connecting to the power s...

Page 48: ...e screen start blinking Touch it again to resume operation To cancel a wash program during a wash cycle touch this button when the digits on the screen start blinking press the Power switch the program will be cancelled D Spinning Speed Setting Button _ Touch this button lightly to select the desired speed When a speed is set it will be displayed on the screen Note Different water temperatures and...

Page 49: ...rgent for programs 1 to 8 Compartment 3 Softener conditioning agent perfume etc H Display _Information as remaining wash time temperature and speed setting and error messages will be shown here Note After power is switched on the display will go on and the remaining wash time decreases As the water pressure and temperature may differ the remaining time maybe adjusted accordingly When the laundry i...

Page 50: ...00 rpm 4 Wool to 40 C 40 C Woolen fabrics 600 rpm 5 Cashmere to 40 C 40 C Cashmere fabrics 600 rpm 6 Silk to 40 C 40 C Silk fabrics 400 rpm 7 Quick to 40 C 40 C Medium soil 1000 rpm 8 Wash to 60 C 40 C Medium soil Attention This program consists only main wash without rinse and spin 0 9 Rinse Medium soil 1000 rpm 10 Spin 1000 rpm 11 Drain 0 Yes No Optional 2 1 3 1 Detergent compartment for prewash...

Page 51: ...0 C 2 58 h Cotton 6 kg 0 50 kWh 53L 40 C 2 22 h Synthetic 3 kg 0 43 kWh 39L 40 C 1 28 h Wool 2 kg 0 42 kWh 40L 40 C 1 08 h Cashmere 2 kg 0 42 kWh 39L 40 C 1 08 h Silk 2 kg 0 55 kWh 34L 40 C 1 02 h Quick 3 kg 0 36 kWh 36L 40 C 0 34 h Wash 3 kg 0 44 kWh 15L 40 C 0 53 h EN 60456 test program Energy label program with Cotton 60 C and max spin speed HNS1460TVE FD Power source 220 240V 50Hz Max working ...

Page 52: ...parts like buttons etc may lead to repair work which user has to pay by themselves and can cause damage in the machine Garments without hems underwear finely woven textile such as fine curtains are to be put into wash bag it is better not to wash them in a washing machine Close zippers and hooks make sure the buttons are sewn on tightly and place small items such as socks belts bras etc in the wash ...

Page 53: ...e ADDING DETERGENT Slide out the detergent drawer and put the required detergent and softening agent into the corresponding compartments Push back the drawer gently Refer to the instructions on the drawer Caution For prewashing program detergent should be added to both compartments 1 and 2 For other programs do not add detergent to compartment 1 Use liquid detergent according to the instructions o...

Page 54: ... heavily soiled clothes 3 Reduce the amount of detergent or choose standard or delicate wash programs for slightly soiled clothes 4 Choose a proper washing temperature Modern detergents can wash with very good result already in lower temperature than 5 60 C Only use higher temperature than 60 C for heavily soiled laundry Follow the dosage recommendation on the detergent package to avoid using too ...

Page 55: ...ts Cotton Approximately 300g Underwear Blended fabrics Approximately 70g LOAD REFERENCE CARE CHART Resistant material Delicate fabric Washable at 95 C Washable at 60 C Washable at 40 C Washable at 30 C Hand wash Dry clean only Wool Seal Bleachable in cold water Do not bleach Iron at 200 C Iron at 150 C Iron at 100 C Don t iron Dry cleaning with any solvent Dry cleaning with pericloride Dry cleanin...

Page 56: ...ACHINE Unplug the machine during cleaning and maintenance Use a soft cloth dampened with soap liquid to clean the machine case and rubber components Do not use organic chemicals or corrosive solvents CLEANING THE FILTER Clean the filter once a month 1 Open the bottom cover 2 Remove the filter by turning counterclockwise 3 Flush the filter clean with running water 4 Replace the filter by turning clockw...

Page 57: ...nstallation to prevent damage as shown below Remove the blanking plugs 1 Remove the back cover 2 Insert the synthetic stabilisers and the transportation bolts 3 Tighten the bolts with a spanner 4 Replace the back cover 5 LONG PERIODS OF DISUSE If the washing machine is left idle for a long period pull out the electrical plug and turn off the water supply Open the washer door to prevent formation o...
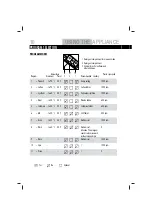
Page 58: ...ve steps again the display will show bEEP on and the alarm sound can be recovered CODES CAUSES SOLUTIONS Err1 Door is not properly shut _ Shut the door properly Err2 Drainage error water not emptied within 6 minutes _ Clean the filter and check the drain hose for blockage If error still exists please contact the maintenance personnel Err3 Temperature sensor not properly connected or damaged _ Conta...

Page 59: ...e within 80 100 cm of height _ Make sure the drain hose is not in water Drainage failure Drain hose is blocked Drain hose end is higher than 100 cm above the floor level The filter is blocked _ Unblock the drain hose _ Make sure the drain hose end is lower than 100 cm above floor level _ Unblock the filter Strong vibration while spinning Not all transportation bolts have been removed Washing machine i...

Page 60: ...20 MAINTENANCE ...

Reviews: